 Alexander Reelsen
Location Tracking with Owntracks, Serverless, Kotlin & the Elastic Stack
This post will talk about using Owntracks on your phone and serverless technologies on the backend to track and store your own location data without sending it to any other third parties. I will use owntracks, the serverless framework, Kotlin, AWS Lambda, AWS S3, plus the Elastic Stack during this blog post.
You can also check out the source in my github repo.
Introduction
I wanted to track my location data without providing the data to any third party provider. I do consider location data pretty sensitive. At one point I found Owntracks, an app for Android and IOS, that can send its location data to an MQTT broker or an HTTP endpoint. However I do not want to run any vserver anymore, as keeping it up to date is too much hassle. So the MQTT approach falls flat. However you can still use something like AWS Lambda to create an HTTP endpoint that accepts location data and does something with it.
This post will create such an endpoint and store the location data in S3 as well as in an Elastic Cloud Cluster, so I can visualize the data in Kibana. However I consider the archiving of data in S3 more important, as this allows me to replay the data anytime - I could run this non-artificial location data set against new geo stores like Tile 38 in the future (using geo-fences and checking when I leave them :-).
All the code is also sitting in a github repository, so you can check it out and easily create such a service yourself without any hassle.
The only requirements to follow me through this tutorial are
- Java 8 and gradle as a build system for the java services (the services are written in Kotlin, a language on the JVM, but gradle will pull in all required dependencies)
- Installation of the serverless framework, which also requires node.js, in order to deploy our services to AWS.
Application Architecture
Before we continue, to all the cloud critics: yes I know my data is still stored on other people’s machines, also unencrypted. At the end it boils down to the question if I trust the AWS security mechanism more than I trust my own ability to secure a system. Let’s assume that for today and move on.
Nothing would be awesome without a fancy diagram, especially if it is a rotated 3d diagram. No worries, we got one! Here it is
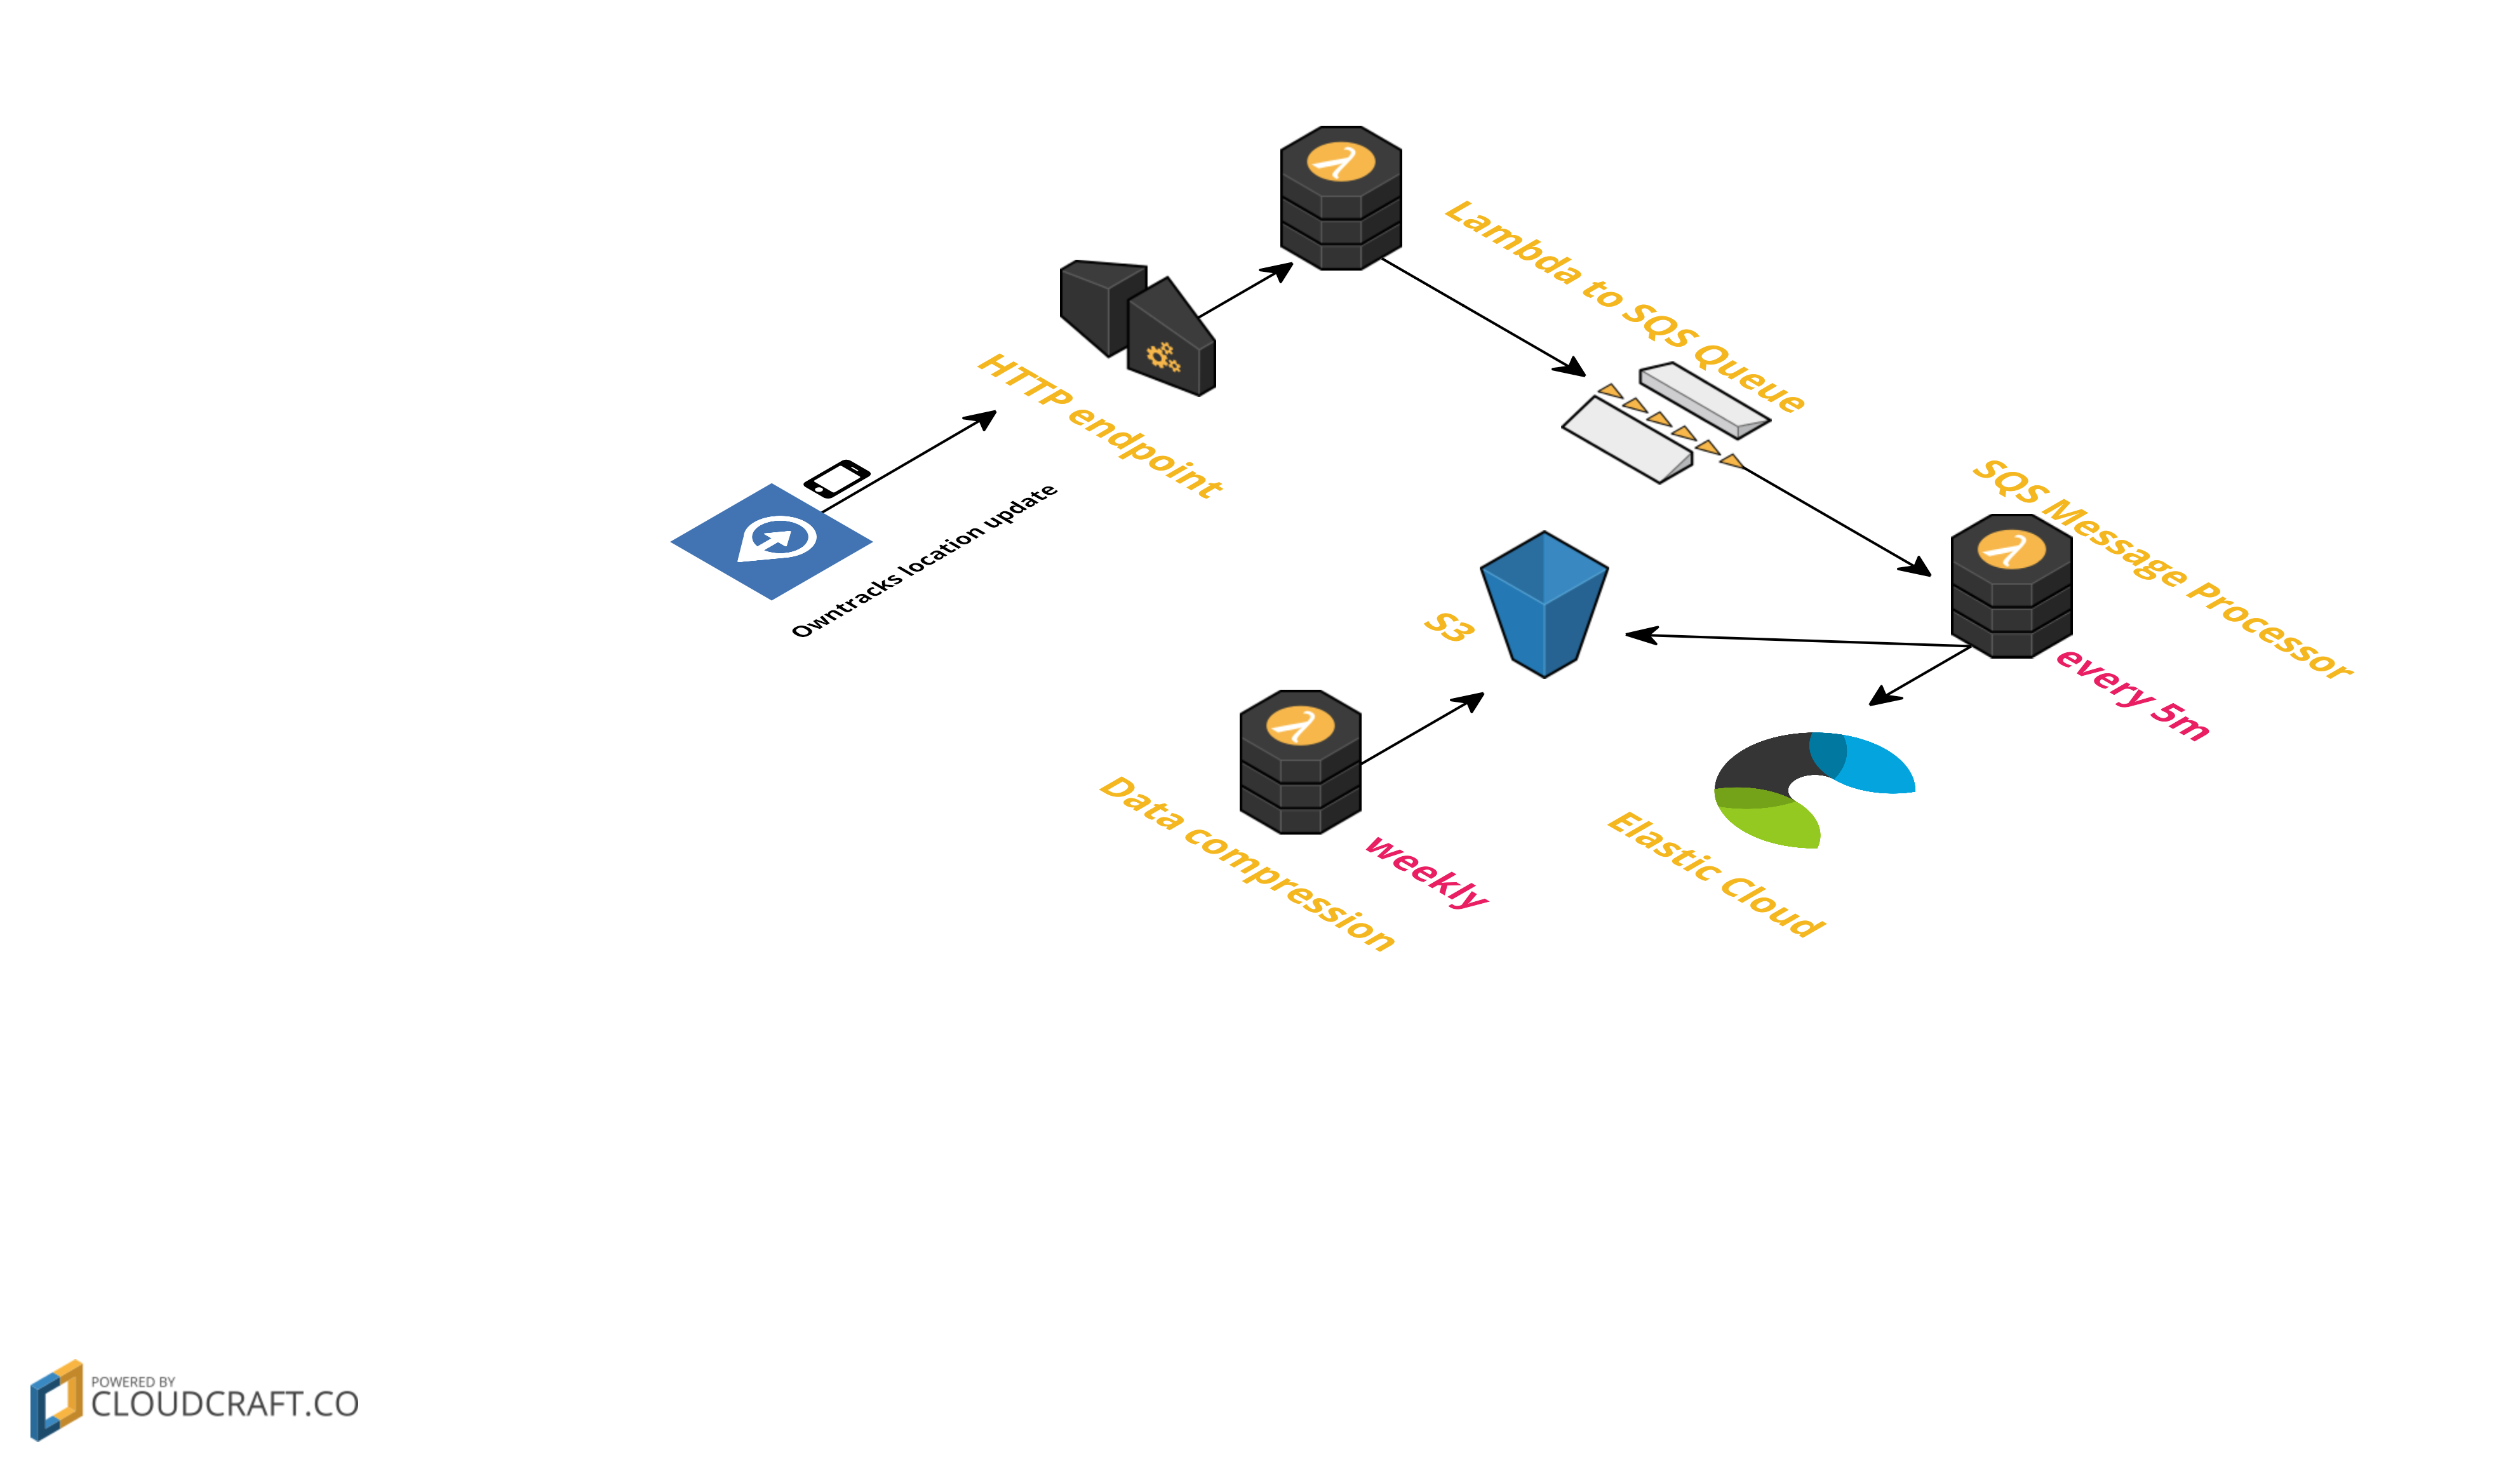
So, what happens here?
- Owntracks sends an update to an AWS Lambda via API Gateway.
- The
httplambda checks if the request should be accepted and if so, puts it in the SQS queue. - Another
processorlambda runs every five minutes and reads up to 250 messages from the SQS queue and sends a list of those messages to each configured processor. The currently available processors are one processor to write into a S3 bucket and one processor to write to an Elastic Cloud instance. After processing the messages are deleted. - Once a week a third
s3lambda runs, that simply collects all data and writes it into a compressed file, so you end up with one file per week.
And that’s it. From then on you can access the configured S3 bucket and download your location data. The format is line delimited JSON in a zip file by the s3 lambda.
All right, so lets get started and setup the AWS part of things.
Setting up the backend
The serverless framework
In case you have not heard about serverless, but have heard about AWS Lambda, it is time to check it out. If you have node.js installed you can just run
npm install -g serverless
Note this install serverless globally, which also means you might want to update it every now and then to make sure you can access the latest features. I used version 1.25.0 when I wrote this post. Next step is to create an empty project (again, just clone the above mentioned repository)
mkdir serverless-owntracks-kotlin
cd serverless-owntracks-kotlin
serverless create --template aws-java-gradle
Setting serverless.yml up
The serverless.yml file describes which functions to create along with which further resources should be created - which in our case means the creation of an S3 bucket to store the location data plus the SQS queue. In addition we are going to create permissions required for the functions to run (Note: This post is adding all the permissions for all the functions, in a real life app you would go with permissions per function, which had been added a while back, but I tried to keep things simple here).
So, let’s create our configuration
service: owntracks-kotlin

provider:
  name: aws
  runtime: java8
# you can overwrite defaults here
#  stage: dev
#  region: us-east-1

  iamRoleStatements:
    - Effect: "Allow"
      Action:
        - "sqs:SendMessage"
        - "sqs:ReceiveMessage"
        - "sqs:DeleteMessage"
        - "sqs:DeleteMessageBatch"
        - "sqs:GetQueueUrl"
      Resource: arn:aws:sqs:us-east-1:*:${file(./.env.yml):AWS_QUEUE}
    - Effect: "Allow"
      Action:
        - "s3:PutObject"
        - "s3:GetObject"
        - "s3:DeleteObject"
        - "s3:PutObjectAcl"
      Resource: arn:aws:s3:::${file(./.env.yml):AWS_BUCKET}/*
    - Effect: "Allow"
      Action:
        - "s3:ListBucket"
      Resource: arn:aws:s3:::${file(./.env.yml):AWS_BUCKET}

  environment:
    BASIC_AUTH: ${file(./.env.yml):BASIC_AUTH}
    ELASTIC_MESSAGE_PROCESSOR_HOST: ${file(.env.yml):ELASTIC_MESSAGE_PROCESSOR_HOST}
    ELASTIC_MESSAGE_PROCESSOR_AUTH: ${file(.env.yml):ELASTIC_MESSAGE_PROCESSOR_AUTH}
    AWS_BUCKET: ${file(./.env.yml):AWS_BUCKET}
    AWS_QUEUE: ${file(./.env.yml):AWS_QUEUE}

package:
  artifact: build/distributions/owntracks.zip

functions:
  # receives a single location event and puts it into SQS
  http:
    handler: de.spinscale.http.Handler
    events:
      - http:
          path: location
          method: post
  # reads a batch of SQS messages and writes them into S3 and to an elastic cluster
  processor:
    handler: de.spinscale.queue.Processor
    memorySize: 1024
    timeout: 60
    events:
      - schedule: rate(10 minutes)
  # reads a full S3 directory of events and reduces to a single gzipped file per week
  s3:
    handler: de.spinscale.s3.Reducer
    events:
      # invoke every monday at 3am
      - schedule: cron(0 3 ? * MON *)

resources:
  Resources:
    queue:
       Type: AWS::SQS::Queue
       Properties:
         QueueName: ${file(./.env.yml):AWS_QUEUE}
    bucket:
      Type: AWS::S3::Bucket
      Properties:
        BucketName: ${file(./.env.yml):AWS_BUCKET}
Don’t commit your secrets
As you can see in this file, we have to set up a few credentials. Again for simplicity I did not do any encryption of those, but I store them in a different file called .env.yml which is part of my .gitignore to not push them accidentally. The correct way would be to use the serverless secrets plugin, once it supports KMS (which it did not by the time of this writing).
The rest of this file should be pretty straightforward. Definition of resources, functions and permissions. We need to read, write and delete from the SQS queue and the same applies to the S3 bucket.
Setting gradle up
Ok, so now we have configured serverless to deploy a java service, but we actually want to write everything in Kotlin. To support this, we have to change the build.gradle file.
buildscript {
    ext.kotlin_version = '1.2.10'
    repositories {
        mavenCentral()
    }
    dependencies {
        classpath "org.jetbrains.kotlin:kotlin-gradle-plugin:$kotlin_version"
        classpath 'org.junit.platform:junit-platform-gradle-plugin:1.0.1'
    }
}

repositories {
    mavenCentral()
    jcenter()
    maven { url "http://dl.bintray.com/jetbrains/spek" }
}

apply plugin: "kotlin"

compileKotlin {
    kotlinOptions.jvmTarget = '1.8'
}
compileTestKotlin {
    kotlinOptions.jvmTarget = "1.8"
}
apply plugin: 'org.junit.platform.gradle.plugin'

junitPlatform {
    filters {
        engines {
            include 'spek'
        }
    }
}

dependencies {
    testCompile 'org.jetbrains.spek:spek-api:1.1.5'
    testCompile 'com.natpryce:hamkrest:1.4.2.0'
    testCompile "com.nhaarman:mockito-kotlin-kt1.1:1.5.0"
    testCompile "io.findify:s3mock_2.12:0.2.4"
    testCompile 'org.slf4j:slf4j-api:1.7.25'
    testCompile 'org.slf4j:slf4j-log4j12:1.7.25'

    testRuntime "org.junit.platform:junit-platform-launcher:1.0.1"
    testRuntime 'org.jetbrains.spek:spek-junit-platform-engine:1.1.5'

    compile (
        'com.amazonaws:aws-lambda-java-core:1.2.0',
        'com.amazonaws:aws-lambda-java-log4j:1.0.0',
        'com.fasterxml.jackson.jr:jackson-jr-objects:2.9.3',
        'software.amazon.awssdk:s3:2.0.0-preview-7',
        'software.amazon.awssdk:sqs:2.0.0-preview-7',
        "org.jetbrains.kotlin:kotlin-stdlib-jre8:$kotlin_version",
        "org.jetbrains.kotlin:kotlin-reflect:$kotlin_version"
    )
}

// Task for building the zip file for upload
task buildZip(type: Zip) {
    // set the base name of the zip file
    baseName = "owntracks"
    from compileKotlin
    from processResources
    into('lib') {
        from configurations.runtime
    }
}

assemble.dependsOn buildZip

task wrapper(type: Wrapper) {
    gradleVersion = '4.1'
}
A fair share of changes stem from getting Kotlin in, and on top of that I am using the Spek testing framework. If you have ever used jasmine in the javascript world, you will like Spek. Also I am a big fan of hamcrest, so I’ll use the hamkrest assertion library, a reimplementation of hamcrest for Kotlin.
Ok, now we got the basics, let’s get started.
The HTTP endpoint
I don’t intend to show any concrete code, but rather talk about how a java lambda is implemented. The above mentioned template creates a class that implements the RequestHandler interface.
class Handler : RequestHandler<Map<String, Any>, ApiGatewayResponse> {

    override fun handleRequest(input: Map<String, Any>?, context: Context?): ApiGatewayResponse {
    }
}

data class ApiGatewayResponse(val statusCode: Int, val body: String, val headers: Map<String, String>,
        // API Gateway expects the property to be called "isBase64Encoded" => isIs
        val isIsBase64Encoded: Boolean)
Two important things to note.
First, the input is just a map of objects, with several fields being part of the map, for example there is a body field that contains the HTTP body and a headers field, that contains all the HTTP headers. The body from an Owntracks client looks like this
{
  "_type": "location",
  "acc": 13,
  "batt": 80,
  "conn": "w",
  "lat": 47.1234591,
  "lon": 13.5432193,
  "tid": "tr",
  "tst": 1501357392
}
There are a couple of interesting fields here. We will take most care about tst (unix timestamp of the event creation) and lat/lon fields for the geo location.
Second, the context allows you to check how many time is remaining until the lambda is killed and the memory limit as well as the cognito identity. Now lets move on to the concrete implementation.
One specialty of the HTTP input is an additional check for HTTP authentication. We don’t want anyone to post location data, right? We could go fancy and set up a DynamoDB and have dynamic user authentication, but that seems clearly overkill for my little lambda, so I just allow this to be configured in the environment. The BASIC_AUTH will be read and compared with the Authorization HTTP header. The good news is, you can configure that variable in the serverless.yml file, or, if you dont want to commit it in your source code repo, but the value in the .env.yaml file. You need to do the Base64 encoding yourself and put the final result in the YAML file
# run this on the commandline and paste the output into the variable
# echo -n my_user:my_secret | base64
BASIC_AUTH: bXlfdXNlcjpteV9zZWNyZXQ=
The endpoint either returns a 403 if your permissions are not correct, or a 200. In that case a message to the SQS queue will be sent, which contains the JSON body plus two headers (x-limit-u and x-limit-d, which the Owntracks request sends along with the body).
You can check out the Handler.kt file on github, it contains less than 100 lines. You might also want to check out the corresponding HandlerSpek.kt file.
Why aren’t we writing directly to S3 and the Elastic Cloud cluster you may ask here. I wanted this HTTP endpoint to be as lightweight as possible. Even if you have 100 processors, the endpoint should be responding quick, and thus the choice was done to put data into SQS.
Processing queue data
Let’s process things. Things that keep hanging in queues are never good. This processor runs every 5 minutes. And yet there are times where it does not process anything or only a single location. This is due to the way owntracks sends updates. Only location changes are sent. So if I am sleeping or just working from home or in the office, no data will be sent by owntracks. On the other hand data could be queued and sent when the phone is back online, so you never know, if there are not several messages to be sent.
In order to simplify things I just created an MessageProcessor interface, that accepts a list of SQS messages. As SQS messages can only be polled up to ten at once, the processor does up to 25 runs to gather 250 messages, in case some backlog has piled up and that’s it.
All the processor needs to do now is to poll SQS and pass the messages on to a list of those MessageProcessors and then delete the processed messages from the queue.
// no need to return anything here, this is a cron job
open class Processor : RequestHandler<Map<String, Any>, Unit> {

  override fun handleRequest(input: Map<String, Any>?, context: Context?) {
      context?.logger?.log("Got input: " + input)

      val queueUrl = queueUrl()
      val messages = receiveMessages(queueUrl)

      if (messages.isEmpty()) {
          context?.logger?.log("No messages in queue, exiting")
          return
      }

      val messageProcessors = getProcessors(context!!)
      context.logger?.log(String.format("Going to process %s messages with %s processors\n", messages.size, messageProcessors.size))
      messageProcessors.forEach {
          try {
              it.process(messages)
          } catch (e : Exception) {
              context.logger?.log("Processor threw exception, continuing " + e.stackTrace.joinToString("\n"))
          }
      }

      deleteMessages(queueUrl, messages, context.logger)
  }
}
The MessageProcessor interface looks like this (with two implementations currently, one for S3, one for Elasticsearch)
interface MessageProcessor {
    fun process(messages : List<Message>)
}
Store in S3
The S3 storage processor looks like this
class S3StoreMessageProcessor(private val logger: LambdaLogger,
                              private val bucket : String = System.getenv("AWS_BUCKET")
) : MessageProcessor {

    override fun process(messages: List<Message>) {
        // create new S3 file
        val s3Client = S3Client.builder().build()
        val path = getKey()
        val putObjectRequest = PutObjectRequest.builder()
                .acl(ObjectCannedACL.PRIVATE)
                .bucket(bucket)
                .contentType("text/json")
                .key(path)
                .build()
        s3Client.putObject(putObjectRequest, getData(messages))
        logger.log(String.format("Stored %s messages in file %s\n", messages.size, path))
    }

    fun getData(messages : List<Message>) : RequestBody {
        val data = StringBuilder()
        messages.forEach { data.append(it.body()); data.append("\n") }
        return RequestBody.of(data.toString())
    }

    fun getKey(date: Date = Date()): String {
        val dateFormat = SimpleDateFormat("'/data/'yyyy/MM/dd/HH:mm.'json'")
        return dateFormat.format(date)
    }
}
So this processor gets a list of messages, writes them as newline delimited JSON into a string and then serializes that string to an S3 object.
Store in Elastic Cloud & visualize in Kibana
Before setting up the cloud cluster, let’s talk about the message processor.
The Elasticsearch Message Processor is not much more complex
class ElasticsearchMessageProcessor(
        private val host : String,
        private val authorizationHeader : String,
        private val logger: LambdaLogger,
        private val enabled: Boolean = !host.isEmpty() && !authorizationHeader.isEmpty()
    ) : MessageProcessor {

    override fun process(messages: List<Message>) {
        if (!enabled) {
            return
        }

        HttpClients.createDefault().use { client ->
            // the index name resembles owntracks-{now/d{YYYY}}, so it becomes owntracks-2017
            val host = "${host}/%3Cowntracks-%7Bnow%2Fd%7BYYYY%7D%7D%3E/location/_bulk"
            val request = HttpPut(host)
            val sb = StringBuilder()
            messages.forEach { message ->
                val inputJson : Map<String, Any> = JSON.std.mapFrom(message.body())
                // replace all fields starting with underscore
                val regex = Regex("^_")
                val map = HashMap(inputJson.entries.map { e ->
                    if (e.key.startsWith("_")) {
                        e.key.replace(regex, "") to e.value
                    } else {
                        e.key to e.value
                    }
                }.toMap())

                val lon = map.remove("lon") as Double
                val lat = map.remove("lat") as Double
                map.put("location", mapOf("lon" to lon, "lat" to lat))

                val df = SimpleDateFormat("yyyy-MM-dd'T'HH:mm:ss'Z'") // Quoted "Z" to indicate UTC, no timezone offset
                df.timeZone = TimeZone.getTimeZone("UTC")
                val epochFromJson = map.get("tst") as Int
                val epochSeconds = Date(epochFromJson.toLong() * 1000)
                map.put("timestamp", df.format(epochSeconds))

                // use the message id to prevent duplicates, even if processed more than once
                sb.append("{ \"index\": { \"_id\" : \"${message.messageId()}\" } }\n").append(JSON.std.asString(map)).append("\n")
            }
            request.entity = StringEntity(sb.toString(), ContentType.APPLICATION_JSON)
            request.addHeader("Authorization", "Basic ${authorizationHeader}")
            request.config = RequestConfig.custom()
                    .setConnectionRequestTimeout(10000)
                    .setConnectTimeout(10000)
                    .setSocketTimeout(10000)
                    .build()

            val response = client.execute(request)
            logger.log("Response from sending bulk to elastic cluster: ${response.statusLine}\n")

            val responseBody = EntityUtils.toString(response.entity)
            val json : Map<String, Any> = JSON.std.mapFrom(responseBody)
            val hasErrors = json["errors"] as Boolean
            if (hasErrors) {
                logger.log("Response returned errors, logging whole response: $responseBody\n")
            }
        }
    }
}
This message processor creates an Elasticsearch bulk request and sends it over to the cloud instance with the correct credentials. You can see that the index naming scheme is fixed, and based on a yearly scheme, i.e. owntracks-2017. I should also probably lower the timeouts as they are much too high. On top of that there is a date conversion happening (which could also be done in the Elasticsearch mapping, but turns out humans are better in reading ISO8601 dates than unix timestamps), latitude and longitude fields are moved into a single JSON object so it be a geo point and fields with underscore get their underscore removed, as Elasticsearch rejects storing such fields.
Reducing and compressing S3 data
Because every 5 minutes a new S3 object can be written, another function runs once a week (on Monday on 3am) and collects all the written S3 objects and creates a single, compressed one out of them in order to prevent having to collect many different files from the bucket.
So this is the reducing S3 processor, see also the source
class Reducer(
        val s3Client: S3Client = S3Client.builder().build()
) : RequestHandler<Map<String, Any>, Unit> {

    companion object {
        val MAX_FILES = 5000
        val BUCKET = "owntracks"
    }

    override fun handleRequest(input: Map<String, Any>?, context: Context?) {
        val objects = getObjectsFromBucket()

        if (objects.isEmpty()) {
            context?.logger?.log(String.format("No s3 files to process, exiting\n"))
            return
        }

        reduceObjectsToOne(objects, context?.logger)
        deleteObjects(objects, context?.logger)
    }
}
Adding an index template to Elasticsearch
In order to visualize my movement, I will use an Elastic Cloud instance, which allows me to store data in Elasticsearch and then use Kibana for the visualization. After starting a small cluster, a template needs to be installed, that configures a geo_point and also uses only a single shard, as we will not store a lot of data.
curl https://PATH_TO_ES_SERVER:9200/_template/owntracks \
-X PUT -u user:pass -d '
{
  "template": "owntracks*",
  "settings": {
    "index": {
      "number_of_shards": "1"
    }
  },
  "mappings": {
    "location": {
      "properties": {
        "location": {
          "type": "geo_point"
        }
      }
    }
  }
}
'
Deploying
Almost done, only configuring is left. You can configure the .env.yml file to look like this
# The basic authentication string to use for the lambda basic authentication
# equals: my_user:my_secret
BASIC_AUTH: bXlfdXNlcjpteV9zZWNyZXQ=

# host to connect to remote elasticsearch cluster
# be sure to include scheme (http or https) and port
ELASTIC_MESSAGE_PROCESSOR_HOST: https://CLOUD_ID.us-east-1.aws.found.io:9243

# basic auth to use for the remote elasticsearch cluster, again in base64
ELASTIC_MESSAGE_PROCESSOR_AUTH: bXlfdXNlcjpteV9zZWNyZXQ=

# the bucket to use
AWS_BUCKET: my-personal-owntracks-bucket

# the queue to use
AWS_QUEUE: owntracks-queue
You can comment out one of the message processor lines to not write to an Elasticsearch instance.
Now on to the nice part. Deployment is soooo simple. You configure your AWS_PROFILE environment variable properly, ensure you have a user that is allowed to run on serverless and all you need to do is
gradle clean check assemble && serverless deploy
Time to test if everything is working by sending a fake owntracks record over to the endpoint. You can run sls info to know your endpoint URL
curl -X POST https://YOUR_ID.execute-api.us-east-1.amazonaws.com/dev/location
{"message":"Missing Authentication Token"}

# some random latlon
curl -X POST -u user:pass https://YOUR_ID.execute-api.us-east-1.amazonaws.com/dev/location -d '{
  "tst": 1501357392,
  "lon": 12.9906219,
  "lat": 42.6584058
}'
The last curl command sends a document that should occur soon in your Elasticsearch instance. You can run sls logs -f http -t and sls logs -f processor -t to see what happens when your functions are called.
Setting up your phone
Install app from the play store. Configure endpoint (https and basic auth) I only have experience with the android app, make sure battery optimization is switched off.
The host configuration needs to include the whole URL including the /dev/location suffix.
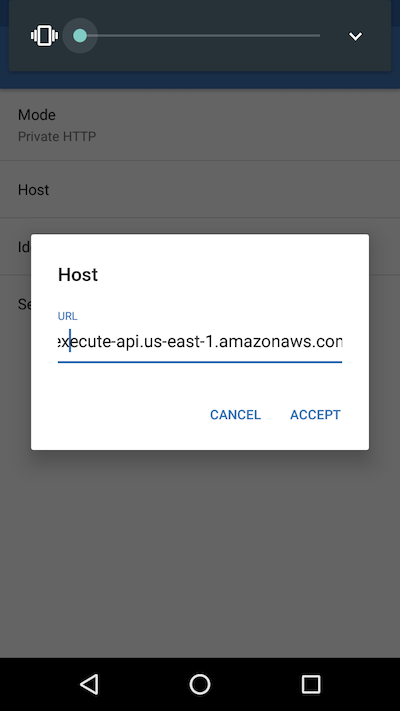
Owntracks Host Configuration
The basic auth configuration has to include the correct username and password plus you want to use a different device ID per device, if you plan to use more than one - also handy if you change your phone and keep the old one around.
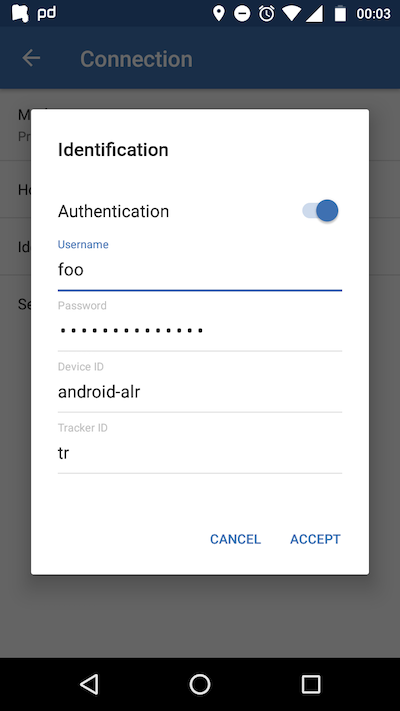
Owntracks HTTP Basic Auth
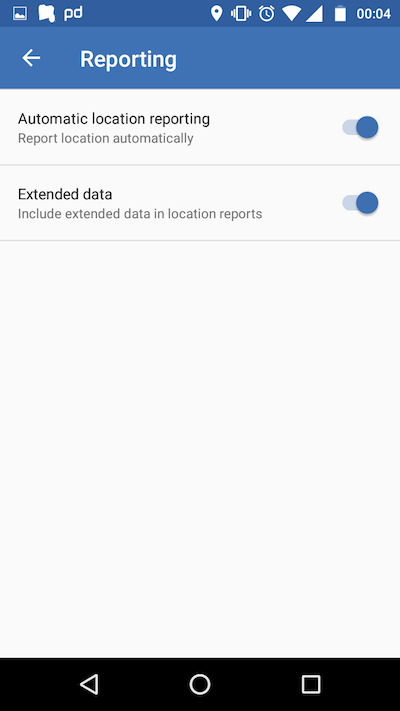
You can also configure the extended data in reporting, that adds a few more fields, but nothing noteworthy.
Owntracks Reporting Settings
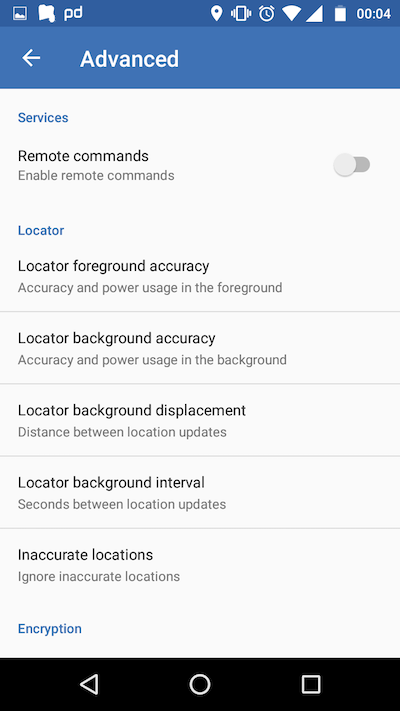
Lastly you can configure the distance between two points to be a valid update, so that new update is sent if you do not move a lot. In addition to that you need to configure the interval of background updates. I usually set this to 5 minutes, but that might not be accurate enough, for example if you go running or drive a lot by car. This also means, you will not generate data points if you do not move.
Owntracks Advanced Settings
After configuring you can trigger an update in the app by hitting the Report button in the map widget. Before doing this, you can run sls logs -f http --startTime '1m' -t to see if the HTTP endpoint is hit. If that is the case you should see the data point within five minutes stored in S3 as well as sent to Elasticsearch.
A few words about Kotlin
One of the other reasons I build this, was to play with Kotlin. The nice part about a serverless project like this is the fact, that it is tiny in scope, so great to get to know a programming language, but more important, to get to know its tooling.
To me, Kotlin is a shorter, concise more sane cousin of Java, that strives for compatibility allowing to gradually upgrade a codebase. Someone planned this language with developer economics in mind and that makes it very compelling, even for existing projects. You can also see, that my code pretty much looks like Java still. And that is fine, you can always kotlinize things the more Kotlin you get to know.
Also tooling is king. JavaScript/Typescript did not feel the same in serverless regarding the tooling. Kotlin developers did an awesome job here. However node.js based execution might be a bunch cheaper. Also as a JVM fan I like the Spek testing framework a lot together with the IDE integration. Another well done job.
If you want to learn more about Kotlin, the Kotlin in Action Book is pretty awesome and highly recommended.
Offline processing and visualizing
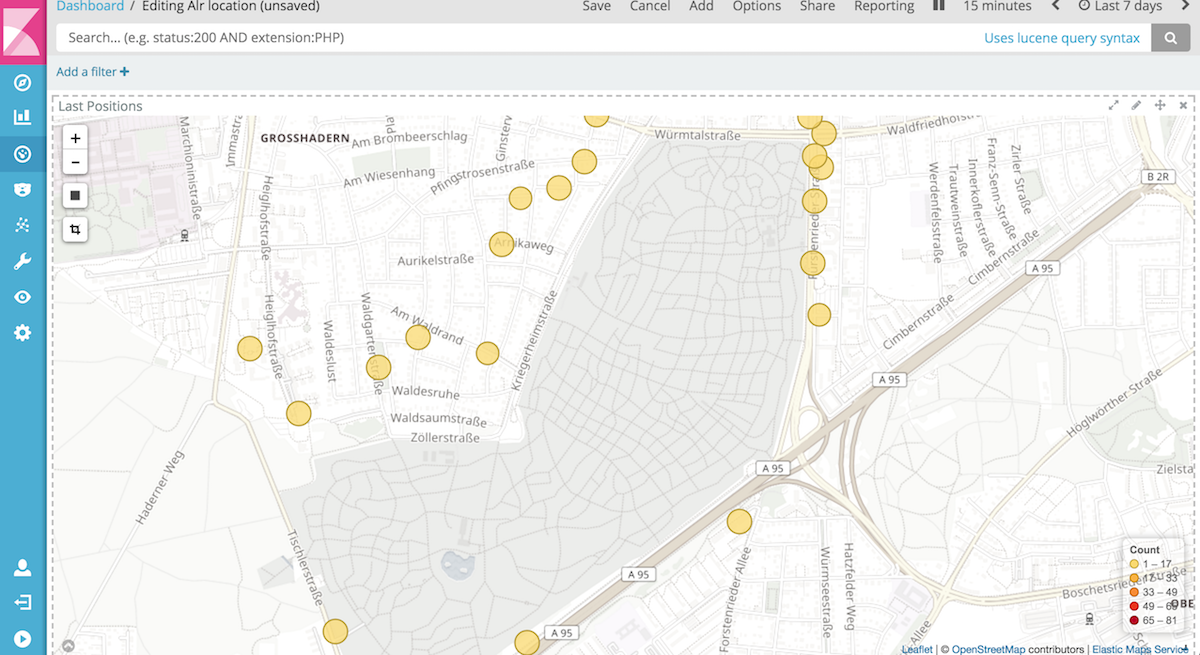
Due to indexing into Elasticsearch, you can use a Kibana map widget to visualize your locations. This one shows a run around a cemetery in Munich
Scrolling around inside of the run data also shows me, that the locations are definitely not a hundred percent exact, I easily get values that are off more than hundred meters. So be careful with exact guesses. I also had a case where something was off more than 20 kilometres.
I still need to find a way to measure the distance I covered, this is hard to do in Kibana. The good thing is, thanks to the data in S3, we can now easily use any other geo store to test and try out. I would love to have some sort of player to playback my runs with distance covered. Oliver Eilhard had a nice blog post doing exactly this with race cars a few years ago on the Elasticsearch blog.
On top of that I had one evening at a beergarden where my phone sent more than five thousand location updates, even though we hung out at the same table for the whole evening. Just something to be aware of, when you use this on several devices. Also this might create some costs and kick you over the free tier. The good news is, that with this architecture, the request is pretty cheap as it just hands over to SQS and that’s it. Also, that changed my mind to use the SQS message id as the document ID in Elasticsearch, so that duplicates can be prevented, even if SQS messages do not get deleted. This still means, it can happen, that the Owntracks app itself is sending too much data though.
Check out the github repo
The github repository can be checked out here, you can just follow the super small README to get up and running.
Next steps
As usual a project is never finished, but I think this serves a nice starting point for me to take a high level look at Kotlin. So what could be done next:
- Kotlinize all things things, I only started with the language a few days ago and my mindset is full of Java due to my day-to-day work since a decade.
- I’d love to have a better tests output than the current one on the console, something like jasmine
- The processors could execute in parallel as they are very likely waiting for I/O - Kotlin coroutines might be a good fit
- Folks can build their own processors
- Logging is pretty awkward currently
- Everything only works on us east 1 right now
- Integrate alerts with cloudwatch metrics
- Get a new notebook: My 2015 13" Macbook Pro is clearly to slow to work with Kotlin, gradle and IDEA IntelliJ. This is rather frustrating to be honest. Something that would be much better with Typescript.
If you have further comments, feel free to drop me an email or ping me on twitter.