 Alexander Reelsen
Introduction into the Elasticsearch Java Rest Client
Note: If you are interested in the new Elasticsearch Client released with Elasticsearch 8.0, please check out my blog post about using the new Elasticsearch Java Client.
TLDR; This blog post introduces the Java REST clients for Elasticsearch. The main focus will be on the High Level REST Client, but the low level REST client will be covered as well.
This is the accompanying blog post for this presentation. You can find the code samples in my GitHub Repo.
I’ll try to write a blog post around my presentations in order to fill the bullet points with some more life and explanations, as it is usually pretty hard to just follow a presentation without some more context, that can either be delivered in a video session or in a blog post. I consider a blog post much more lasting and likely be consumed by more people than an uploaded YouTube video.
History & Background
Let’s start with some history. There are already a bunch of existing HTTP clients for Elasticsearch, even officially supported and maintained ones. Checking out the Clients Documentation at the time of this writing I see support for JavaScript/Node, Ruby, Go, .NET, PHP, Perl, Python and Rust - aside from Java. The roots of some of these clients (notably Perl and Ruby) even date back before there was a company founded around Elasticsearch and its ecosystem.
So, while clients have been around for a really long time, there was no
official Java-based HTTP client. The main reason was the existence of the
TransportClient. The transport client used the node-to-node communication
port (9300) to talk to Elasticsearch nodes, not HTTP. This meant, there was
no need for a HTTP client. This came with a few catches though. First, you
always needed to update your application when you updated Elasticsearch as
there were no serialization guarantees. Second, the security model got a
little bit more complex. It’s easier to claim, that port 9300 is for
internal cluster communication, whereas port 9200 is for client
communication. This model did not work with the TransportClient. Lastly, the
TransportClient used all the classes, that the node was using as well, so
there was no differentiation between internal only and external facing
classes - which sometimes is needed due to different execution paths or
validation logic.
A few community driven HTTP clients were started, one of the more known ones is Jest. At the end of 2016 a blog post about the state of the official Elasticsearch Java Clients was released to explain the move to a HTTP client, which contains a few more very good arguments than the above paragraphs.
The first so-called low level REST client, that served as building block for everything else, was released with Elasticsearch 5.0.0. The first version of the High Level REST client was released with Elasticsearch 5.6.0.
Implementation & Architecture & Compatibility
One of the basic principles is splitting the client in two parts: the
RestClient and the RestHighLevelClient. The first one
handles lower level things like the connection, tracing, automatic discovery of nodes,
load balancing, whereas the high level counterpart is responsible for
requests creation without requiring the user to provide JSON strings or
byte arrays.
Currently, the client still depends on the Elasticsearch Core Project, but in the long term there might be ways to decouple this.
The Elasticsearch client is based on the Apache HTTP Client and therefore also works on Java 8. As the Apache HTTP client and its dependencies are a commonly used dependency you may want to consider shading the client.
The client is thread safe. It should be sufficient to use a single instance across your application. In addition, the client support synchronous and blocking mode, as well as an asynchronous mode using listeners.
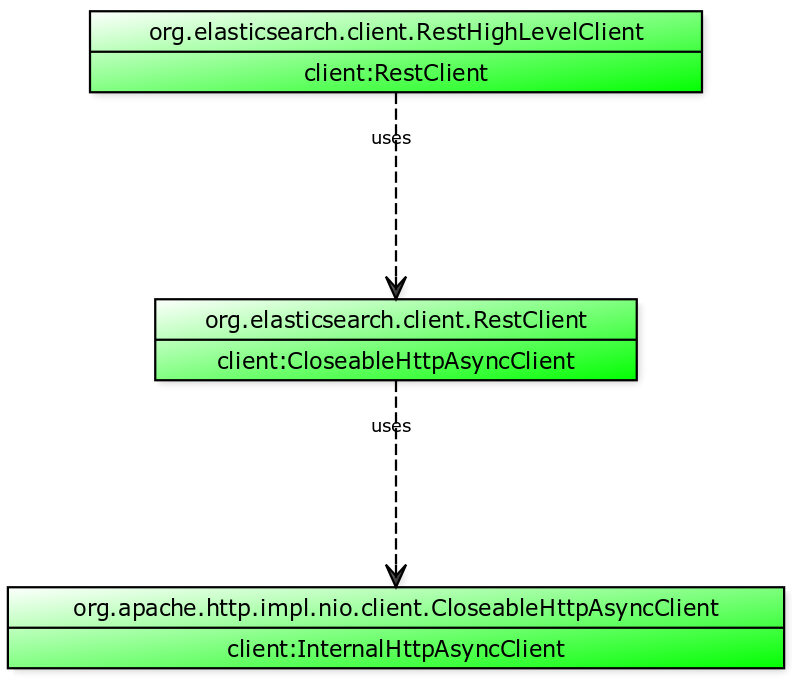
In order to clear up some confusion, what part of the client is doing what,
assume that the RestClient is doing connection and setup specific work,
apart from sending the actual request. This includes proper TLS setup, HTTP
basic authentication, sniffing and the proper use of node selectors.
The HighLevelRestClient features dedicated request specific classes for
all endpoints and also has some helper builders for complex requests like
searches (including aggregations, highlighting, etc).
One more word about compatibility. Apart from requiring at least Java 8 the client is supposed to be forward compatible, which means that the 7.0 client should be able to communicate with every 7.x cluster.
Keeping the client up-to-date makes sense in general in order to retrieve bug fixes, updated dependencies, but you should update the client last, once the cluster has been updated.
Getting Up And Running
Enough talk, time to check out some code.
Instantiating a client
RestHighLevelClient client = new RestHighLevelClient(
  RestClient.builder(new HttpHost("localhost", 9200)));

ClusterHealthResponse response =
  client.cluster().health(new ClusterHealthRequest(), RequestOptions.DEFAULT);

ActionListener<ClusterHealthResponse> listener =
  ActionListener.<ClusterHealthResponse>wrap(
        r -> System.out.println(r.getStatus()),
        Throwable::printStackTrace);

client.cluster()
  .healthAsync(new ClusterHealthRequest(), RequestOptions.DEFAULT, listener);
The above snippet instantiates a high level client, which automatically also
instantiates a low level client. You can see, that the Apache HTTP client is
not fully abstracted away, as classes like HttpHost are from that
dependency.
Also, you can see the two different modes of invocation, synchronous and asynchronous.
One more thing becomes obvious: every call requires you to supply a
RequestOptions object. You can use RequestOptions.DEFAULT or you can use
a custom what, that has special headers set (for example a different
authorization on a per request base, when you have a tenant based app).
Basic Auth
final CredentialsProvider credentialsProvider =
    new BasicCredentialsProvider();
credentialsProvider.setCredentials(AuthScope.ANY,
    new UsernamePasswordCredentials("user", "password"));

RestClientBuilder builder =
  RestClient.builder(new HttpHost("localhost", 9200))
    .setHttpClientConfigCallback(
      b -> b.setDefaultCredentialsProvider(credentialsProvider));
This uses a CredentialsProvider (also a common class from Apache HTTP
client) to set a username and a password for each request, by configuring
the provider in the RestClientBuilder.
TLS
Now on to our favorite topic. TLS is just as uncool to configure as with
any java application. If you use custom CAs or certificates, you will need
to load them first and then set a proper SSLContext.
KeyStore truststore = KeyStore.getInstance("jks");
try (InputStream is = Files.newInputStream(keyStorePath)) {
    truststore.load(is, keyStorePass.toCharArray());
}
SSLContextBuilder sslBuilder = SSLContexts.custom()
    .loadTrustMaterial(truststore, null);
final SSLContext sslContext = sslBuilder.build();
RestClientBuilder builder = RestClient.builder(
    new HttpHost("localhost", 9200, "https"))
    .setHttpClientConfigCallback(new HttpClientConfigCallback() {
        @Override
        public HttpAsyncClientBuilder customizeHttpClient(
                HttpAsyncClientBuilder httpClientBuilder) {
            return httpClientBuilder.setSSLContext(sslContext);
        }
    });
Executing Operations
So, this was the introductory part of the lower level REST client. Let’s move on to the high level one. Don’t worry, we will have another small section on more advanced features about the low level client later on, but for now, let’s index and query some data.
Indexing Documents
Before indexing some data, we need to do another step, and that is getting serialization up and running. There are tons of JSON serializers. I’m going with the easiest route here and let the JSON library figure out everything at run time. If I was writing a production app, I would absolutely want to make sure, that I do not do any reflection based run time behavior, but that I configure serialization/deserialization mechanism directly in the code. First this prevents reflection from happening, second, this means you can debug stuff in an IDE, third, the person coming after you will not have a headache about magic. So, for the sake of the example, let’s assume, we have a product POJO.
@JsonDeserialize(using = ProductDeseralizer.class)
@JsonSerialize(using = ProductSerializer.class)
public class Product {

    private String id;
    private String name;
    private String description;
    private double price;
    private int stockAvailable;

    // getters and setters go here ...
}
You can see at the top the annotation based mention of custom serializers
and deserializers. I am using jackson-databind in this example.
// does not write out the id, which is part of metadata
public class ProductSerializer extends JsonSerializer<Product> {
    @Override
    public void serialize(Product product, JsonGenerator generator, SerializerProvider serializers) throws IOException {
        generator.writeStartObject();
        generator.writeStringField("name", product.getName());
        generator.writeStringField("description", product.getDescription());
        generator.writeNumberField("stock_available", product.getStockAvailable());
        generator.writeNumberField("price", product.getPrice());
        generator.writeEndObject();
    }
}
The Product has pretty much a flat structure. One specialty here is the
case of not writing out the id field, because this will be part of the
metadata only, but not part of the JSON body when indexing a document - you
could just add it as a regular field as well though.
public class ProductDeseralizer extends JsonDeserializer {

    @Override
    public Object deserialize(JsonParser jp, DeserializationContext ctxt) throws IOException {
        JsonNode productNode = jp.getCodec().readTree(jp);

        Product product = new Product();
        if (productNode.has("name")) {
            product.setName(productNode.get("name").textValue());
        }
        if (productNode.has("description")) {
            product.setDescription(productNode.get("description").textValue());
        }
        if (productNode.has("price")) {
            product.setPrice(productNode.get("price").doubleValue());
        }
        if (productNode.has("stock_available")) {
            product.setStockAvailable(productNode.get("stock_available").intValue());
        }
        return product;
    }

}
The ProductDeseralizer is much more passive and checks for the existence
of each field. You could drop this, and be sure to only parse valid objects.
Also, you may want to add a validation method at the end of the
deserialize method to make sure that more fields got set. Also, we still
haven’t set the ID in here.
In order to properly interact with Product entities we can set up a
ProductService
public interface ProductService {

    Product findById(String id) throws IOException;

    Page<Product> search(String query) throws IOException;

    Page<Product> next(Page page) throws IOException;

    void save(Product product) throws IOException;
}
The interface has methods, that create a product, find it by id and execute
a search, as well as paginating through the results using a Page object.
We’ll now cover each of those methods. Let’s start with indexing.
The implementation would pass the index name and the RestHighLevelClient like this:
public class ProductServiceImpl implements ProductService {

    private static final ObjectMapper mapper = new ObjectMapper();

    private final String index;
    private final RestHighLevelClient client;

    public ProductServiceImpl(String index, RestHighLevelClient client) {
        this.index = index;
        this.client = client;
    }

    // interface implementation methods go here...

}
final byte[] bytes = ...;
final IndexRequest request = new IndexRequest(index);
request.id("my_id"); // optional
request.source(bytes, XContentType.JSON);

final IndexResponse response = client.index(request, RequestOptions.DEFAULT);
The above snippet would be the textbook version of indexing a single document. Let’s first figure out, how to serialize the POJO
public class ProductServiceImpl implements ProductService {

    private static final ObjectMapper mapper = new ObjectMapper();

    private IndexRequest indexRequest(Product product) throws IOException {
        final byte[] bytes = mapper.writeValueAsBytes(product);
        final IndexRequest request = new IndexRequest(index);
        if (product.getId() != null) {
            request.id(product.getId());
        }
        request.source(bytes, XContentType.JSON);
        return request;
    }
}
This snippet adds a indexRequest() method to serialize the POJO to a byte
array, and optionally set the product ID. The main work is done by jackson
using the above defined serializer.
Now we could call the above client.index() method. However, we have a first
mismatch here, between our application and how Elasticsearch behaves.
Elasticsearch prefers many document updates at once, from an application
perspective you are usually working on a single entity and update that one.
A possible change on this could be to do multiple product updates at once, like this:
public void save(List<Product> products) throws IOException {
    BulkRequest request = new BulkRequest();
    for (Product product : products) {
        request.add(indexRequest(product));
    }
    final BulkResponse response = client.bulk(request, RequestOptions.DEFAULT);
    for (int i = 0; i < products.size(); i++) {
        products.get(i).setId(response.getItems()[i].getId());
    }
}
In this case we group multiple updates into a single bulk requests. However,
this would require us to batch single entity operations into one big
operation. If you rely on the document to be indexed, once the call returns,
you would need to have you calling code waiting until the bulk processor
returns. Now you could simplify the save() method for a single POJO like
this
@Override
public void save(Product product) throws IOException {
    save(Collections.singletonList(product));
}
This would not alleviate the single update problem though. If we are good
with asynchronous update, we can make use of the BulkProcessor later on.
Let’s try to find a product by id first, as this is a rather simple
operation in the ProductService implementation
@Override
public Product findById(String id) throws IOException {
    final GetResponse response =
      client.get(new GetRequest(index, id), RequestOptions.DEFAULT);
    final Product product =
      mapper.readValue(response.getSourceAsBytes(), Product.class);
    product.setId(response.getId());
    return product;
}
The most important part here is again the object mapper call to produce a
POJO from a byte array. Again you can see, that the serializer is not doing
all the work, as the id gets set manually by the setter from the metadata. A
proper implementation would hide this detail, and maybe convert a
GetResponse to a Product so you do not have to do any conversion work in
this find() method. This also applies to the next part of searching
documents, as serialization should be fixed here as well. Let’s take a look
at the search() method:
@Override
public Page<Product> search(String input) throws IOException {
    return createPage(createSearchRequest(input, 0, 10), input);
}

private SearchRequest createSearchRequest(String input, int from, int size) {
    final SearchSourceBuilder searchSourceBuilder = new SearchSourceBuilder();
    searchSourceBuilder
            .from(from)
            .size(size)
            .query(QueryBuilders.multiMatchQuery(input, "name", "description"));
    return new SearchRequest(index).source(searchSourceBuilder);
}

private Page<Product> createPage(SearchRequest searchRequest, String input) throws IOException {
    final SearchResponse response = client.search(searchRequest, RequestOptions.DEFAULT);
    if (response.getHits().getTotalHits().value == 0) {
        return Page.EMPTY;
    }
    if (response.getHits().getHits().length == 0) {
        return Page.EMPTY;
    }

    List<Product> products =
      new ArrayList<>(response.getHits().getHits().length);

    for (SearchHit hit : response.getHits().getHits()) {
        final Product product =
          mapper.readValue(hit.getSourceAsString(), Product.class);
        product.setId(hit.getId());
        products.add(product);
    }

    final SearchSourceBuilder source = searchRequest.source();
    return new Page(products, input, source.from(), source.size());
}
Quite a bit to unpack here. First, a SearchRequest gets created,
retrieving the first 10 hits for the input term and returning a Page
object. Why that? Well, this way, we can abstract away the pagination
implementation, and we could replace it using search_after.
The query itself is pretty simple, a match query on two fields, namely
name and description.
The next step is to execute the search request. If there are no hits
returned or due to whatever reason the hits array in the response is empty,
a Page.EMTPY object is returned, indicating zero results.
If there is data to parse, then each hit, will be converted to a Product
POJO and the list of products will be returned within the Page object.
Now paginating through the result set can be done, by supplying the Page
object to the page() method.
@Override
public Page<Product> next(Page page) throws IOException {
    int from = page.getFrom() + page.getSize();
    final SearchRequest request =
      createSearchRequest(page.getInput(), from, page.getSize());

    return createPage(request, page.getInput());
}
This was a quick overview about a simple serialization logic. Let’s recap, what could be improved:
- You could create less code by using more annotations. That’s a classic readability vs. implicit configuration trade-off, that you will have to take for your code base (Lombok might be the most extreme of those).
- Setting the product id in the code at every occasion is ugly. This should be centralized
- The
Pageobject looks neat, but of course requires serialization to a web client as well, that might expose such information - Sending data in bulk is preferred, but tricky, especially if you want to be sure that a document has been written, you might need to wait for a write operation to return. This needs to be accommodated for in your application architecture.
So, let’s talk about proper bulking next…
Bulk Indexing & Bulk Processor
To recap, a bulk request is just a collection of write requests (index, update, delete). Grouping requests together will greatly improve performance.
BulkRequest request = new BulkRequest();

request.add(new IndexRequest("my_index").id("1")
        .source(XContentType.JSON,"name", "My first product"));
request.add(new IndexRequest("my_index").id("2")
        .source(XContentType.JSON,"name", "My second product"));
request.add(new IndexRequest("my_index").id("3")
        .source(XContentType.JSON,"name", "My third product"));

client.bulk(request, RequestOptions.DEFAULT);
However, how do you know when a bulk requests has a decent size? This is a mixture of number of documents, the total size of that request and your expectations within your application to now bulk too many requests, but also make sure they get regularly flushed.
As you do not want to do such a calculation manually, you can use
the BulkProcessor class in Java. Also, other clients like python, perl and
the javascript one have such a helper as well.
This is how the bulk processor looks like
BulkProcessor bulkProcessor = BulkProcessor.builder(
        client,
        new BulkProcessor.Listener() {
            @Override
            public void beforeBulk(long executionId,
                                   BulkRequest request) { ... }

            @Override
            public void afterBulk(long executionId,
                                  BulkRequest request,
                                  BulkResponse response) { ... }

            @Override
            public void afterBulk(long executionId,
                                  BulkRequest request,
                                  Throwable failure) { ... }
        })
        .setBulkActions(10000)
        .setBulkSize(new ByteSizeValue(5, ByteSizeUnit.MB))
        .setFlushInterval(TimeValue.timeValueSeconds(5))
        .setConcurrentRequests(1)
        .setBackoffPolicy(
            BackoffPolicy.exponentialBackoff(TimeValue.timeValueMillis(100), 3))
        .build();
Let’s unfold the setup of the bulk processor before diving into details. As you can see by providing a listener, the whole execution becomes asynchronous, which means, there is no direct per document feedback, when a document has been indexed.
The listener class features three methods, that require implementation
beforeBulk(): This happens before the bulk request is sent to the cluster. You could do some sanitation here or add additional checks. This one is probably empty quite often.afterBulk(): Both after bulk methods are called when a bulk request returns. One is called in case an exception is thrown. Note that this is not an exception due to a single write operation failure, but something more grave like a connection issue. If the request is properly processed you will retrieve theBulkResponse. In order to ensure that all documents have been properly indexed, you need to check for errors in theBulkResponseas well.
Let’s now check the different configuration options for the bulk processor.
First, you can set the number of write operations when a bulk request should
be triggered via setBulkActions(). Second, you can set the maximum request
size. Basically the size is recomputed whenever you call
BulkRequest.add(), and once the limit - which is 5 MB in this snippet - is
reached a new bulk request is sent. Lastly you can configure a flush
interval via setFlushInterval(). This is the maximum duration a request
should not be sent.
Note: When using all three of these criteria, any of those being met will trigger request. In the above example the request either contains 10k documents, has a size of 5 megabytes or 5 seconds have passed since the last bulk request. Note, that by default no flush interval is set, so requests may wait indefinitely before being sent, if no updates are added.
We’re still not finished, configuring the bulk processor here.
The BulkProcessor can sent several requests in parallel. By default, this
is set to 1, so one process can run in the background, while new requests
are being collected. You can disable this by setting it to 0, a good
option when running this in tests, so that flushing will be synchronous.
The last configuration option is the back off policy. When Elasticsearch is overloaded, it emits a special error code and exception back to the client telling the client, that the error was supposed to be a temporary error. The bulk processor is doing an automated retry of those. You can configure the aggressiveness of this retries by configuring a back off policy. By default, an exponential back off policy is used, which means retry wait times become longer over time. You can also disable back off or use a constant waiting time.
After seeing the architecture of the BulkProcessor, you also may have
noticed the implementation challenge here. If you want to have an API to
store a single document, you would need to return something like a Future
and wait for the bulk processor listener to complete that future.
This is a pretty tricky thing to do, and I wrote a exceedingly simple implementation here (plus a test).
Executing Searches
Before moving over to the low level REST client, we should probably take another look at the core functionality of the client, and that is executing searches using builder classes.
This is a boolean query builder
final BoolQueryBuilder qb = QueryBuilders.boolQuery()
    .must(QueryBuilders.multiMatchQuery("Book"))
    .should(QueryBuilders.rangeQuery("price").lt(100))
    .filter(QueryBuilders.rangeQuery("stock_available").gt(0))
    .filter(QueryBuilders.rangeQuery("price").gt(0));

SearchRequest searchRequest = new SearchRequest(INDEX);
searchRequest.source().query(qb);
SearchResponse response =
  client.search(searchRequest, RequestOptions.DEFAULT);
The QueryBuilders class will give you builders for all the different
queries. The same applies for aggregations:
SearchRequest searchRequest = new SearchRequest(INDEX);
// set size to 0 to prevent fetch phase
searchRequest.source().size(0);

// bucket prices by 10, then get average stock per bucket
searchRequest.source().aggregation(
  AggregationBuilders.histogram("price_histo").interval(10).field("price")
    .subAggregation(AggregationBuilders.avg("stock_average").field("stock_available")));

final SearchResponse response =
  client.search(searchRequest, RequestOptions.DEFAULT);
Histogram histogram = response.getAggregations().get("price_histo");

List<Double> averages = histogram.getBuckets().stream()
  .map((Histogram.Bucket b) -> {
    final Avg average =  b.getAggregations().get("stock_average");
    return average.getValue();
}).collect(Collectors.toList());
In this example response.getAggregations().get() returns an Aggregation
class, where the user has to specify the concrete implementation.
Also, each concrete implementation returns a specific bucket class, allowing extraction of further information about a bucket, for example the ranges when you use a range aggregation.
The principle of builder classes is all around the search request. You do the same with sorting:
searchRequest.source().sort("price", SortOrder.DESC);
// or use a builder
searchRequest.source().sort(SortBuilders.fieldSort("price").order(SortOrder.DESC));
or highlighting, collapsing and suggests
searchRequest.source().highlighter().field("description");

searchRequest.source().collapse(new CollapseBuilder("brand"));

final SuggestBuilder builder = new SuggestBuilder()
    .addSuggestion("name", SuggestBuilders.termSuggestion("name"))
    .setGlobalText("adida");
searchRequest.source().suggest(builder);
As already mentioned above, using search_after is a better alternative
to using offsets. The basic idea is to use the sort key of the last returned
hit as the input for the next search. So you need to extract the most recent
sort values from a search response and use it in the next search request:
SearchRequest searchRequest = new SearchRequest(INDEX);
searchRequest.source().query(QueryBuilders.matchQuery("name", "Name"));
searchRequest.source().sort(SortBuilders.fieldSort("price").order(SortOrder.DESC));
final SearchResponse response =
  client.search(searchRequest, RequestOptions.DEFAULT);

// create a new search request
SearchRequest searchAfterRequest = new SearchRequest(INDEX);
searchAfterRequest.source()
        .query(QueryBuilders.matchQuery("name", "Name"))
        .sort(SortBuilders.fieldSort("price").order(SortOrder.DESC));
SearchHit lastHit = response.getHits().getHits()[response.getHits().getHits().length-1];
searchAfterRequest.source().searchAfter(lastHit.getSortValues());

final SearchResponse searchAfterResponse =
  client.search(searchAfterRequest, RequestOptions.DEFAULT);
Low Level Rest Client
All of the above request specific work was done via the high level client. Let’s go one level deeper and take another look at the low level REST client.
You can either instantiate your own client instance and hand that over to
the high level client or the high level client will instantiate its own
client. You can always retrieve it via client.getLowLevelClient()
Time to take a look at a few Elastic specific features. Also keep in mind, that the other official clients do have similar features.
Node Selectors
The first feature are node selectors to define custom logic, which nodes in a cluster should receive a request. Usually you want all data nodes to retrieve data.
However, in case of having some dedicated ingest nodes, you may want to make sure to send a request to such a node. The node selector will be configured when building the REST client.
final NodeSelector INGEST_NODE_SELECTOR = nodes -> {
    final Iterator<Node> iterator = nodes.iterator();
    while (iterator.hasNext()) {
        Node node = iterator.next();
        // roles may be null if we don't know, thus we keep the node in then...
        if (node.getRoles() != null && node.getRoles().isIngest() == false) {
            iterator.remove();
        }
    }
};

HttpHost host = new HttpHost("localhost", 9200, "http");
final RestClientBuilder builder = RestClient.builder(host);
builder.setNodeSelector(INGEST_NODE_SELECTOR);
Sniffers
Another useful feature is sniffing. Instead of hard coding the hosts of you may want to update the list of nodes to connect to, while your instance of a client is running. This is done using sniffing by utilizing a background thread that keeps polling for a list of nodes in the background.
This is how you enable the sniffer for a rest client.
RestClient restClient = RestClient.builder(
    new HttpHost("localhost", 9200, "http"))
    .build();
Sniffer sniffer = Sniffer.builder(restClient).build();

// don't forget to close both
restClient.close();
sniffer.close();
Note that the sniffer is an own dependency. You can also configure the sniffer to update the list of nodes, in case a connection failure happens or add your own custom failure listener if that happens.
Shading
The likelihood, that a transitive dependency of your application dependencies will make use of the Apache HTTP client or one other of the Elasticsearch dependencies is high. In order to prevent version conflicts, you can use shading and rename the packages that the REST clients are using.
Deprecation warnings
While getting to the end of this article slowly, there are still a few good hints before we’re done. One of my favorite features is the strict deprecation mode in the client.
You might know, that Elasticsearch is trying to prepare the user and administrator of a cluster for upgrades. One of the ways this is exposed is the deprecation log. However such a deprecation log line does not tie a deprecation to a certain request. In addition to this, a HTTP response also contains a deprecation header - you may have seen this in the Kibana Dev-Tools Console already.
The REST client is capable to fail with an exception, if a deprecation is returned. While this might not be the best setting to get started with in production, it is a great way of enabling this in your CI suite first and see which of your tests are failing, before going live with this setting and be sure that your client does not use any deprecated feature before doing a major version upgrade.
final RestClientBuilder builder = RestClient.builder(host);
builder.setStrictDeprecationMode(true);
One line changes are the best changes…
Using with Elastic Cloud
If you are using the client against an Elastic Cloud instance, you do not need to remember or configure the external IP, you can reuse the cloud ID in the builder.
String cloudId = "optionalHumanReadableName:" +
  "dXMtZWFzdC0xLmF3cy5mb3VuZC5pbyRlbGFzdGljc2VhcmNoJGtpYmFuYQ==";
final RestClientBuilder builder = RestClient.builder(cloudId);
Debugging & Logging
Logging under Java is always a no-brainer, that takes you five releases to get right, thanks to all the different logging implementations. Apache HTTP client uses JCL, the jakarta commons logging library, now known as Apache Commons Logging.
If you want to get specific logging for the Elasticsearch specific parts of
HTTP requests you can set the org.elasticsearch.client package to TRACE
or DEBUG.
If you really want to inspect the whole request you can go down to the
Apache client logging by setting org.apache.http.wire=TRACE. You should be
very careful setting this in production, as it will also return
sensitive data like the Authorization header, potentially exposing
passwords depending on your type of authorization.
Testing your Application using Testcontainers
One last thing, that I found invaluable for proper integration testing was the Testcontainers library, which has explicit Elasticsearch support.
All it takes is a single dependency
testCompile "org.testcontainers:elasticsearch:1.13.0"
From then on you can use it directly in your test classes like this:
private static final ElasticsearchContainer container =
    new ElasticsearchContainer("docker.elastic.co/elasticsearch/elasticsearch:7.6.2")
      .withExposedPorts(9200);


@BeforeAll
public static void startElasticsearchCreateLocalClient() {
    container.start();

    HttpHost host = new HttpHost("localhost", container.getMappedPort(9200));
    final RestClientBuilder builder = RestClient.builder(host);
    client = new RestHighLevelClient(builder);
}
This way you are starting Elasticsearch once within a test class, which makes sense due to the start up time. Don’t forget to clean your data and/or index templates after each test with such a test setup.
If you only want to start Elasticsearch once for all your test classes, a possibility is mentioned in the testcontainers documentation.
Summary
That’s it for today. Well, almost. Just a few final words. I hope you got a glimpse what you can use the REST clients for in order to communicate with Elasticsearch.
Ensure you are aware about certain features of Elasticsearch like sniffing and node selectors, as this might be a possibility to save on another infrastructure like load balancing (depending on your setup).
Asynchronous and/or reactive code with single write operations is hard to properly incorporate into the bulk request based structure of Elasticsearch. The above mentioned bulk processor based approach might lead to code that is hard to maintain. Maybe taking a step back and think about a proper design where data should be indexed first and how it should be propagated will fix this on another level (think publish-subscribe mechanism, which could be bulked again).
Test, test, test! It’s rather easy to get up and running using Testcontainers, so there is no excuse to not have a proper test infrastructure for your app.