 Alexander Reelsen
Introduction into Spring Data Elasticsearch
TLDR; This blog post takes a look at Spring Data Elasticsearch, and how to use and test it in your application - from a heavy Elasticsearch user. I recently wrote an internal application using Spring Boot and Spring Data Elasticsearch and will share my experiences in this post. Disclaimer: I am not a heavy Spring Framework user and admittedly it is not my favorite way of building web applications: but as with any technology, you actually should be building something in order to form an opinion yourself. Consider this blog post a side effect :-)
Spring Data Elasticsearch uses the Elasticsearch REST client underneath. I also wrote a blog post about that client, which you can read here.
This is the accompanying blog post for this presentation. You can find the code samples in my GitHub Repo. I’m more than happy to talk about this at your local user group as well.
Introduction
Just to give some context, this is the description of Spring Data
Spring Data’s mission is to provide a familiar and consistent, Spring-based programming model for data access while still retaining the special traits of the underlying data store.
I think this is a great description. While trying to retain a common access model for many data stores, Spring Data still tries to expose specific data store features. This also applies to the Elasticsearch extension.
The Spring Data Elasticsearch extension is a community maintained extension, but to me it looks quite up-to-date. It also features a reactive extension, if you have the need for it.
Starting with Spring Data major version 4 (included in Spring Boot 2.3) the extension is based on Elasticsearch 7.x and thus as up-to-date as needed. Under the covers the Elasticsearch REST Client is used.
Getting up and running
As with many other spring projects, configuration and getting up and running is comfortably easy, for me all I needed to add was a single dependency
implementation 'org.springframework.boot:spring-boot-starter-data-elasticsearch'
Configuring your Spring Boot application via environment variables
Spring Boot has an endless amount of configuration abilities. You can supply properties, configuration files in different formats, environment variables and some more. For me the use of environment variables is really nice. First, you can easily set those in your local setup and second, this is also easy to configure when running on k8s with vault in order to retrieve secrets.
My local tool of choice is usually direnv. This allows to set custom environment variables when changing into that directory. However direnv is more than that, you can also use it to load a custom JDK version or just execute arbitrary commands, when you switch into this directory - which means you could even load secrets from vault locally or use envchain if you want to protect secrets properly.
For my project my .envrc file looks like this
dotenv
This tells direnv to load environment variables from .env - which looks
like this
SPRING_SECURITY_OAUTH2_CLIENT_REGISTRATION_GITHUB_CLIENT_ID=...
SPRING_SECURITY_OAUTH2_CLIENT_REGISTRATION_GITHUB_CLIENT_SECRET=...
ELASTICSEARCH_URL="https://linkrating:secretPassword@localhost:9200"
ELASTIC_APM_SERVICE_NAME=linkrating
ELASTIC_APM_SECRET_TOKEN=Y7823HL3-52JF27dYy
ELASTIC_APM_SERVER_URLS=http://localhost:8200
ELASTIC_APM_ENVIRONMENT=dev
Every environment variable starting with SPRING_ will be used for Spring
configuration - in this case for GitHub authentication used in this app. The
ELASTICSEARCH_URL is custom for this particular application.
The ELASTIC_ variables are for the Elasticsearch APM setup, which we will
cover later.
One more thing you could configure if needed, is a different behavior when
you start your application via ./gradle by modifying the bootRun task
bootRun {
  // disable APM locally
  environment "ELASTIC_APM_RECORDING", "false"
  environment "ELASTIC_APM_INSTRUMENT", "false"

  args = ["--spring.profiles.active=dev"]
}
I’d personally try to keep everything in environment variables if possible to have a single source of truth.
Let’s take a look at a java class next to get to know the mapping of POJOs.
Entities & Field Mapping
This is a sample class for a user profile
// ...
import org.elasticsearch.index.VersionType;
import org.springframework.data.annotation.Id;
import org.springframework.data.elasticsearch.annotations.DateFormat;
import org.springframework.data.elasticsearch.annotations.Document;
import org.springframework.data.elasticsearch.annotations.Field;
import org.springframework.data.elasticsearch.annotations.FieldType;

import javax.validation.constraints.Email;
import javax.validation.constraints.NotBlank;
import javax.validation.constraints.NotNull;
import javax.validation.constraints.Size;

@Document(indexName = "user-profiles", shards = 1, versionType = VersionType.INTERNAL, createIndex = false)
public class UserProfile {

    @Id @Field(type = FieldType.Keyword) @Email @NotBlank
    private String email;

    @Field(type = FieldType.Keyword)
    private Region region;

    @Field(type = FieldType.Keyword) @Size(max=100) @NoHtml @NotBlank
    private String country;

    @Field(name="full_name", type = FieldType.Keyword) @Size(max=100) @NoHtml @NotBlank
    private String fullName;

    @Field(type = FieldType.Keyword) @NotNull
    private Set<@Size(max=2) @Locale String> languages;

    @Field(name="created_at", type = FieldType.Date, format = DateFormat.date_time)
    private Date createdAt;

    // getters & setters
    // ...
}
Quite a bit to unfold here, let’s tackle every annotation and its parameters each by each.
First the @Document annotation: This one specifies, which index our
entities should go into. By default the spring application creates the index
as well, based on the configuration in this annotation and the following
field annotations. While this might cover most of the use-cases, I prefer to
have an application listener, that creates a new index template when
starting up and also create an index manually to keep more control. One of
the things that worries me slightly, is the fact of exposing expert
settings as annotation parameters like indexStoreType and versionType) -
things that I’d try not to set if possible. Especially versionType is set
away from the default INTERNAL to EXTERNAL and I am not sure why that is
the case, there is also no mention in the documentation about the reasoning.
Another issue with those expert level defaults is, if they ever
change on the Elasticsearch side (which should only happen for a major
version upgrade), you need to change your application.
The most important parameter of the @Document annotation is the
indexName one. In my case I do create an alias at the application
startup, if that alias/index does not exist yet. Remember: Always make use
of aliases
API,
which allows you to hide the number of shards/indices that are used for your
data within Elasticsearch. I consider aliases an interface, where as
indices/shards/mappings are the concrete implementation, that the user has
no need to deal with.
Next up is the @Id annotation, which makes this field the _id of your
document, being the unique identifier in this index.
The @Field annotation configures the type of a field (given the fact that
we already put this information in the index template, this is merely
important to change the behavior for certain fields). You can also set the
name to a different field name. In this example we are using this to
switch from camel case to snake case.
For certain field types there is further configuration, like the format
for date formats. Specifying this format is important, as this will result
in the correct serialization of a date field.
The @NoHtml, @NotBlank, @Size, @Locale and @NotNull annotations
are used for validation, partially implemented with a custom validator.
What I learned when writing this app is the use of annotations within
generics is valid. Every time I read this line, I die a little about its
readability
private Set<@Size(max=2) @Locale String> languages;
You can also serialize enums into Elasticsearch, which is super useful for type safety when parsing user input.
Configuring the Elasticsearch client
This is where the ELASTICSEARCH_URL environment variables comes into play. I
was lazy and put username, password, protocol and endpoint URL into a single
environment variable.
@Configuration
public class RestClientConfig extends AbstractElasticsearchConfiguration {

  @Bean
  @Override
  public RestHighLevelClient elasticsearchClient() {
      final String stringUrl = System.getenv("ELASTICSEARCH_URL");
      final URI uri = URI.create(stringUrl);

      String host = uri.getHost();
      int port = uri.getPort() == -1 ? 9200 : uri.getPort();
      final ClientConfiguration.MaybeSecureClientConfigurationBuilder builder =
        ClientConfiguration.builder().connectedTo(host + ":" + port);

      // enable SSL if https is being used in the URL
      boolean isSsl = "https".equals(uri.getScheme());
      if (isSsl) {
          builder.usingSsl();
      }

      // enable basic auth if specified
      String userInfo = uri.getUserInfo();
      if (userInfo != null) {
          final String[] userPass = userInfo.split(":", 2);
          builder.withBasicAuth(userPass[0], userPass[1]);
      }

      logger.info("Elasticsearch server [{}:{}] ssl[{}] auth[{}]", host, port, isSsl, userInfo != null);
      return RestClients.create(builder.build()).rest();
  }
}
This sets a default port if none is specified - which usually would be a problem as HTTP expects port 80 by default, but I guess in case of Elasticsearch it is safe to switch to 9200.
Again, all of this could also configured via different environment variables if that simplifies configuration for you. Also, there might be a better way to do this that I am not aware off.
Repositories
One of the most natural ways of accessing data in Spring Data is using repositories. Those usually allow you to retrieve data via finders. For most data stores the names of the finder methods are translated to queries to include/exclude documents. The notion of search and relevancy is not really part of this, as this is a concrete implementation detail of Elasticsearch as a data store.
This is what a repository can look like, but you can of course implement your custom search logic in there as well.
import org.springframework.data.elasticsearch.repository.ElasticsearchRepository;

public interface UserProfileRepository
  extends ElasticsearchRepository<UserProfile, String> {

}
Extending ElasticsearchRepository gives you finders like findById().
One last difference to the upcoming ElasticsearchOperations class is that
saving an entity will also trigger a refresh. Saving a lot of entities will
put some additional load on your cluster, however this ensures that
searching for an entity after save will never return stale data.
Attention: Queries get automatically created from method names when using repositories. This is a great feature of Spring Data , however be very careful, that you do not end up with inefficient queries putting a high load on your cluster.
For example there is a findBy...EndingWith() query (the same applies to
findBy...Containing(). According to the
documentation
this translates to a query like *foo, which is not an efficient query
based on how the inverted index needs to be traversed.
A better, albeit more complex version to get up and running might be to use reverse token filter plus a multi field, to store the same data in reverse and then to a prefix search which is potentially much faster.
It would be wrong to blame Spring Data for this behavior, as any abstraction to simplify & generalize will loose some of the power of the underlying data store, however it is important to be aware of such limitations, once you decide to use a data store. Duh! If that wasn’t news, I don’t know what is!
The same applies to the use of aggregations, where we will take a look at the
ElasticsearchRestTemplate next.
What I also found hard to use is the possibility of using the @Query
annotation at a repository method like this (stolen from the
official documentation):
interface BookRepository extends ElasticsearchRepository<Book, String> {
    @Query("{\"match\": {\"name\": {\"query\": \"?0\"}}}")
    Page<Book> findByName(String name, Pageable pageable);
}
While this works as well, it requires you to produce valid JSON in a string, which is always hard to read (and yes, I know it is easier with text blocks, but still not my thing) - especially once your queries become longer and deeper nested. If you integration test this, and your development team is comfortable with this, that might be fine. These rules are not set in stone 😬
ElasticsearchRestTemplate
Reminder: As Spring Data Elasticsearch moves from the TransportClient
using the Elasticsearch node-to-node binary protocol to the RestClient
using HTTP, you should always use the ElasticsearchRestTemplate and
migrate away from ElasticsearchTemplate, if you are still using it.
The good news is, that you do not need to create any special template class,
once you have created a RestHighLevelClient like we already did above!
ElasticsearchOperations class
ElasticsearchRestTemplate implements ElasticsearchOperations, which is
providing all the nitty gritty work for low level search & cluster actions.
Searches now look like everyday-normal Elasticsearch queries, that are
handed over to the template class:
// filter by state & region
final BoolQueryBuilder qb = QueryBuilders.boolQuery()
  .filter(QueryBuilders.termQuery("state", Contribution.State.APPROVED.name()))
  .filter(QueryBuilders.termQuery("region", region.name()));

final NativeSearchQuery query = new NativeSearchQuery(qb);
// aggregate on username, sort by summed up score
query.addAggregation(AggregationBuilders.terms("by_user")
  .field("submitted_by.email")
  .size(40)
  .order(BucketOrder.aggregation("total_score", false))
  // sum up the score of all contributions
  .subAggregation(AggregationBuilders.sum("total_score").field("score"))
query.setPageable(Pageable.unpaged());
final SearchHits<Contribution> hits = elasticsearchRestTemplate.search(query, Contribution.class);
final Aggregations aggregations = hits.getAggregations();
Coming from the Elasticsearch side of things this is my favorite way of
writing queries, as it is reusing the Elasticsearch classes. The
NativeSearchQuery class allows you to specify a query just as if you are
using the RestHighLevelClient.
There is one issue here. As I am only interested in aggregations and not in
documents, this query still executes in two
phases
and tries to fetch unneeded documents. The reason for this is that
Pageable.unpaged() will set the size parameter. If you want to have
slightly faster aggregations, you may need to set a Pageable with a size of
zero. Maybe a static variable Pageable.NO_DOCUMENTS might help here.
In case you are not such a big fan of NativeSearchQuery for querying
Elasticsearch data, there are two alternatives.
First, if you want to have full control, you can use a StringQuery and
supply the whole JSON search query as a string. You can probably guess that
I am an as big fan as of the @Query annotation about that one.
Second you can use the CriteriaQuery and specify a list of Criterias.
This is also used to create the queries from the repository finders,
allowing you to specify fields, values and context (i.e. ending with).
This might be more of a Spring like solution, but I prefer the native
approach by far. If you are using several data stores in a single
application, this strategy might help you to keep to code somewhat similar
though. You might be as surprised as I am, that there will probably someone
after you taking care of your code. One of your goals should always be to
make your successor feel comfortable in your code - also, probably that
successor is future you two years from now, you will no idea about that
code! 😱
Loading templates on start up
As already mentioned at the beginning, I prefer installing index templates on start up. Also, you could built an upgrade mechanism on start up if you need to re-index your data and then switch aliases for example.
Luckily the Spring Framework has a well known ApplicationListener class,
that is triggered when the application is ready.
@Component
public class StoreTemplateOnApplicationListener implements ApplicationListener<ApplicationReadyEvent> {

    private static final Logger logger =
      LoggerFactory.getLogger(StoreTemplateOnApplicationListener.class);
    private final String mappingUserProfile;
    private final RestHighLevelClient client;
    private final ElasticsearchOperations elasticsearchOperations;

    @Inject
    public StoreTemplateOnApplicationListener(RestHighLevelClient client,
                        ElasticsearchOperations elasticsearchOperations) {
        this.client = client;
        this.elasticsearchOperations = elasticsearchOperations;
        this.mappingUserProfile =
          getResource("/mapping-userprofile.json");
    }

    @Override
    public void onApplicationEvent(ApplicationReadyEvent event) {
        logger.info("Connecting to Elasticsearch cluster to write index templates, and optionally create initial index, nodes {}",
                client.getLowLevelClient().getNodes());

        storeIndexTemplate("user_profiles",
                           "user-profiles*", mappingUserProfile);

        String formattedIsoDate = ZonedDateTime.now(ZoneOffset.UTC)
                         .format(DateTimeFormatter.ISO_LOCAL_DATE);

        boolean existsUserProfileIndex = indexExists("user-profiles*");
        if (!existsUserProfileIndex) {
            createIndex("user-profiles-" + formattedIsoDate, "user-profiles");
            saveSampleProfiles();
        }

        logger.info("Elasticsearch setup done");
    }

    // ...
}
So, when starting up, an index template is installed and optionally, if
there are no user profiles existing, we also index a test set. This is super
useful for local testing, but should ideally only be executed depending on
the current profile (i.e. for test, but especially not for prod). This
class also sets an alias for the user-profiles index. I also learned there
are so-called repository
populators
for this initial kind of indexing.
ElasticsearchConverter
The method of serialization changed from Spring Data Elasticsearch 4.x
on-wards. The Jackson ObjectMapper has been replaced with the
MappingElasticsearchConverter - which is using a feature called Meta
Model Object Mapping (MOM) under the covers.
The most important consequence of this change is to ensure that every object
gets properly serialized. You can implement your own Converter classes and
register them in the AbstractElasticsearchConfiguration extending config class.
By opening the ElasticsearchCustomConversions class you will see different
examples of converters. They are rather easy to implement due to
implementing @FunctionalInterface.
I did not need to implement any custom converters for my little project.
Testing
Testing is an interesting topic with Spring and Elasticsearch in combination. If you want real integration tests, you need a Spring ApplicationContext and an Elasticsearch instance up and running - which is possible, but time consuming. Running a test that fires up an application context is already quite a stretch for unit tests, putting Elasticsearch on top requires you to wait even longer to get test feedback. So try to write fast running unit tests first and then go from where.
In order to test Elasticsearch functionality, I highly recommend using testcontainers with the Elasticsearch module.
The app I built rendered a lot of HTML out, so I needed to test the templating layer and its output as well, which required a full up and running Spring application context (which gets reused on several runs, so the cost of start up is only paid once).
@ExtendWith(SpringExtension.class)
@WebMvcTest
@ContextConfiguration(classes = { WebSecurityConfig.class,
   UserProfileController.class, AdminService.class })
@ActiveProfiles("test")
public class ControllerMvcTest {

    @Autowired
    private MockMvc mvc;

    @Autowired
    private AdminService adminService;

    @MockBean
    private ElasticsearchOperations elasticsearchOperations;

    @MockBean
    private UserProfileRepository userProfileRepository;

    @Test
    public void testMainPageRenderingLoggedOut() throws Exception {
        mvc.perform(get("/"))
                .andExpect(status().isOk())
                .andExpect(content().string(
                    allOf(not(containsString("Exception")),
                          not(containsString("exception")))))
                .andExpect(content().string(containsString("Log in")))
                .andExpect(model().attribute("is_admin", false));
    }

    // all the other tests
}
As this test is marked with @WebMvcTest the MockMvc class will be
autowired. If any functionality from ElasticsearchOperations or
UserProfileRepository is needed, you can mock it using Mockito. In this
example no Elasticsearch functionality is needed, because no user is logged
in. Other tests first configure a logged in user and then requires mocking
of the Elasticsearch classes.
Pro tip: If you are using Junit Jupiter, add the following file to
parallelize your tests, if possible (make sure you do not bind to static
ports etc). Save this under src/test/resources/junit-platform.properties
# execute top-level classes in parallel but methods in same thread
junit.jupiter.execution.parallel.enabled = true
junit.jupiter.execution.parallel.mode.default = same_thread
junit.jupiter.execution.parallel.mode.classes.default = concurrent
Use forbidden APIs
Even though this is not Spring specific, I still find it super important. Never ever rely on system locales to output something, also do not use dangerous API calls with ambiguous results depending on the setup of the environment where your code is running. In order to prevent that, there is a neat library called forbidden APIs. This API checker scans through the bytecode and fails the build if API calls that are on a denylist are found.
Again this requires a really small change to your build.gradle file:
plugins {
  // ...
  id 'de.thetaphi.forbiddenapis' version '3.0.1'
}

forbiddenApis {
  bundledSignatures = [ 'jdk-unsafe', 'jdk-deprecated', 'jdk-non-portable',
                        'jdk-reflection', 'jdk-internal', 'jdk-system-out' ]
}
You can trigger the check automatically or run ./gradlew forbiddenApis
manually. Try putting a System.out.println() statement in the code and see
for yourself!
Keep your dependencies up-to-date!
Before going back to Spring Data, one reminder to ensure your dependencies are up-to-date. Again, all it takes is a plugin to add
plugins {
  // ...
  id "com.github.ben-manes.versions" version '0.29.0'
}
Now running ./gradlew dependencyUpdates will show you which
dependencies are up-to-date and which need to be updated.
Further features
This article is intended to be a super light-weight introduction, and many features have not been covered. When talking to various developers they came up with some interesting approaches, for example using Spring expression language to dynamically select an index for a repository. While this works, it will also be hard to debug in production, so if you do things like that, make sure you have an extensive test suite!
Spring Data in general offers way more features, that I have not covered here:
- Entity callbacks
allow you to execute code before/after saving an entity. Also, if you
change a running application, features like
BeforeConvertCallbackcan help you to change your domain objects from old to new datatypes. This feature can also be used to configure created/last modified timestamps. - Highlighting:
You need to configure highlighting via the
ElasticsearchRestTemplateclass (will not work via a repository), but if specified, everySearchHit<T>will also contain highlighted fields. - Auditing: Tracking entity changes (authors and timestamp). Note that Elasticsearch has a similar feature, so make sure you use it only once.
Adding Elastic APM
One of the advantages of using the most common web framework in the JVM space is the excellent support of other tools. The Elastic APM Java Agent is no exception here. Spring support is really good! So, let’s enable the java agent quickly. Add the following dependency in your build.gradle
implementation 'co.elastic.apm:apm-agent-attach:1.18.0.RC1'
This adds the Java APM agent to your project. Strictly speaking, this would not be necessary, as do not need this as a dependency, one could also specify the agent on the command line, but this way I know for sure, that APM is always enabled by starting it programmatically in my Spring application like this
@SpringBootApplication
public class CommunityContributorApp {

	public static void main(String[] args) {
		ElasticApmAttacher.attach();
		SpringApplication.run(LinkRatingApplication.class, args);
	}
}
Do you remember the APM configuration in the .env file? This configuration
will now be picked up automatically. One prerequisite to have APM up and
running is to start an APM
server,
which retrieves the APM data from the agent. When running on Elastic Cloud,
there is an APM server readily available.
So, what do we gain from this additional setup? Easy! Beautiful dashboards and the ability to dive into your app!
You can easily get an overview how much time is spent in which part of your application. For this Spring Boot application there is quite a bit of thymeleaf rendering going as well as a little bit Elasticsearch traffic and some time is spent in the controller logic.
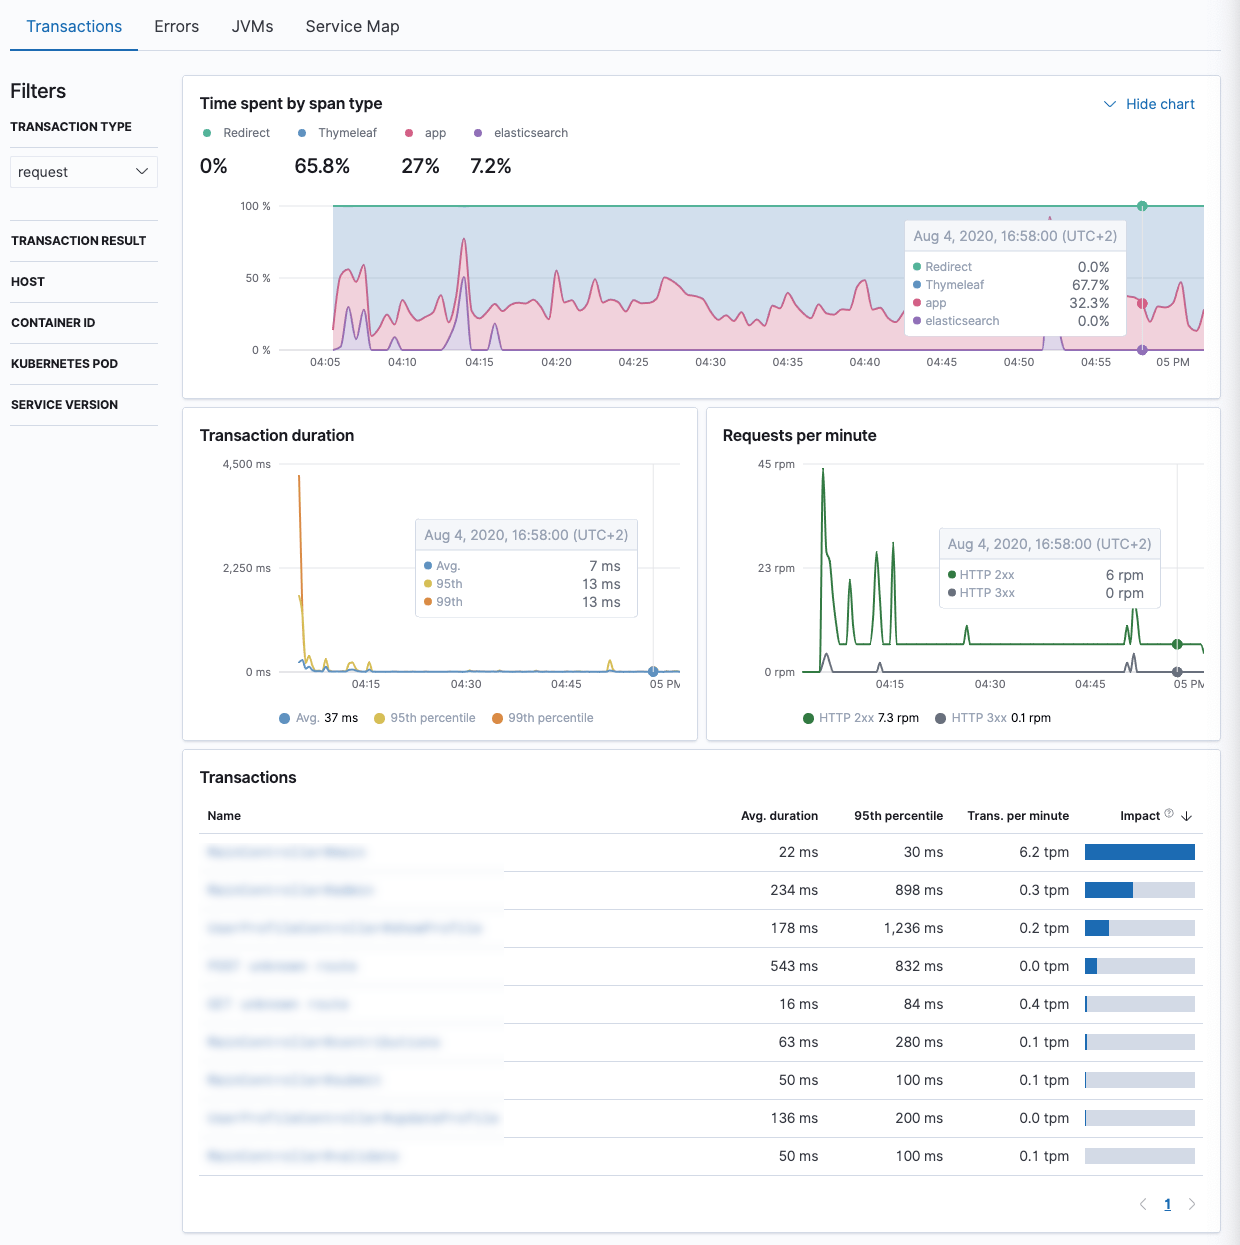
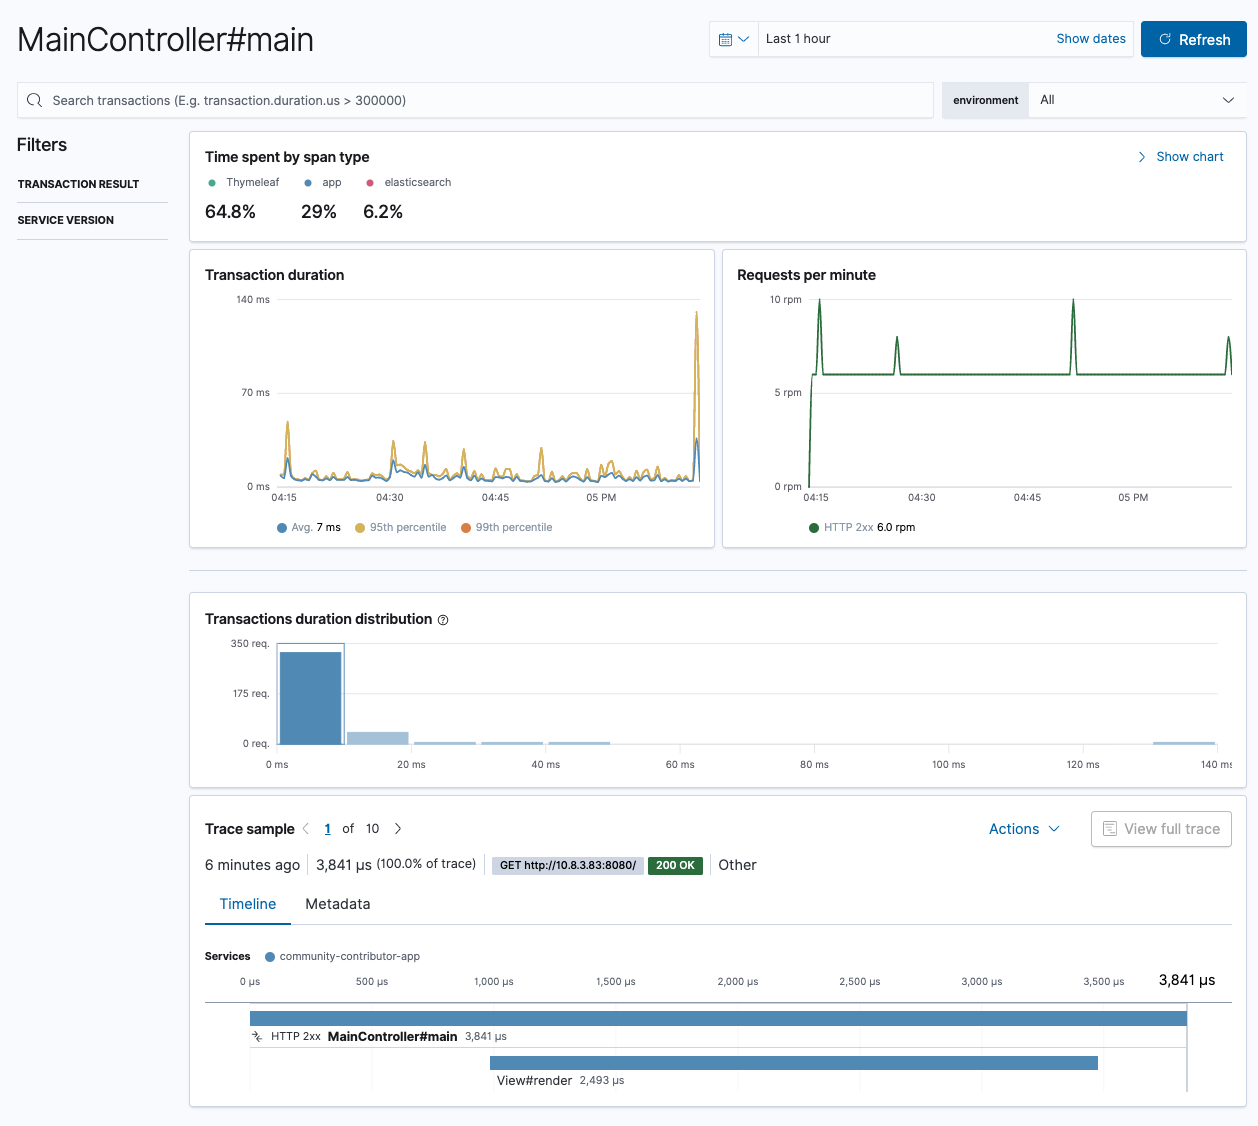
You can also check out the performance of certain endpoints. You also notice that I am as good in naming my controllers as the Java developers are in naming their startup methods 💪
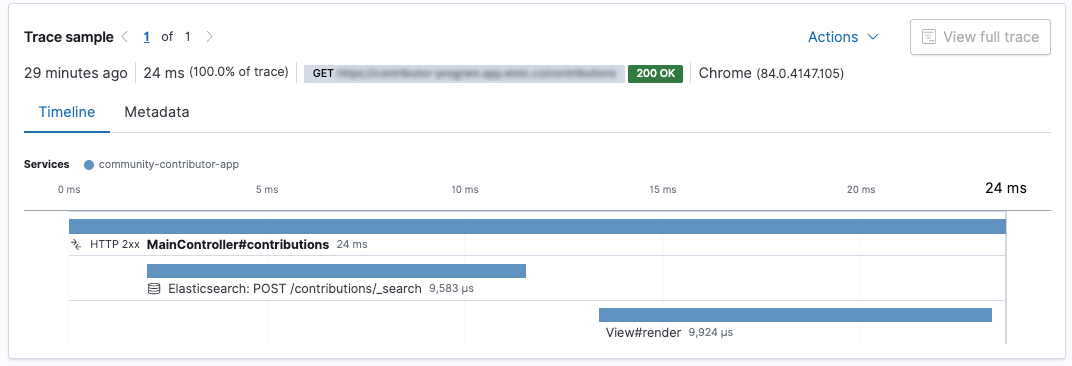
The Java agent instruments also the Elasticsearch REST client, so that each request will be treated as a span of an transaction. In this example you can see that retrieving data from Elasticsearch is as almost as fast as rendering the results - this only works if the HTTP client has an open and already initiated connection of course. The tiny part between sending the search and rendering the view: that’s our business logic… not much to do in this case.
Also there is a dedicated error view and a coarse overview about your JVM including memory consumption, garbage collections and running threads.
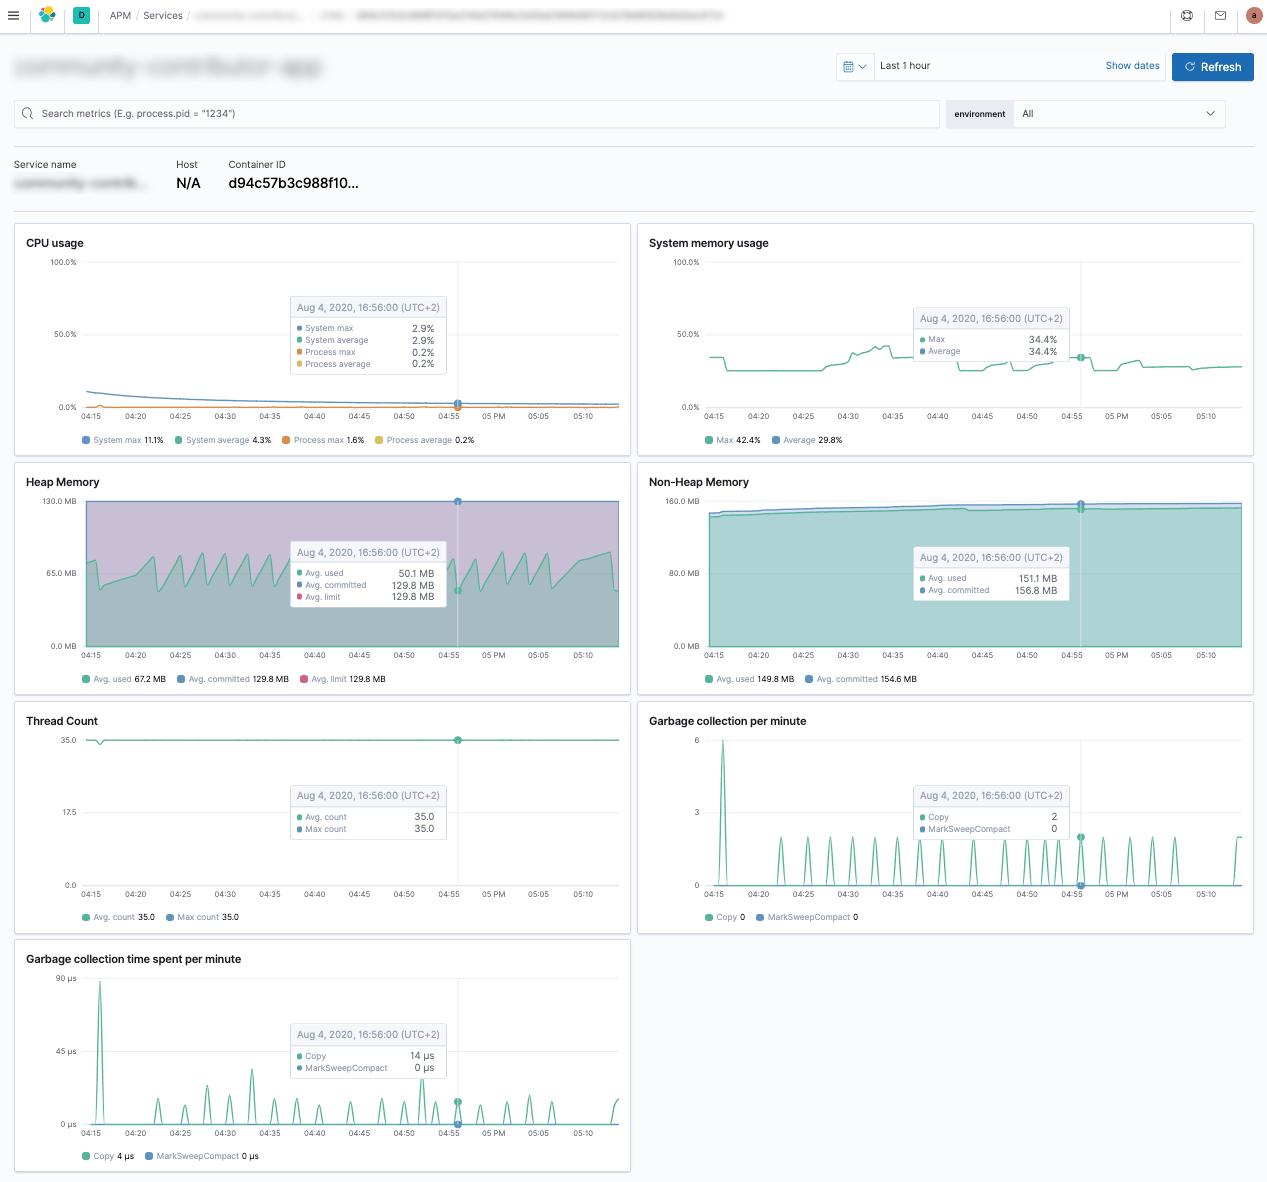
If you are using an Elasticsearch cluster anyway, consider taking a look at APM to get more insights in your application.
Enable JSON logging
The last thing not strictly related to Spring Data Elasticsearch is changing your log format to be in JSON and in an ECS compatible way. If you are wondering what ECS is: The Elastic Common Schema defines a common set of fields to be used when storing event data in Elasticsearch, such as logs and metrics. This common set of fields can be reused in all kinds of dashboards and also makes searching for fields across different data sources much easier.
Logging in JSON also means you do not need to do any grok or regular expression based parsing of log messages, including awkward exception parsing in the java world.
Logging in JSON allows to easily transport the stdout logs to an Elasticsearch cluster without any further processing, for example by using Filebeat.
Add the following dependency to your java project (build.gradle in my
case):
implementation 'co.elastic.logging:logback-ecs-encoder:0.5.0'
The above dependency imports a specific logback ECS layout, which then can
be used in src/main/resources/logback-spring.xml
<?xml version="1.0" encoding="UTF-8"?>
<configuration>
    <appender name="CONSOLE" class="ch.qos.logback.core.ConsoleAppender">
        <encoder class="co.elastic.logging.logback.EcsEncoder">
            <serviceName>my_service_name</serviceName>
        </encoder>
    </appender>
    <root level="INFO">
        <appender-ref ref="CONSOLE"/>
    </root>
</configuration>
Going live & deployment
Spring Boot has added a list of neat features over the last couple of months to streamline & simplify deployment. Many of you will deploy your application as a docker image, so having a base docker image and then adding the fat jar will result in all the dependencies being added in every single time, despite they change much less than your actual code.
In order to solve this, you can add the dependencies separately from your
code, which will result in much smaller images. There is a great
overview over the
different approaches to create Docker images, but with Spring Boot 2.3 you
have the bootBuildImage gradle task, which uses Cloud Native
Buildpacks under the hood, doing exactly what is
mentioned above to create an image with several layers.
One more thing to keep in mind when going live is to enable sniffing for the Elasticsearch Client. Sniffing is a feature shared by all official Elasticsearch clients. By polling the cluster in the background, the sniffer will always keep an up-to-date list of reachable nodes in its host list - so you do not have to worry too much about changing cluster topology. One thing to be aware of: The sniffer also needs to be closed when shutting down, as it is using another thread in the background. As I was using Elastic Cloud for my internal application, there was no need for the sniffer, as there is only a single endpoint.
Lastly, deployment is an evergreen topic. Most of you will probably deploy on k8s using docker images nowadays. I did that with a recent app as well, however for demos I prefer to get up and running faster. Two really good candidates for this are heroku and qovery. The sample app I’ve linked below in the resources features a super simple .qovery.yml setup file. Deployment happens automatically with every commit.
Next steps
So, what would I do different the next time I write an internal app? Well, to be blunt, I don’t think I would go with Spring Boot again. The biggest reason here is that I personally don’t have a lot of experience with the whole ecosystem, and the vast size of this ecosystem requires you to know quite a bit of ins and outs to write efficient framework code - which is perfectly fine. There is a lot of magic going on, driven by convention on the hand, but also technical things like reflection on the other hand, that will potentially save you heaps of time, especially when there is spring framework experience in your team. Personally I prefer to be able to step-debug through the code, which is harder with Spring Boot by betting on DI/reflection. The same applies to Spring Data itself: If you know it, it probably makes a lot of sense to use. Me coming from the Elasticsearch side of things there was no need for an additional abstraction from my perspective, when my system only uses a single data store that I am very familiar with.
Also, I used a fair bit of thymeleaf, as I decided early on to to a lot of server side rendering. More recently I played around with Svelte as I found React always hard to read. I now think I have a stack to build my next app with, should it be needed:
Javalin is a small framework on top of jetty, that is written in Kotlin and tries to stay away from the above described magic (that really is none, sometimes it masquerades as such). Pac4j allows you to integrate authentication like GitHub based auth into your application (plus many others so you could mix and match over time). This came for free with Spring and really required only two configuration settings. In my next setup Javalin will basically be a JSON layer doing backend work, all the display logic will be done in the browser, thanks to Svelte. Tailwindcss requires some work upfront to feel familiar but is really nice to work with. I still need to figure out a way to properly integrate the svelte compiler/development setup in Java though - that’s something for a future blog post I guess.
One thing you will lose is the nice APM integration though requiring you to spend some more time setting it up properly, but I can live with that.
Resources
- Spring Data Documentation
- Spring Boot Sample App, an app to rate links, including GitHub authentication, using Elasticsearch as a backend
- Presentation introducing Spring Data Elasticsearch, corresponding video
- Book (german): Spring Boot 2 by Michael Simons
- Elastic Java APM Agent
Final remarks
You made it down here, wooow! Thanks for sticking with me. Follow or ping me on Twitter, GitHub or reach me via Email.
If there is anything to correct, drop me a note, and I am happy to do so!
Same applies for questions. If you have question, go ahead and ask!