 Alexander Reelsen
Running a Serverless Lucene Reverse Geocoder
TLDR; This post shows the possibility of running a reverse geocoder based on Apache Lucene in a serverless environment. The post features the serverless framework, Lucene’s geo capabilities using points and shapes, and last but not least mentions graalvm to reduce start up times. We will also talk about AWS Lambda, Google Cloud Run and their differences.
This post is based on a presentation with the same title.
After I wrote a location tracker as an AWS Lambda in Kotlin (blog post and GitHub repository), I thought about what to do next and ended up with the idea of a reverse geocoder.
What will you learn in this post:
- How a reverse geocoder works
- Finding public data sets to implement your reverse geocoder
- Index geo shapes & points with Apache Lucene on Java 11 & Gradle
- Write a CLI application querying Apache Lucene and speed it up using GraalVM
- Deploy the app & index on AWS Lambda using the serverless framework
- Create a small web application using Javalin with built-in authorization
- Deploy a compiled binary on Google Cloud Run enjoying millisecond startups
What is serverless?
When I started on the code, the whole serverless paradigm was still somewhat new, now after two years I do consider serverless and its paradigm more of a commodity, so I will not spent a lot of time on explaining it.
You may have heard of the term FaaS, Function as a Service, basically meaning, that a provider offers you an execution environment as a service, and you only have to bring your code and do not care about that environment (i.e. a node interpreter or a JVM) and the provider takes care of running your code.
On top of that serverless also implies a different billing model. To be more exact, that billing model is the outcome of being a different architecture, as your application is only running, when it is called, but does not need any compute resources when no one is using them. This results in being billed by execution time.
The usual way of configuring resources is setting an amount of memory and based on that you also get differently strong CPUs. All serverless platform have a maximum execution time for such functions, otherwise they would just be a regular service, right?
This also changes the architecture of an application, as this means, that there are several small pieces of code (your functions), that need to act together as a single application to the outside world.
The serverless platform provider also takes care of scaling your application. By starting more services on more incoming requests, the developer does not need to take care about scaling that part of your application.
Common examples for serverless applications can be
- Web applications with short lived HTTP requests, i.e. API calls
- Cron jobs, that are rather short running
- Event processing & streaming
- Share nothing web applications, as serverless lacks the concept of a server side session
You need to take care of not trying to fit everything into a serverless
application as this might make your application unnecessarily complex. A good
example is a slack bot. A slack bot requires to reply to a command - like
/whatever command - within three seconds, or you can send the response to
another URL without any time limitation. In case you don’t know the response
length because of querying several services you would need to write some
state into a queue, send that message and have another function processing
that and sending it back to the client. While this works, it looks rather
complex to me, compared to an old-school application that simply sends the
data later without involving any queue or other technology.
Despite AWS Lambda (the pioneer serverless technology) is already more than six years old, there is still a lot of fluctuation with regards to offers and ongoing development. Watch re:invent every year and you will see. Let’s take a quick look, what is out there
- The giants: AWS Lambda, GCP Cloud Functions, Azure Functions, Alibaba Function Compute, Tencent Serverless Cloud Function
- The smaller ones: CloudFlare Workers, IBM Cloud Functions
- The K8s league: KNative, Kubeless, Nuclio, Fission, OpenFaas
- The docker league: Fn Project, OpenFaas
I suppose everything that is not from the big cloud providers will converge to a k8s layer.
Is Java well suited for serverless applications?
After reading that introduction, you may be wondering, if Java is a good fit at all for this application architecture. Java is not too well suited for short lived tasks, as it starts in some kind of interpreted mode and optimizes itself after running some time, when the JIT compiler kicks in. Also there is some overhead for the JVM startup time plus the potential of more initialization time due to dependencies as well as the application itself, for example static loggers.
However, the JVM is seeing a lot of improvements with regards to start up time, the potential of compiling data at build time instead of run time (i.e. calculating a graph for dependency injection or precompiling templates). Micronaut and Quarkus are two examples of doing this.
Let’s take a look how long our Java application takes. Our use-case is a so called reverse geocoder.
What is a reverse geocoder?
Geocoders are components to map a location to a latitude and longitude. For example an address or your favorite pizza restaurant. A reverse geo coder is doing the opposite. You provide a latitude and a longitude and the output as a location.
The idea here is to sent a request like this
{
  "latitude"  : 48.1790,
  "longitude" : 11.5677
}
and get a response like this
{ "city" : "München" }
Implementation - points vs. shapes
So, how can we implement a reverse geocoder? Let’s think about the most naive implementation. Index every city with a latitude/longitude pair and then execute a search for the next point from the supplied location. Sounds nice, but is a recipe for inexactness. Consider this:
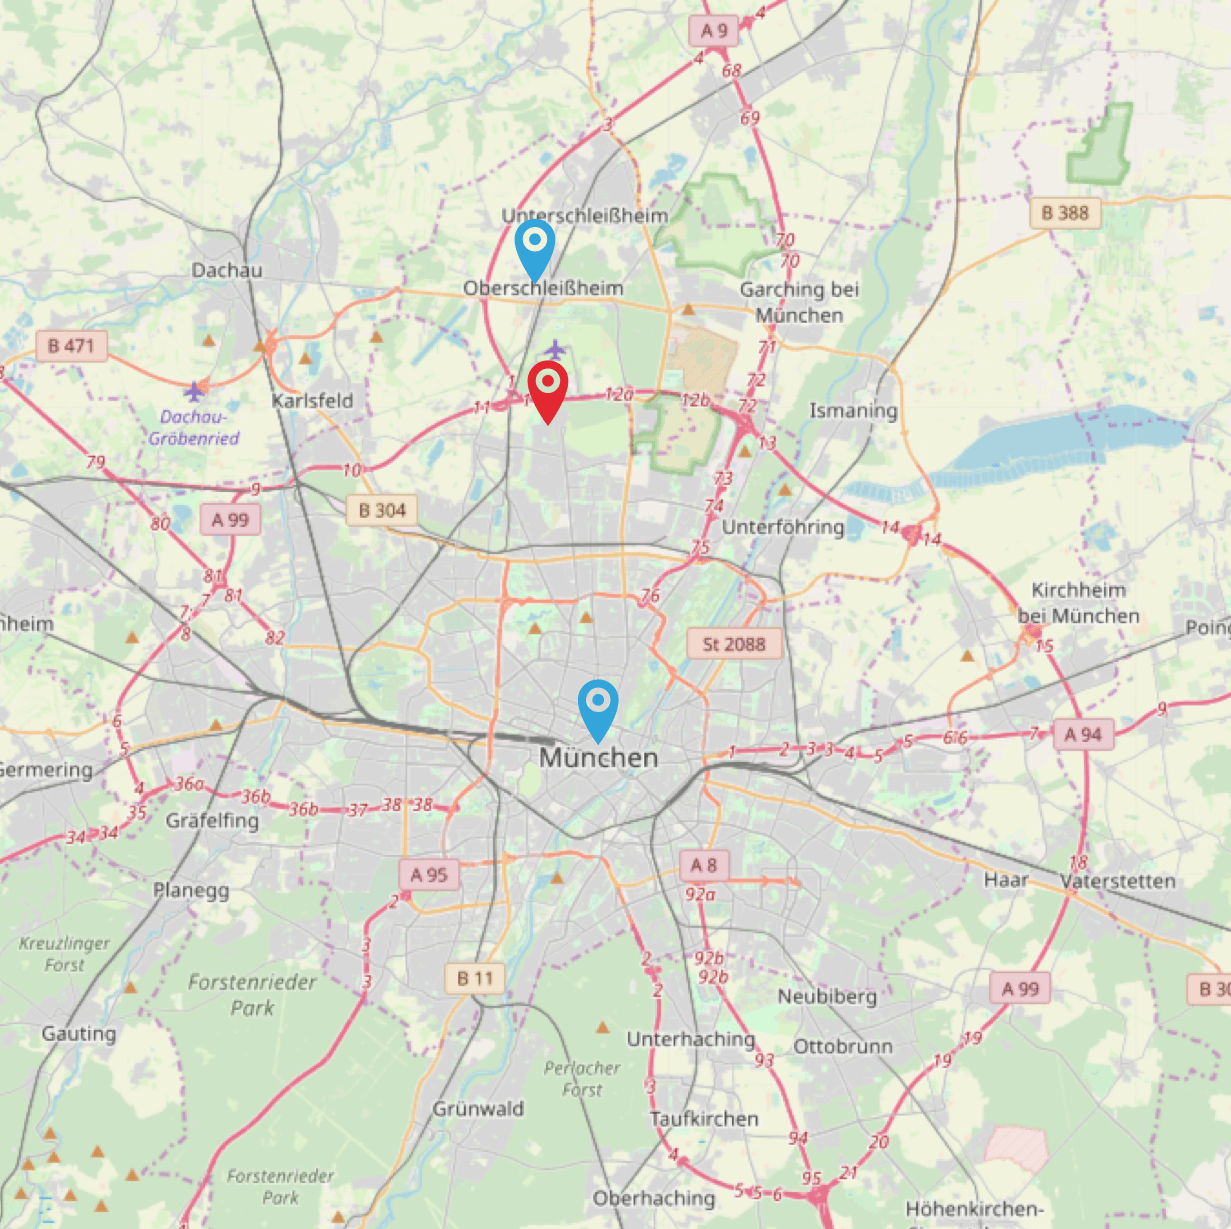
Imagine our location is the red pin, and the two blue pins are indexed locations, namely München and Unterschleißheim. If you queried by distance, you would return the information that this location is in Unterschleißheim, which is absolutely wrong, as the red pin is still in the northern parts of Munich.
What can be done to fix this? Change your indexing strategy. Either each city needs more points like its outer edges, or just start indexing the city of Munich as a geo shape instead of a geo point. Then you could query, if you were within a shape, and if not, execute another geo point distance query. This is also the approach that we will take within this application.
This means, we need to get two sets of data actually. First shapes for bigger cities, second geo points for the rest of Germany. We will focus only on Germany in this example.
Getting proper data
Unless you are a geo company, this is probably one of the bigger challenges.
Finding the correct data and getting it into the right format. For the list
of geo points I fell back to the
OpenGeoDB. You can follow the
download page and
download the DE.tab file. This tab separated value file contains German
legislations like states, counties and entries for each postcode including
name, latitude and longitude. All we need is to filter out those and index
as geo points. Also, the license for this is public
domain.
Side note: I have not verified the correctness/age of this data, so it may be completely off, but serves our demonstration purpose.
Next step is to get shapes. There are many sites with shapes, but not all of them are allowed to be used from a license perspective, so take your time and read the corresponding license. However there are a lot of great initiatives to provide such data, one is whosonfirst allowing you do download geoshapes from many different locations and cities. See a search for Munich for example - bonus points for using Elasticsearch! 😀
I created a CSV file with shapes to download with a list of german cities and islands, which is also part of the GitHub repository.
Apache Lucene & Geo: It’s a match!
Before we dive into the offline index creation using Apache Lucene, let’s talk about the huge investment of Apache Lucene into improving geo searches by adding a completely new data structure to it.
Storing a LatLonPoint requires two, and 4 bytes for each, so it is rather efficient. A GeoShape however used to be much more complex to store, for example you could store the values of geo hashes that are inside the shape and by selecting a different granularity you could trade in index space for exactness around the edges. However the new LatLonShape is using so-called triangular mesh tesselation. To cite the Elasticsearch documentation here
GeoShape types are indexed by decomposing the shape into a triangular mesh and indexing each triangle as a 7 dimension point in a BKD tree. This provides near perfect spatial resolution (down to 1e-7 decimal degree precision) since all spatial relations are computed using an encoded vector representation of the original shape instead of a raster-grid representation as used by the Prefix trees indexing approach.
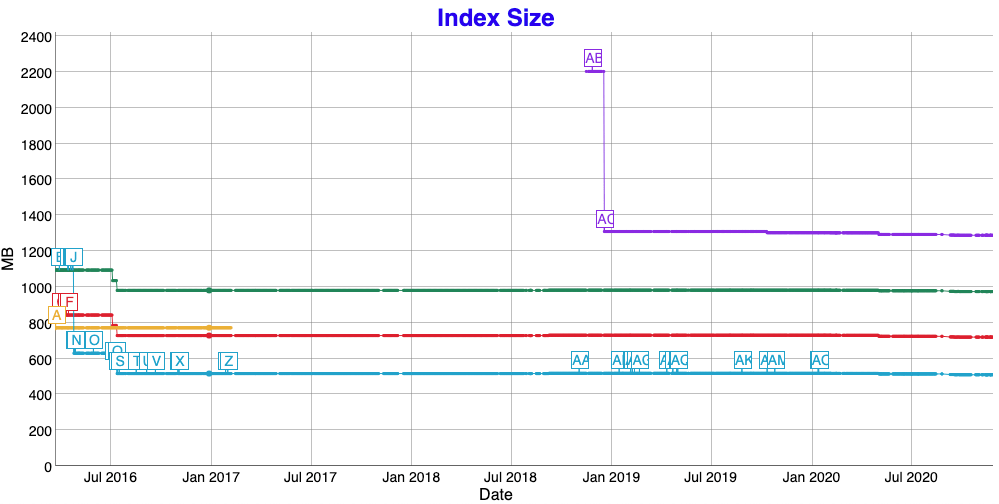
If this does not answer all your question about the new KD tree structure being used, let’s take a look at the Lucene nightly geo benchmarks:
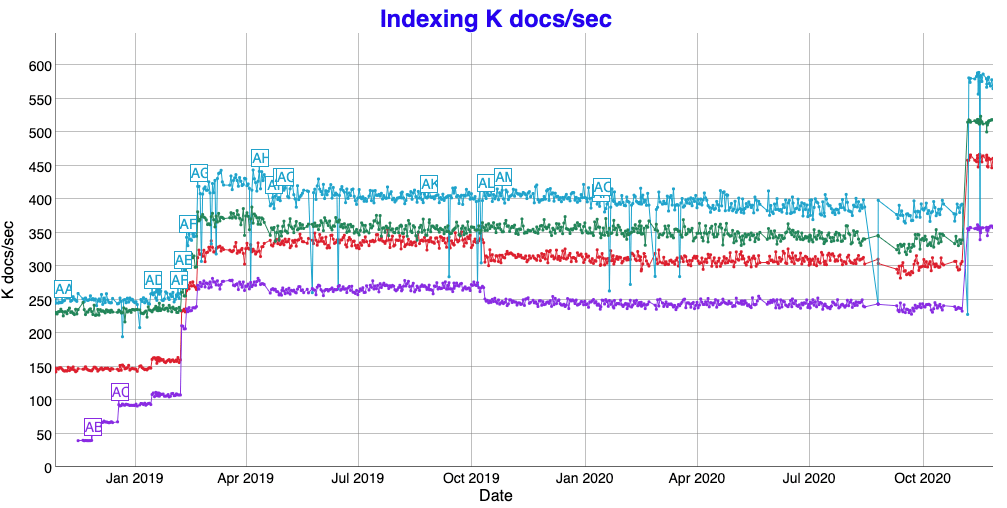
In case you are wondering about the latest performance increases, that is just a reminder to get beefier hardware every now and then 😀
Also there have been dramatic improvements in index size at the beginning. Even though I find it generally interesting that a complex shape takes only 2.5x the space of points…
So, in order to utilize those Lucene features within a serverless environment, let’s try to do most work upfront - that is index creation in this case. We try to create the full Lucene index as part of our package that is deployed to a serverless environment.
Indexing data offline
With data sources for shapes and points, let’s dig into the code. Let’s
start creating an offline indexer, which creates a Lucene index via a gradle
task. This whole java project will be built using gradle, and there is a
indexer sub project, that is doing all the indexing work.
We need to have the ability to download the geo point file as well as the geo shape files as this is not part of the repo.
plugins {
  id 'java'
  id "de.undercouch.download" version "4.1.1"
}

dependencies {
  compile 'com.fasterxml.jackson.dataformat:jackson-dataformat-csv:2.12.0'
  compile 'com.squareup.okhttp3:okhttp:4.9.0'
}

sourceCompatibility = 11
targetCompatibility = 11

task(buildIndex, dependsOn: 'classes', type: JavaExec) {
  main = 'de.spinscale.index.CsvShapeIndexer'
  classpath = sourceSets.main.runtimeClasspath
  args 'src/main/resources/downloads/', 'build/indices'
}

task(downloadShapes, type: JavaExec) {
  main = 'de.spinscale.index.CsvShapeParser'
  classpath = sourceSets.main.runtimeClasspath
  args 'src/main/resources/downloads/'
}

task(downloadCsvPointFile, type: Download) {
  src 'http://www.fa-technik.adfc.de/code/opengeodb/DE.tab'
  dest 'src/main/resources/'
}

test {
  dependsOn('buildIndex')
}
None of those downloading tasks are run automatically, so you have to run
them once initially via ./gradlew :indexer:downloadShapes :indexer:downloadCsvPointFile.
The downloadCsvPointFile task downloads a tab separated file containing
the mapping from geo points to cities. An entry looks like this
25263 09184149 UNTERSCHLEISSHEIM Unterschleißheim 48.28330 11.56670 85716 089 25977 15 M Stadt 6 225
The important fields to index here are Unterschleißheim, the latitude
48.2833 and the longitude 11.5667. As the TSV file also contains lines
without geo points or postal codes we need to write some logic to not parse
those.
public class CsvPointParser {

    private static final String POINT_FILE_NAME = "/DE.tab";

    private final List<CsvPointParser.GeoPoint> points;

    public CsvPointParser() throws IOException {
        points = readCsv();
    }

    private List<CsvPointParser.GeoPoint> readCsv() throws IOException {
        List<CsvPointParser.GeoPoint> points = new ArrayList<>();
        try (Scanner scanner = new Scanner(getClass().getResourceAsStream(POINT_FILE_NAME))) {
            while (scanner.hasNextLine()) {
                final String line = scanner.nextLine();
                // skip commented line
                if (line.startsWith("#")) {
                    continue;
                }
                final List<String> record = getRecordFromLine(line);
                final String name = record.get(3);
                final String lat = record.get(4);
                final String lon = record.get(5);
                final String plz = record.get(7);
                if (name != null && !name.isEmpty() && lat != null && !lat.isEmpty() && lon != null && !lon.isEmpty() && plz != null && !plz.isEmpty()) {
                    points.add(new GeoPoint(name, Double.parseDouble(lat), Double.parseDouble(lon)));
                }
            }
        }
        return points;
    }


    private List<String> getRecordFromLine(String line) {
        List<String> values = new ArrayList<String>();
        try (Scanner rowScanner = new Scanner(line)) {
            rowScanner.useDelimiter("\t");
            while (rowScanner.hasNext()) {
                values.add(rowScanner.next());
            }
        }
        return values;
    }

    // GeoPoint class and getter to retrieve points...
Next up are the shapes. There is a shapes.csv file in the repo, that
contains links to geojson files from whosonfirst.
A single line looks like
München,muenchen.json,https://data.whosonfirst.org/101/748/479/101748479.geojson
or can contain additional geo points like
Nürnberg,nuernberg.json,https://data.whosonfirst.org/101/905/935/101905935.geojson,49.436236|11.082745
The geo point at the end of the line is used for testing. There is a parameterized test checking that every single shape exists. As every GeoJSON file also contains a center of the shape, this is used for testing. However, sometimes that center is not within the shape and needs a manual geo point. This is what the last column is for.
So, after downloading, you should have more than 700 shapes in your
indexer/src/main/resources/downloads directory. These shapes can now be
used for indexing - that happens when you run ./gradlew :indexer:buildIndex by calling the CsvShapeIndexer class. The class first
indexes all shapes, and then check for each point if it is within a just
indexed shape. If that’s the case, it will not be indexed at all. With my
current data set this is the ./gradlew :indexer:buildIndex response.
> Task :indexer:buildIndex
Indexed 706 shapes, committing
Enriching index with post code locations, that are outside of the indexed shape
Indexed 49252 points, skipped 8645. Merging down to one segment...
So we indexed 706 shapes, then read 49252 points. Out of those 8645 points were not indexed, because they were within an already indexed shape.
The CsvShapeIndexer class looks like this
public void createIndex() throws IOException, ParseException {
    IndexWriterConfig indexWriterConfig = new IndexWriterConfig()
        .setOpenMode(IndexWriterConfig.OpenMode.CREATE);
    try (Directory directory = new NIOFSDirectory(this.directory);
         IndexWriter writer = new IndexWriter(directory, indexWriterConfig)) {

        for (CsvShapeParser.Shape shape : shapes) {
            if (shape == null || shape.id == null || shape.id.isEmpty()) {
                continue;
            }
            writer.addDocument(createDocument(shape));
        }

        System.out.println(String.format(Locale.ROOT,
            "Indexed %s shapes, committing", shapes.size()));
        writer.commit();

        System.out.println("Enriching index with post code locations " +
            ", that are outside of the indexed shape");

        CsvPointParser pointParser = new CsvPointParser();
        final DirectoryReader reader = DirectoryReader.open(writer);
        final IndexSearcher searcher = new IndexSearcher(reader);
        int skipped = 0;
        int indexed = 0;
        for (CsvPointParser.GeoPoint point : pointParser.getPoints()) {
            Query q = LatLonShape.newPointQuery("geoshape",
                ShapeField.QueryRelation.INTERSECTS,
                new double[] { point.getLat() , point.getLon() });

            final TopDocs topDocs = searcher.search(q, 1);

            if (topDocs.totalHits.value == 0) { // index geopoint
                writer.addDocument(createDocument(point));
                indexed++;
            } else if (topDocs.totalHits.value == 1) { // do nothing
                skipped++;
            } else { // throw exception
                throw new RuntimeException("Found " + topDocs.totalHits.value
                    + " hits for" + point);
            }
        }

        System.out.println(String.format(Locale.ROOT,
          "Indexed %s points, skipped %s. Merging down to one segment...",
          indexed, skipped));
        writer.commit();
        writer.forceMerge(1);
    }
}
After creating and opening the Lucene index, loop through all shapes,
create a document for each like this:
private Document createDocument(CsvShapeParser.Shape shape) throws IOException,
      ParseException {
    Document doc = new Document();
    doc.add(new StringField("city" , shape.id, Field.Store.YES));

    byte[] bytes = Files.readAllBytes(Paths.get(downloadDirectory)
        .resolve(shape.getFilename()));;
    final String geojson = new String(bytes, StandardCharsets.UTF_8);

    final SimpleGeoJSONPolygonParser parser =
        new SimpleGeoJSONPolygonParser(geojson);
    Polygon[] polygons = parser.parse();
    for (Field field : LatLonShape.createIndexableFields("geoshape", polygons[0])) {
        doc.add(field);
    }

    if (parser.getGeomLatitude() == null && parser.getGeomLatitude() == null) {
        System.out.println(String.format("Could not add point for shape %s", shape.id));
    } else {
        doc.add(new LatLonPoint("location", parser.getGeomLatitude(), parser.getGeomLongitude()));
    }

    return doc;
}
After reading the geojson document into a byte array, a
SimpleGeoJSONPolygonParser is used. This class comes from Lucene, but I
had to fix it a little in order to be able to properly parse the geojson
files from whosonfirst.
The LatLonShape.createIndexableFields() creates the shape from a polygon
from the JSON file. And if there is also a latitude/longitude it is used as
well via the LatLonPoint.
After reading all the shapes, indexWriter.commit() is used to persist data
on disk. Now all the geo points are read, and for every found point, we can
search through the just indexed data and check if the point is within one of
the shapes. If it is not, there is another createDocument() method to
persist the point.
private Document createDocument(CsvPointParser.GeoPoint point) {
    Document doc = new Document();
    doc.add(new StringField("city" , point.getName(), Field.Store.YES));
    doc.add(new LatLonPoint("location", point.getLat(), point.getLon()));
    return doc;
}
When running the above buildIndex call before running ./gradlew test, we
can actually unit test the outcome of the above index creation. One of the
most important tests to me was to check if the shapes are indexed. As we
have this neat shapes.csv file this can be used for testing as well using
a parameterized test. Before upgrading to junit jupiter I wrote a custom test
runner, but when upgrading I realized that I can just go with a parameterized
test instead.
public class GeoJsonTests {

    private static List<CsvShapeParser.Shape> shapes;
    private static final String indicesDirectory = "build/indices/";
    private static final String downloadDirectory = "src/main/resources/downloads/";
    private static DirectoryReader reader;
    private static IndexSearcher searcher;

    @BeforeAll
    public static void loadShapes() throws Exception {
        final CsvShapeParser parser = new CsvShapeParser(downloadDirectory);
        shapes = parser.getShapes();

        reader = DirectoryReader.open(
            new NIOFSDirectory(Paths.get(indicesDirectory)));
        searcher = new IndexSearcher(reader);
    }

    @AfterAll
    public static void closeResources() {
        IOUtils.closeWhileHandlingException(reader);
    }

    @ParameterizedTest(name = "[{0}] is indexed properly")
    @MethodSource("retrieveGeoShapes")
    public void testGeoShapes(CsvShapeParser.Shape shape) throws Exception {
        if (shape.geoPoints().isEmpty()) {
            // extract latitude longitude from shape file if exists
            byte[] bytes = Files.readAllBytes(
                Paths.get("src/main/resources/downloads")
                    .resolve(shape.getFilename()));;
            final String geojson = new String(bytes, StandardCharsets.UTF_8);
            final SimpleGeoJSONPolygonParser polygonParser =
                new SimpleGeoJSONPolygonParser(geojson);
            polygonParser.parse();
            assertThat(polygonParser.getGeomLatitude()).isNotNull();
            assertThat(polygonParser.getGeomLongitude()).isNotNull();
            executeLatLonTest(shape.id, polygonParser.getGeomLatitude(),
                polygonParser.getGeomLongitude());
        } else {
            for (CsvShapeParser.Point point : shape.geoPoints()) {
                executeLatLonTest(shape.id, point.lat, point.lon);
            }
        }
    }

    private static Stream<Arguments> retrieveGeoShapes() {
        return shapes.stream().map(Arguments::of);
    }

    private void executeLatLonTest(String expectedCity, Double latitude,
        Double longitude) throws IOException {
      // ...
    }
}
So, if there is a manually specified lat/lon pair to test with, then this will be used (also a list of pairs is supported), otherwise the lat/lon pair considered as center from geojson file itself is used.
The executeLatLonTest() method also has some additional tests, to ensure
that only a single result is returned, when running the shape query, and
will fail if no result is found.
Using this parameterized test, I can check all 700 shapes in just over a second.
I also added a sanity test to check for more than 49k documents in total, to make sure, that documents have been indexed
public class IndexerTests {

    @Test
    public void testIndexHasEnoughDocuments() throws Exception {
        Path indexPath = Paths.get(System.getProperty("user.dir"),
            "..", "indexer", "build", "indices");

        try (Directory directory = new NIOFSDirectory(indexPath);
             DirectoryReader reader = DirectoryReader.open(directory)) {
            IndexSearcher searcher = new IndexSearcher(reader);
            assertThat(searcher.count(new MatchAllDocsQuery()))
                .isGreaterThan(49000);
        }
    }
}
Finally we have the raw data we need. Can we write a lambda now? Naaah, we
still need to write the component reading the data again, a searcher, that
can be used. This is another sub project just like the indexer one, let’s
add a searcher one. In order to keep things extensible, my base area is to
have a single searcher per Path, so one could even have several Lucene
indices within their package:
private static final ConcurrentHashMap<Path, Searcher> searchers =
    new ConcurrentHashMap<>();

public static Searcher getSearcher(Path path) throws IOException {
    if (searchers.containsKey(path) == false) {
        Directory directory = new NIOFSDirectory(path);
        DirectoryReader reader = DirectoryReader.open(directory);
        Searcher searcher = new Searcher(reader);
        Searcher putIfAbsentSearcher = searchers.putIfAbsent(path, searcher);
        // if these two differ, close the reader/directories to not leak
        // and use searcher that has been added in the meantime instead
        if (putIfAbsentSearcher != null && !searcher.equals(putIfAbsentSearcher)) {
            IOUtils.closeWhileHandlingException(reader, directory);
        }
    }

    return searchers.get(path);
}
This ensure that only a single searcher is handed out. This could also be implemented in many different ways, so don’t take this for extremely granted.
public class Searcher implements Closeable  {

    private static final String FIELD_NAME_SHAPE = "geoshape";
    private final IndexSearcher searcher;
    private final DirectoryReader reader;

    Searcher(DirectoryReader reader) {
        this.searcher = new IndexSearcher(reader);
        this.reader = reader;
    }

    public SearchResult search(double latitude,
                               double longitude) throws IOException {
        long start = System.nanoTime();
        SearchResult searchResult = search(SearchResult.Hint.Shape,
                                           latitude, longitude);
        if (searchResult.isEmpty()) {
            searchResult = search(SearchResult.Hint.Point,
                                  latitude, longitude);
        }
        long end = System.nanoTime();
        searchResult.setTook(TimeUnit.NANOSECONDS.toMillis(end - start));
        return searchResult;
    }

    private SearchResult search(SearchResult.Hint hint, double latitude,
                                double longitude) throws IOException {
        // ...
        return new SearchResult(city, hint);
    }

    @Override
    public void close() {
        IOUtils.closeWhileHandlingException(reader.directory(), reader);
    }
}
The core logic is hidden in the search() method that takes the hint as an
argument. Based on the hint being either Shape or Point a different
query is created, that searches for shapes or points. I know with a bit of
boosting, this could probably become a single query.
This is the search method
private SearchResult search(SearchResult.Hint hint, double latitude, double longitude) throws IOException {
    TopDocs docs;
    if (hint == SearchResult.Hint.Shape) {
        Query query = LatLonShape.newPointQuery(FIELD_NAME_SHAPE,
            ShapeField.QueryRelation.INTERSECTS,
            new double[] { latitude, longitude });
        docs = searcher.search(query, 1);
    } else {
        docs = LatLonPointPrototypeQueries.nearest(searcher, "location",
            latitude, longitude, 1);
    }

    if (docs.totalHits.value == 0) {
        return SearchResult.empty(hint);
    }

    ScoreDoc scoreDoc = docs.scoreDocs[0];
    Document doc = searcher.doc(scoreDoc.doc);
    String city = doc.getField("city").stringValue();
    return new SearchResult(city, hint);
}
Depending if you want to search for points or shapes, a different query is used, as in the shape case one needs to search against the geo shape, where as for the point case, another query against another data type is used.
My test for this looks like (again based on the above code, you probably want to test for much more things).
@Test
public void testSearchesWork() throws Exception {
    Path indexPath = Paths.get(System.getProperty("user.dir"), "..", "indexer", "build", "indices");

    try (Searcher searcher = new Searcher(DirectoryReader.open(new NIOFSDirectory(indexPath)))) {
        // munich city centre
        assertLatLon(48.1374, 11.5755, "München", Shape, searcher);
        // Munich Nord to make sure this does not become Oberschleissheim
        assertLatLon(48.2162, 11.5580, "München", Shape, searcher);

        assertLatLon(48.2697, 11.5712, "Unterschleißheim", Shape, searcher);
        assertLatLon(48.1028, 11.4230, "Planegg", Point, searcher);
        assertLatLon(51.7447, 14.6243, "Forst (Lausitz)", Point, searcher);
        assertLatLon(50.9664, 6.8946, "Köln", Shape, searcher);
        assertLatLon(54.1837, 7.8833, "Helgoland", Shape, searcher);
        assertLatLon(51.6723, 8.7314, "Borchen", Shape, searcher);
        assertLatLon(51.4699, 7.1022, "Essen", Shape, searcher);
        assertLatLon(51.2318, 6.7247, "Düsseldorf", Shape, searcher);

        // ensure island edge does not get considered to be its neighbour
        assertLatLon(53.7200, 7.3287, "Norderney", Shape, searcher);
        assertLatLon(53.6846, 7.0945, "Juist", Shape, searcher);
    }

    private void assertLatitudeLongitude(double latitude, double longitude,
        String expectedCity, SearchResult.Hint expectedHint,
        Searcher searcher) throws Exception {
        // ...
    }
}
Finally we have all the infra in place to write our first application querying the index. In order to not confuse you with lambda code, let’s write a small CLI tool to make sure our searcher component works as intended.
Running locally as a CLI tool
This is the third sub project in our build, named cli, containing a single
class with a main() method like this
public static void main(String[] args) throws IOException {
    String program = System.getProperty("sun.java.command");
    if (args.length != 3) {
        System.out.println("Exactly three arguments required!");
        System.out.println("Usage: " + program + " path-to-lucene-index latitude longitude\n");
        System.out.println("Example usage: " + program + " lucene/ 48.1374 11.5755\n\n");
        System.exit(1);
    }

    String path = args[0];
    Double lat = Double.valueOf(args[1]);
    Double lon = Double.valueOf(args[2]);
    Path indexPath = Paths.get(path);

    // some validation skipped here for readability...

    System.out.println(String.format(Locale.ROOT,
        "Searching for city at lat %s/lon %s", lat, lon));
    Searcher searcher = Searcher.getSearcher(indexPath);
    SearchResult result = searcher.search(lat, lon);

    if (result.isEmpty()) {
        System.out.println("No results found");
    } else {
        String hint = result.hint == SearchResult.Hint.Shape ? "within": "nearby";
        String format = "Point is %s %s, search took %sms";
        System.out.println(String.format(Locale.ROOT, format, hint,
            result.city, result.getTook()));
    }
}
Let’s make sure we have an easy to use CLI application, by bundling
everything into a single jar, creating a fat-jar by changing
cli/build.gradle to:
plugins {
  id 'java'
  id 'application'
}

application {
  mainClassName = 'de.spinscale.cli.CliSearcher'
}

task fatJar(type: Jar) {
  manifest {
    attributes(
      "Main-Class": "de.spinscale.cli.CliSearcher",
      "Implementation-Version": archiveVersion,
      "Implementation-Title": "CLI Searcher"
    )
  }
  archiveBaseName = project.name + '-all'
  from { configurations.compile.collect { it.isDirectory() ? it : zipTree(it) } }
  with jar
}

dependencies {
    compile project(':searcher')
}

test.dependsOn (':indexer:buildIndex')
assemble.dependsOn (':cli:fatJar')
Now we can build via ./gradlew :indexer:assemble and run
java -jar cli/build/libs/cli-all-0.0.1.jar indexer/build/indices \
  48.1374 11.57
which returns something like
Searching for city at lat 48.1374/lon 11.57
Point is within München, search took 38ms
38ms is not really fast and only covers the search. A full call requires starting the JVM, opening the Lucene index, executing the search and shutting down again. We’ll see, how we can speed this up later. But now, it’s time for AWS Lambda.
Running on AWS lambda
AWS Lambda has a java helper library allowing you to implement a
RequestHandler interface. You can read the input as a map and return a
response class like this:
class Response {
    private final boolean isIsBase64Encoded = false;
    private final int statusCode;
    private final String body;

    public Response(int statusCode, String body) {
        this.statusCode = statusCode;
        this.body = body;
    }

    public boolean isIsBase64Encoded() {
        return isIsBase64Encoded;
    }

    public int getStatusCode() {
        return statusCode;
    }

    public String getBody() {
        return body;
    }
}
The handler itself will check the JSON body, extract the latitude and
longitude fields and execute a search against those.
private static final String EMPTY_BODY_RESPONSE =
    Json.object().add("error", "empty body").toString();

private final Path luceneIndex = getTaskRoot().resolve("indices");

@Override
public Response handleRequest(Map<String, Object> input, Context context) {
    try {
        if (input.containsKey("body")) {
            JsonValue body = Json.parse(input.get("body").toString());
            double latitude, longitude;
            try {
                final JsonObject json = body.asObject();
                latitude = json.get("latitude").asDouble();
                longitude = json.get("longitude").asDouble();
            } catch (NullPointerException e) {
                return new Response(400, EMPTY_BODY_RESPONSE);
            }

            Searcher searcher = Searcher.getSearcher(luceneIndex);
            if (searcher == null) {
                return new Response(500, "cannot serve requests");
            }
            SearchResult searchResult = searcher.search(latitude, longitude);
            JsonObject jsonObject = Json.object()
                .add("city", searchResult.city)
                .add("took", searchResult.getTook());
            return new Response(200, jsonObject.toString());
        }
        return new Response(400, EMPTY_BODY_RESPONSE);
    } catch (Exception e) {
        return new Response(500, e.getMessage());
    }
}

protected Path getTaskRoot() {
    return Paths.get(System.getenv("LAMBDA_TASK_ROOT"));
}
The JSON package used here was minimal-json in order to keep the packaged
size of the lambda as small as possible.
The other specialty is the getTaskRoot() method, which returns the main
directory that contains the Lucene index, as the lambda unpacks the .zip
archive into the task root directory.
In a test, we can override that method extending the existing handler, like this:
public class TestHandler extends Handler {
    @Override
    protected Path getTaskRoot() {
        return Paths.get(System.getProperty("user.dir"), "..", "indexer", "build");
    }
}
A test looks like this:
@Test
public void testGoodCase() throws IOException {
    String json = Json.object()
        .add("latitude", 48.1374)
        .add("longitude", 11.5755)
        .toString();

    Handler handler = new TestHandler();
    Context context = mock(Context.class);
    final Map<String, Object> body = Collections.singletonMap("body", json);
    Handler.Response response = handler.handleRequest(body, context);
    assertThat(response.getStatusCode()).isEqualTo(200);
    String city = Json.parse(response.getBody())
        .asObject().get("city").asString();
    assertThat(city).isEqualTo("München");

    // ensure a second request works just fine, no index readers are closed
    handler.handleRequest(body, context);
    assertThat(response.getStatusCode()).isEqualTo(200);
}
We’re almost ready for deployment. The only step missing is packaging. A lambda deployment is basically just a zip file in an S3 bucket. So, let’s create a zip file first in a gradle task.
plugins {
  id 'java'
}

sourceCompatibility = 11
targetCompatibility = 11

dependencies {
    compile project(':searcher')

    implementation 'com.amazonaws:aws-lambda-java-core:1.2.1'
    runtimeOnly 'com.amazonaws:aws-lambda-java-log4j:1.0.1'
    compile 'com.eclipsesource.minimal-json:minimal-json:0.9.5'
}

task buildZip(type: Zip) {
    // set the base name of the zip file
    baseName = "searcher-germany"
    from compileJava
    from processResources
    into('indices') {
      from project(':indexer').buildDir.toString() + '/indices'
    }
    into('lib') {
        from configurations.runtime
    }
}

test.dependsOn (':indexer:buildIndex')
assemble.dependsOn (':aws-lambda:buildZip')
Keep the java compatibility at 11 as this is the latest that AWS Lambda
supports. The buildZip task creates a zip file. Running ./gradlew :aws-lambda:assemble will create the final artifact at
aws-lambda/build/distributions/searcher-germany-0.0.1.zip, which is less
than ten megabytes.
AWS Lambda Deployment
All right, deployment time! Using the serverless
framework for deployment. You need nodejs
installed locally, I usually use nvm for this.
Then you can run npm install -g serverless and install serverless
system wide for your node version. Before you can continue you need to setup
your AWS credentials as well, I assume that you have them properly set in
your environment via AWS_PROFILE or similar.
The final step is to create a serverless.yml file
service: searcher-germany

provider:
  name: aws
  runtime: java11

package:
  artifact: build/distributions/searcher-germany-0.0.1.zip

functions:
  http:
    memorySize: 512
    handler: de.spinscale.lambda.http.Handler
    events:
      - http:
          path: location
          method: post
With this file we can now run sls deploy, wait and sit back. Your output
should be something like
Serverless: Packaging service...
Serverless: Creating Stack...
Serverless: Checking Stack create progress...
.........
Serverless: Stack create finished...
Serverless: Uploading CloudFormation file to S3...
Serverless: Uploading artifacts...
Serverless: Uploading service searcher-germany-0.0.1.zip file to S3 (9.43 MB)...
Serverless: Validating template...
Serverless: Updating Stack...
Serverless: Checking Stack update progress...
Serverless: Stack update finished...
Service Information
service: searcher-germany
stage: dev
region: us-east-1
stack: searcher-germany-dev
resources: 11
api keys:
  None
endpoints:
  POST - https://44uhd6vy02.execute-api.us-east-1.amazonaws.com/dev/location
functions:
  http: searcher-germany-dev-http
layers:
  None
Ok, time to invoke curl!
body='{"latitude":48.18, "longitude":11.56}'
endpoint="https://44uhd6vy02.execute-api.us-east-1.amazonaws.com/dev/location"
curl -v -X POST $endpoint -d $body
returns
{"city":"München","took":399}
a second invocation will be much faster. After a couple of executions I am consistently down to 4-5 milliseconds instead of 400. This is because the Lambda itself is provisioned, the index is opened and read, and will surely fit into memory. If your search returns a point, searches will take a little longer as two searches need to be executed.
Running sls logs -f http shows something like this for each function
invocation
REPORT RequestId: 811d7916-f7c4-498d-be3d-241682076c4f Duration: 6.63 ms Billed Duration: 7 ms Memory Size: 512 MB Max Memory Used: 108 MB
and for the first call due to initialization
REPORT RequestId: 8583bb92-b72c-469f-a12a-ffcc5e07a463 Duration: 1570.00 ms Billed Duration: 1570 ms Memory Size: 512 MB Max Memory Used: 106 MB Init Duration: 418.46 ms
Memory duration is always about 108, so we could probably go down to 128MB and see how that works out and how that changes execution time, as you potentially also reduce CPU with that step.
AWS Lambda deployment issues
So, this was smooth, right? We only had to… naaaah, we had to jump through quite a bit of hoops actually to make everything work. Don’t underestimate the complexity of deploying full applications instead of just a single function like this one.
Lambda has improved a lot in the last years and added a bunch of features like the ability to change to docker as packaging format, or the usage of layers for the Lucene index, or use EFS.
The deployment model is so different, that tasks like monitoring/observability/log centralization suddenly become more complex again.
Also, testing is a bit more complex, as there is no real end-to-end testing
unless you have deployed your stack or run a local test environment. Most
deployment tools like serverless or AWS own one named sam do have some
local testing options, but I rather would like to codify this within the
java infrastructure. The
sample-apps
GitHub repo mainly contains some hello world testing examples.
Sooooo, two questions remain after this exercise: how could we improve testing and how can we get rid of the startup issue, where it takes 1.5s for the initial request to be answered.
What if the deployment format changed to you could test locally? What if the deployment format is a Docker container. That alone does not solve our problem though - it would need to be something like a web app/server that answers requests. AWS support for Docker images is different though, by using custom runtimes. A custom runtime allows the user to not rely on a provided runtime like java/python/node but to implement their own, including compiling down to binaries like a crystal, rust or go app. However, that comes with a price, that one has to adhere to the rules of the custom runtime. Let’s take a look how this works
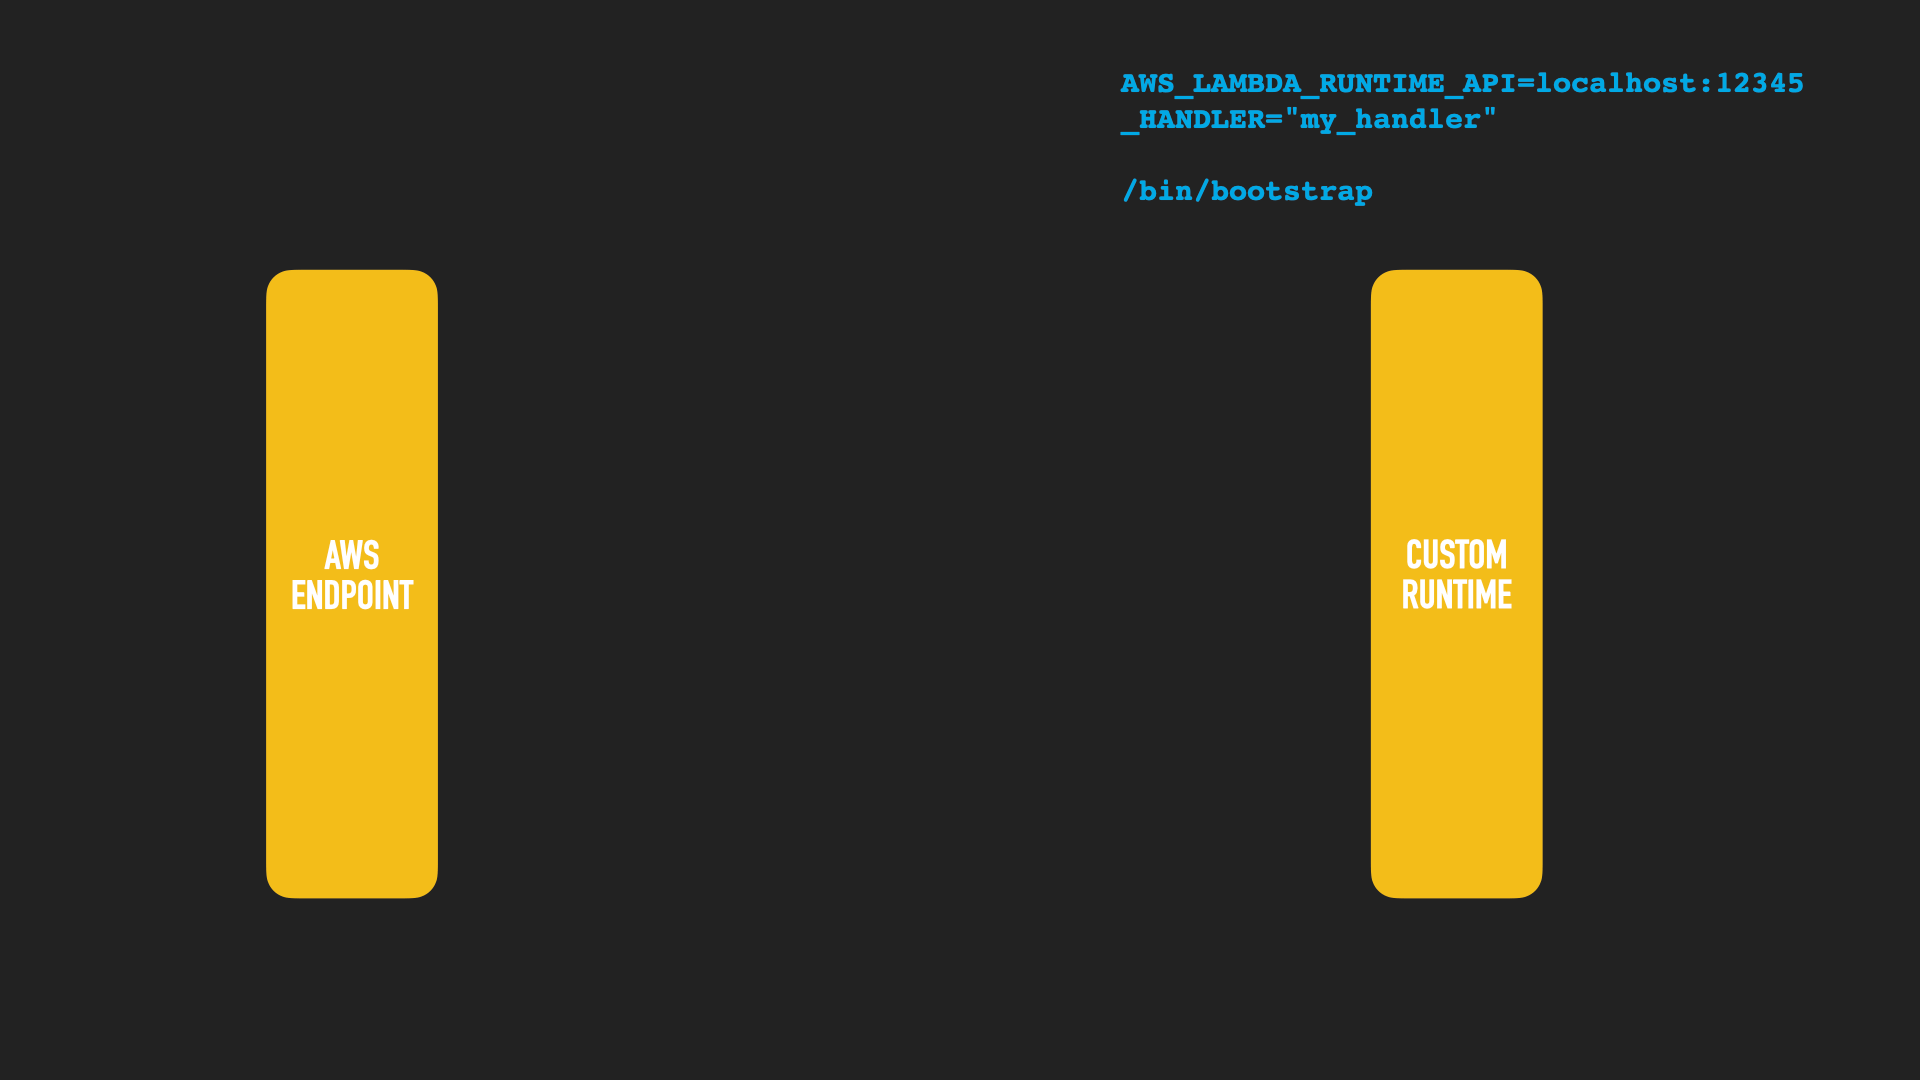
The custom runtime needs to have a /bin/bootstrap binary in its zip
archive. The component calling the runtime will provide environment
variables. One is the _HANDLER that is called in case you ship several
functions, the other one is the endpoint to poll to retrieve the event to
process.
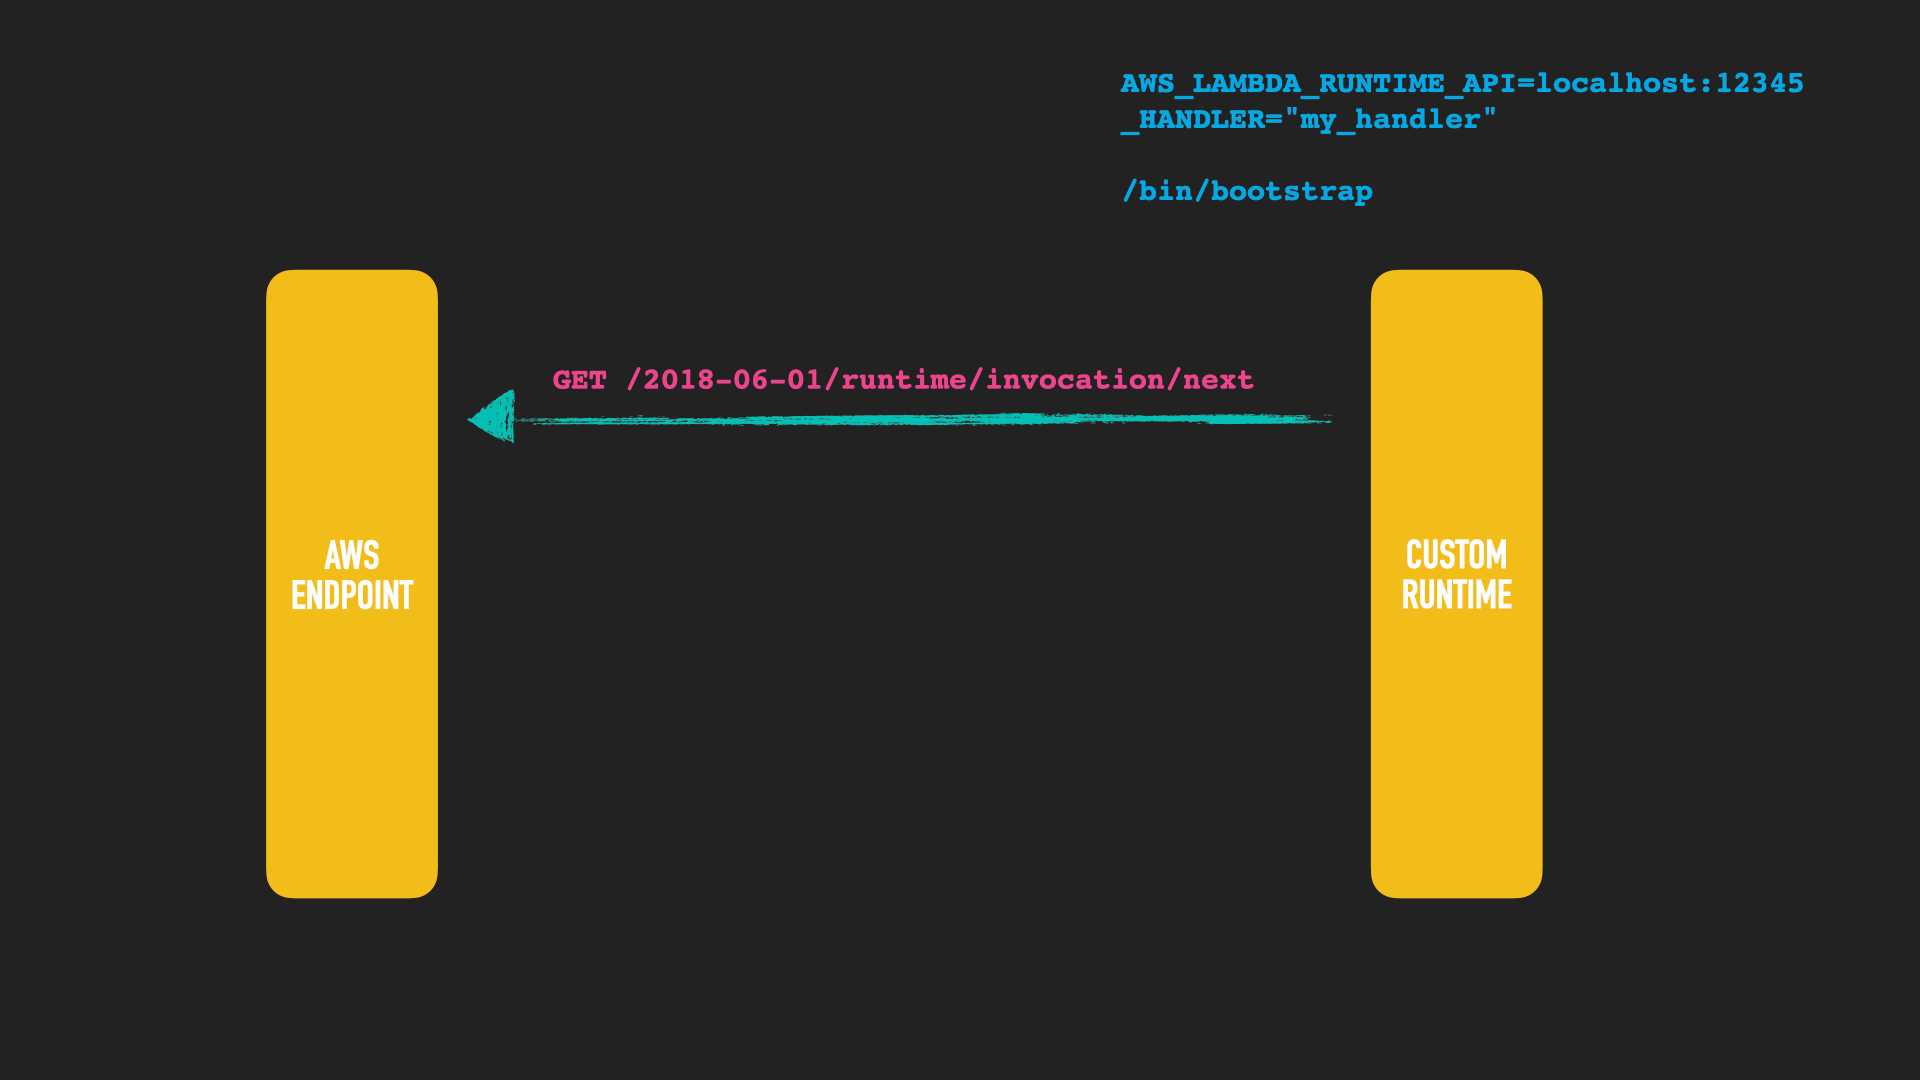
The runtime API needs to fire up a HTTP client and retrieve the next event.
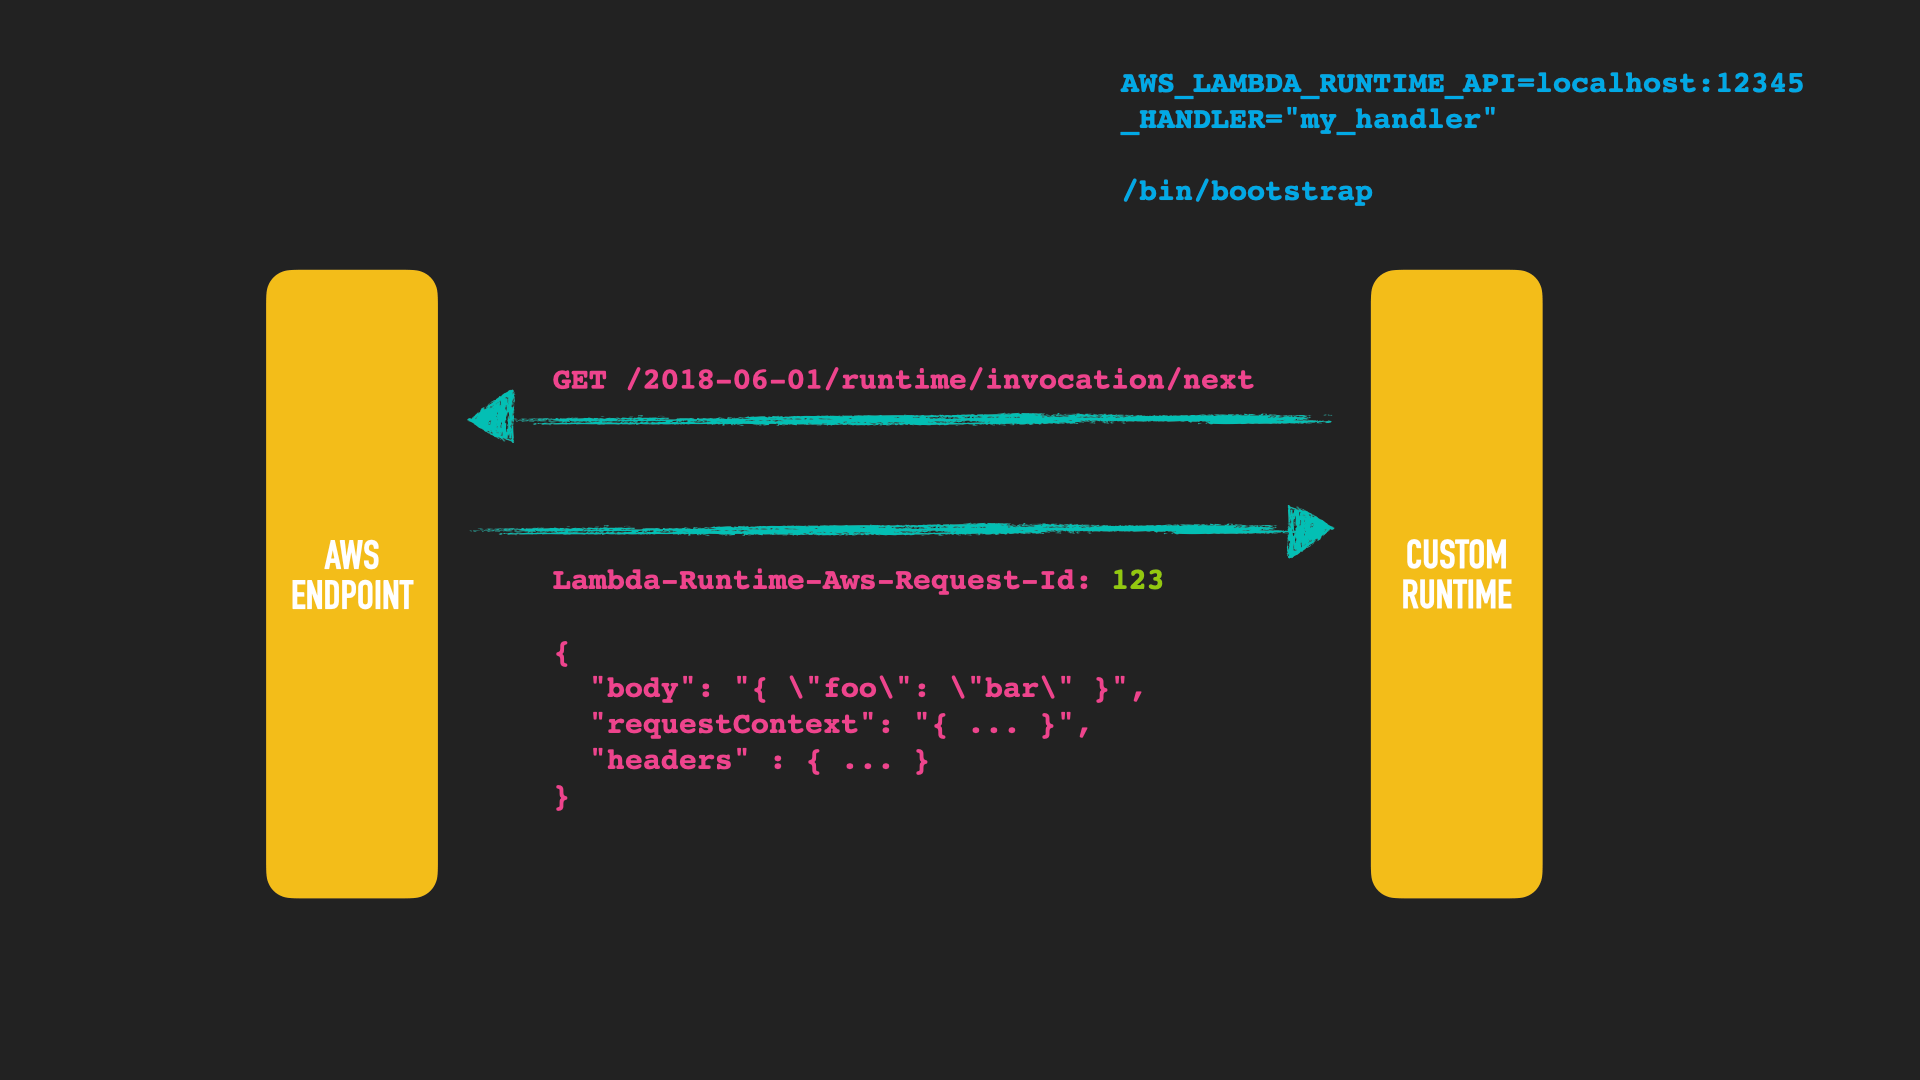
The runtime API responses with the corresponding event data, depending if this is a HTTP server or a an event that has been triggered. The important part here is the header that contains the ID to reference this event, when sending an answer.
The custom runtime will now do its fancy processing.
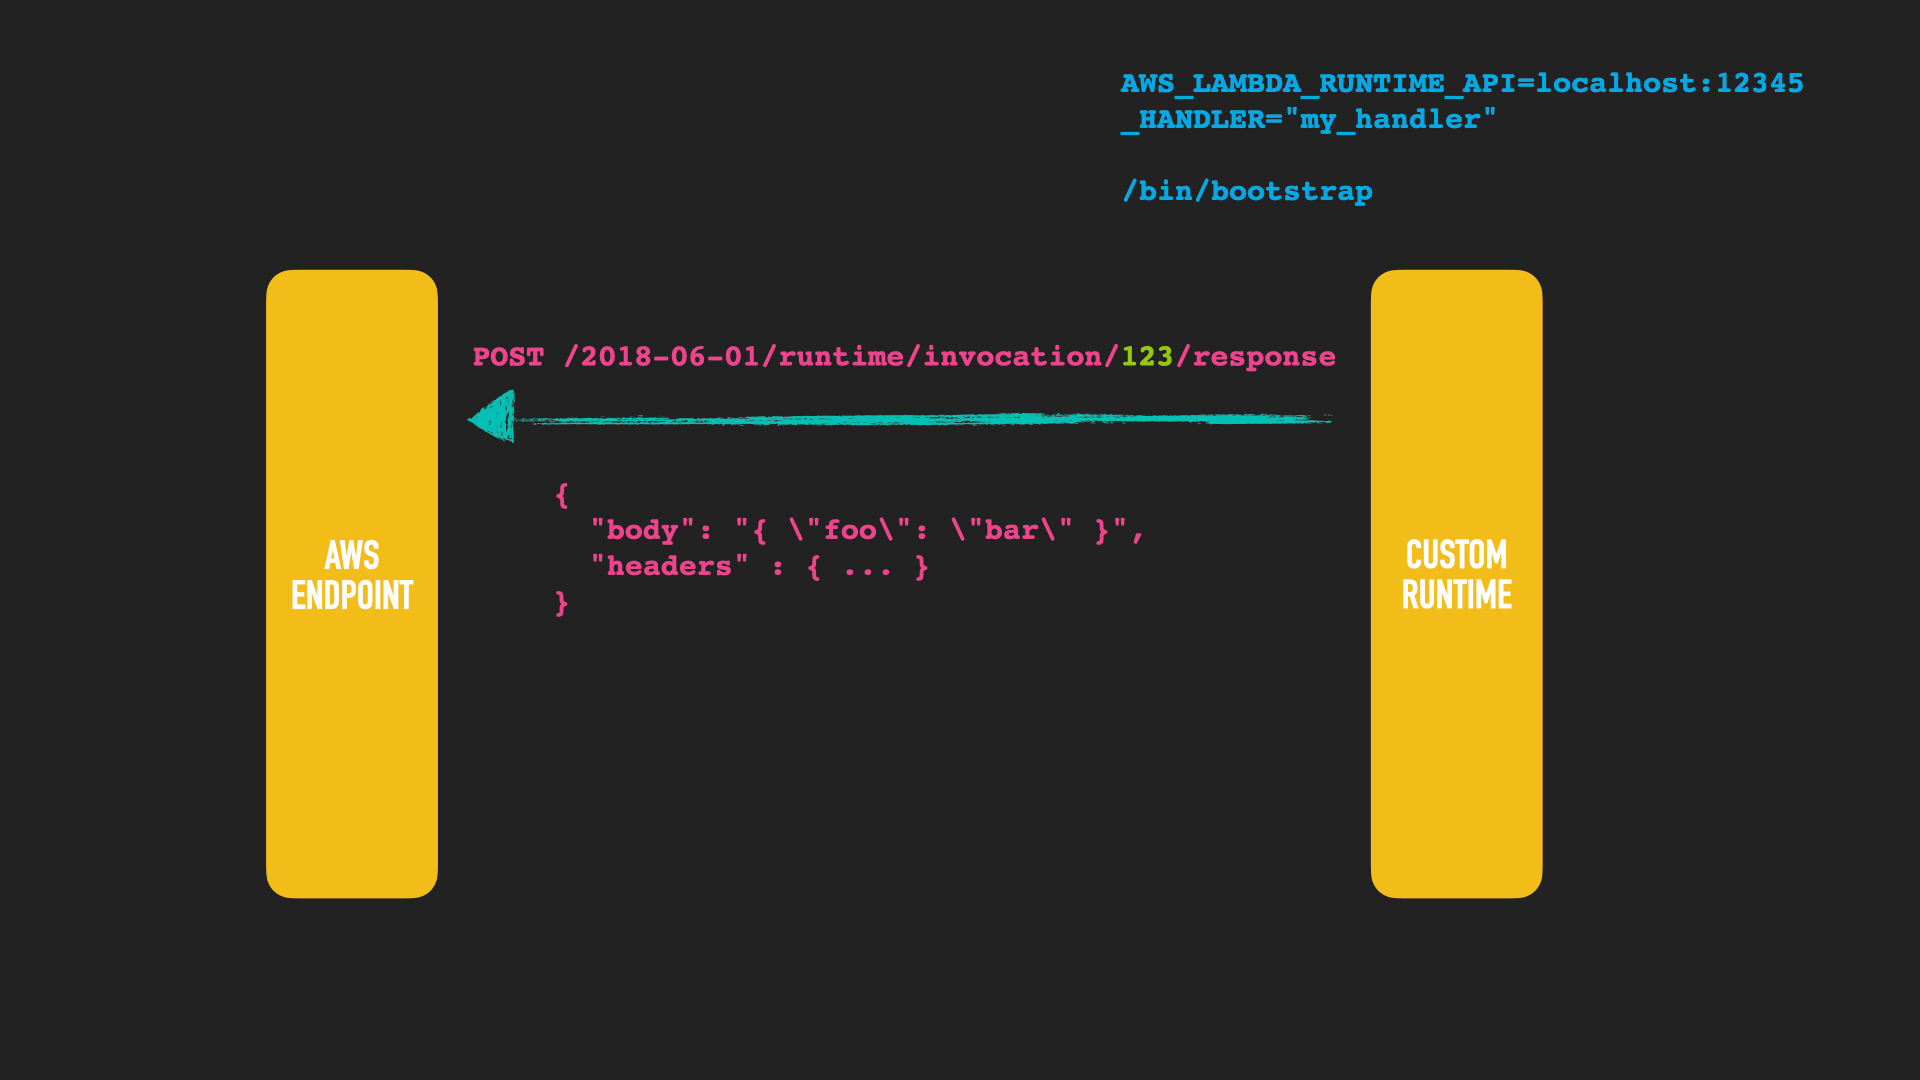
After done with processing another HTTP request is sent to respond with the result. The AWS endpoint should reply with a HTTP 202, that processing was done successfully.
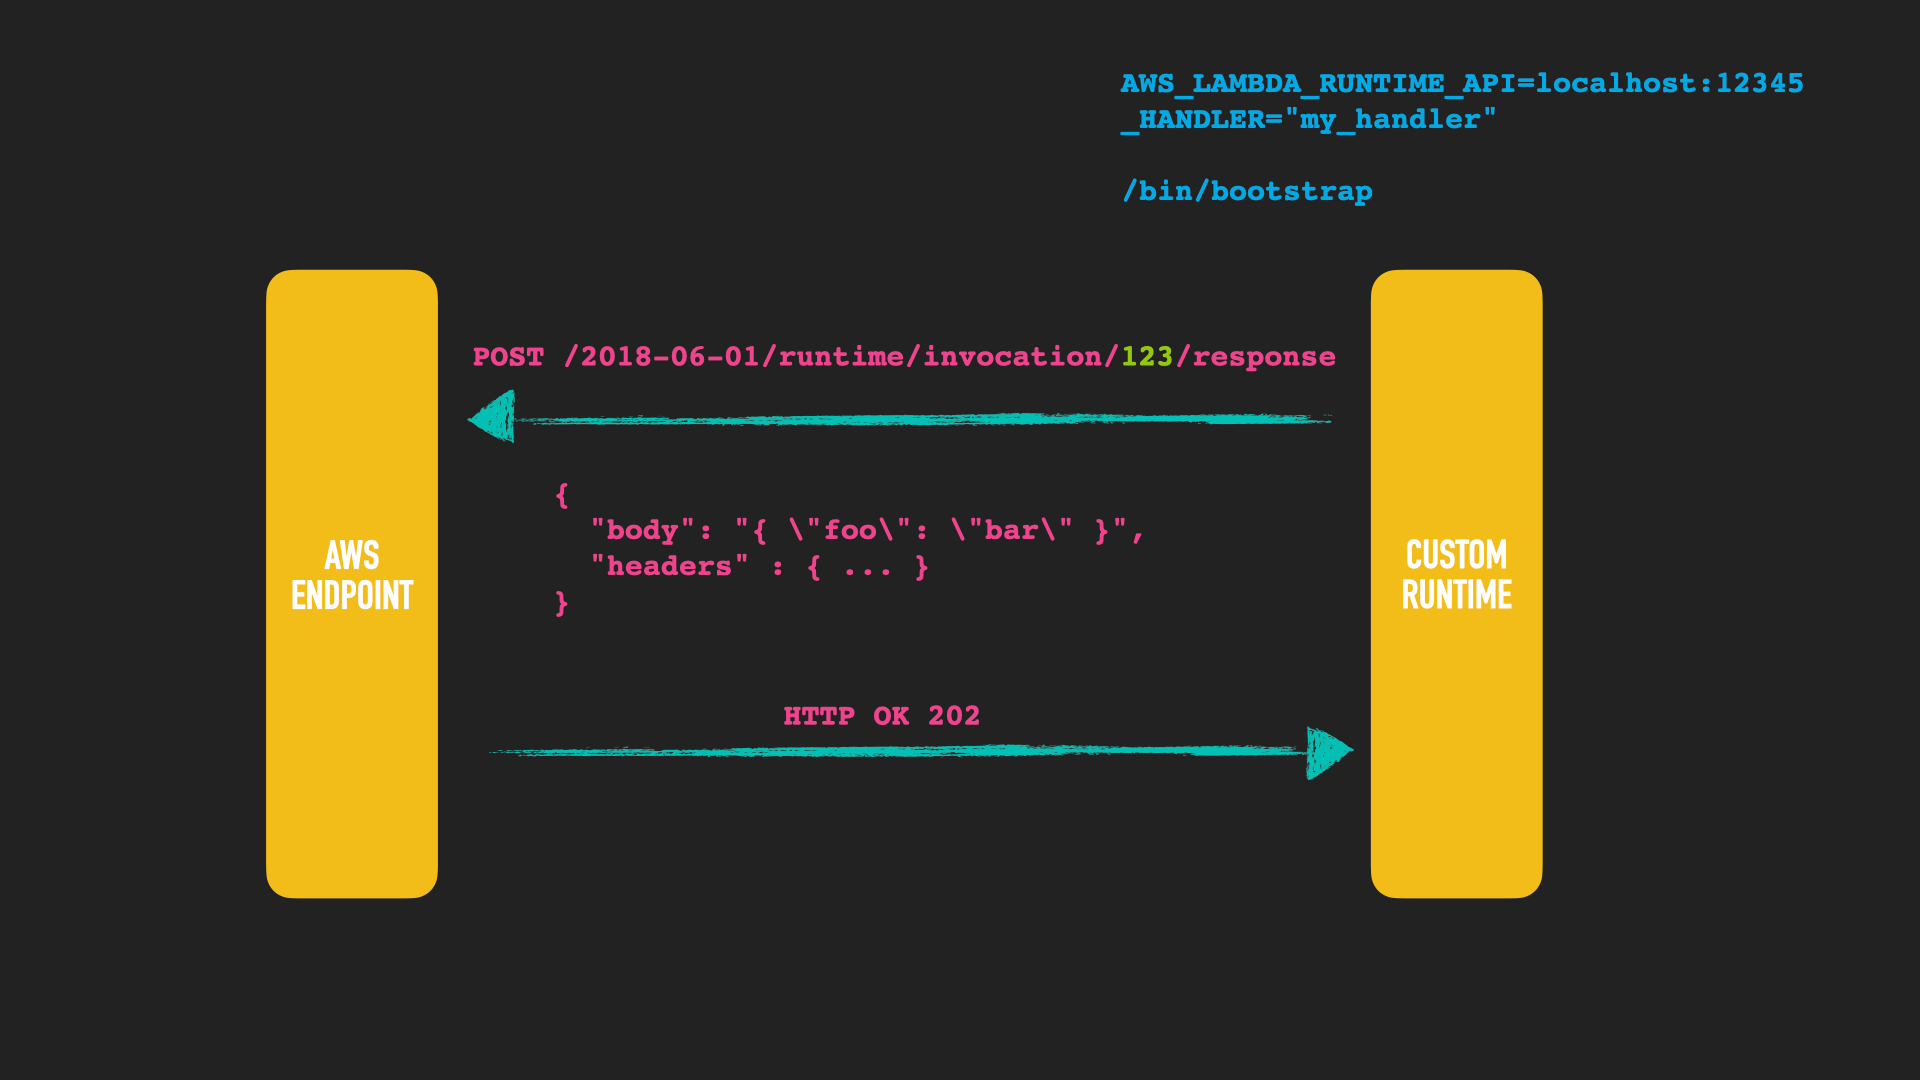
Alternatively you can also sent a processing error that event, so it can potentially be reprocessed.

If the initialization of your lambda fails, you may need to notify the AWS endpoint even before you are able to process an event.

I tried to write a custom runtime with Crystal two years ago and it worked flawless. See this unmaintained GitHub repo.
For java applications however things are different. Bringing your own JDK is not an option, because it would make the lambda package too big and you would not gain any performance. So, another option would be using GraalVM.
Spoiler: I will not create a custom runtime using Graal. If you are interested in that, there are a couple of deserted GitHub projects or the Quarkus Lambda integration as well as the Micronaut Lambda integration, that both seem to have support for custom runtimes.
Using GraalVM to speed up CLI execution
Let’s try to create binary at least for our CLI tool. First, we need to install graalvm, you can do that via sdk
sdk install java 20.3.0.r11-grl
sdk use java 20.3.0.r11-grl
Next up, the cli/build.gradle file needs to be adapted to build a native
image:
nativeImage {
  graalVmHome = System.getProperty('java.home')
  mainClass = 'de.spinscale.cli.CliSearcher'
  executableName = 'cli-searcher'
  outputDirectory = file("$buildDir/bin")
  arguments(
          '--no-fallback',
          '--initialize-at-build-time=de.spinscale,org.apache.lucene',
          '--report-unsupported-elements-at-runtime'
  )
}
Now running ./gradle :cli:nativeImage should build a binary after a
minute, which is available at ./cli/build/bin/cli-searcher. On my macbook
it has a size of about 12 megabytes.
Let’s run it:
./cli/build/bin/cli-searcher $PWD/indexer/build/indices 48.1374 11.5755
returns
Searching for city at lat 48.1374/lon 11.5755
Point is within München, search took 6ms
Searching this a second time will bring down the time down to 0ms - I suppose due to the file system cache. Searching for a point (remember one additional query) takes around 8ms for the first search, but the second one also shows 0ms. So, this is MUCH faster than the JVM version. Time for an unscientific benchmark using hyperfine.
First, let’s test execution speed with the help of the file system cache.
hyperfine --warmup 5 \
  'java -jar cli/build/libs/cli-all-0.0.1.jar indexer/build/indices 48.1374 11.5755' \
  './cli/build/bin/cli-searcher indexer/build/indices 48.1374 11.5755'
results in

So, the JVM version takes a little more than 600 milliseconds to run - this
includes starting up a whole JVM and unpacking the fat jar. Not too bad
actually. However the binary needs less than 10ms. You can see the speed
difference in the last line, about 67x faster on average. That’s quite the
thing. However, the file system cache is of great help here. Running purge
on osx cleans the file system cache, let’s try the same with a cleared FS
cache to show the differences
hyperfine --warmup 5 \
  'java -jar cli/build/libs/cli-all-0.0.1.jar indexer/build/indices 48.1374 11.5755' \
  './cli/build/bin/cli-searcher indexer/build/indices 48.1374 11.5755' \
  --prepare 'sudo purge'
Make sure to run sudo purge once before running hyperfine as you cannot
enter your password into there.

In relative comparison, both are now more similar as they are both slower. The JVM version now needs more than 1.2 seconds to run, where as the binary also needs more than 200ms (400ms mean) and up to 700ms - having a much bigger variance than before.
Morale of the story: Sometimes its not your code allowing for big speedups. Having a binary helps though 😀
Running as a web application
So, let’s move to the final part of this post. I first thought about implementing a custom AWS runtime using Graal - but I am not convinced yet about custom runtimes. You basically run against another black box - that never really changes thanks for AWS strictness. That black box makes sense to poll for arbitrary events like event notifications, s3 bucket notifications or a HTTP request.
However if I all I want to implement is a small HTTP service, this is a bit of overhead, as this could just be a web application.
Luckily a new paradigm compared to cloud functions came along in 2019, namely Google Cloud Run.
The GA announcement was done in September 2019, however it was in beta quite some time before that.
So, why is Google Cloud Run a better fit than a custom runtime? First, the deployment format is well known: a Docker container pushed into a private registry. Second, your application is a regular web application, that exposes a certain port and that’s it - makes it much easier to write, and especially to test! Third, the notion of concurrency is different to functions. Functions need to be triggered for each invocation and run in isolation - one request at a time is processed by a function. Google Cloud Run allows to configure a concurrency per docker container. However this does not mean, that you service is running all the time, it is basically scaled down between requests and cannot run background tasks - just like a regular serverless function.
That said, I still prefer that execution model over lambda - also with all the freedom of running arbitrary code. So, let’s create a small web application around the searcher.
Creating a web application
We will use Jetty based framework Javalin as
webserver. This Webserver class consists of some initialization code and
setting up the Javalin app. The main method looks like this:
public static void main(final String[] args) throws Exception {
    requireNonNull(System.getenv("AUTH_FILE"),
        "environment variable AUTH_FILE not set");
    requireNonNull(System.getenv("INDEX_DIRECTORY"),
        "environment variable INDEX_DIRECTORY not set");
    requireNonNull(System.getenv("PORT"),
        "environment variable PORT not set");

    final Path authFstPath = Paths.get(System.getenv("AUTH_FILE"));
    final Path indexDirectory = Paths.get(System.getenv("INDEX_DIRECTORY"));
    final String portAsString = System.getenv("PORT");

    final Webserver webserver = new Webserver(indexDirectory, authFstPath);

    webserver.start(Integer.parseInt(portAsString));
}
Google Cloud Run will set the PORT environment variable. You can also
configure this when running ./gradlew :webserver:run in the
webserver/build.gradle file:
run {
  environment 'PORT', '7000'
  environment 'AUTH_FILE', 'build/resources/test/auth.fst'
  environment 'INDEX_DIRECTORY', 'build/data'
}
You may ask yourself now, what the AUTH_FILE is for. Well, after a bit of
tinkering around I wanted to have some simple authorization mechanism within
the code, so that the application does not need to lookup user data in a
third party data store. We’ll cover that in the next paragraph. The basic idea is
to again use Lucene for this.
The Javalin application setup looks like this
final AuthFST authFST = AuthFST.readFrom(authFstPath);

this.app = Javalin
    .create(config -> {
        config.showJavalinBanner = false;
        // but useful for billing
        config.requestLogger((ctx, executionTimeMs) -> {
            TokenAccessManager.UserRole role = ctx.attribute("auth-type");
            final String r = role != null ? role.name() : "NOT_AUTHENTICATED";
            logger.info("path[{}], status[{}], role[{}], executionTimeMs[{}]",
                    ctx.path(), ctx.res.getStatus(), r, executionTimeMs);
        });
        config.accessManager(new TokenAccessManager(authFST));
        config.compressionStrategy(CompressionStrategy.NONE);
        config.server(() -> {
            // similar to JettyUtil.getOrDefault but without mbean
            // registration, startup optimization for graal
            return new Server(new QueuedThreadPool(100, 2, 60_000));
        });
    });

app.get("/", ctx -> ctx.redirect("https://website.de"));
app.get("/health", new HealthHandler(), roles(OPERATIONS));
app.post("/search", new SearchHandler(indexDirectory),
    roles(SEARCH_ALLOWED, SEARCH_REJECTED));

// crude catch all exception logger
app.exception(Exception.class, (exception, ctx) -> {
    logger.error("Exception in request [{} {}]",
        ctx.req.getMethod(), ctx.req.getRequestURI(), exception);
});

// clean shutdown
Runtime.getRuntime().addShutdownHook(new Thread(app::stop));
Basically the web server has three endpoints
GET /: This is a redirect to your main website, for sample purposesGET /health: A static handler that returns if the application is ready to serve requestsPOST /search: The logic to run the search
The health handler also requires an authorization HTTP header, even though the handler itself does not contain any auth logic
public class HealthHandler implements Handler {

    private final static String OK_STATE = "{ \"state\" : \"OK\" }";

    @Override
    public void handle(@NotNull final Context ctx) throws Exception {
        ctx.contentType("application/json").result(OK_STATE);
    }
}
The search handler is a little bit more interesting:
public class SearchHandler implements Handler {

  private final Searcher searcher;

  public SearchHandler(final Path indexDirectory) throws IOException {
    searcher = Searcher.getSearcher(indexDirectory);
  }

  @Override
  public void handle(@NotNull final Context ctx) throws Exception {
    final UserRole role = ctx.attribute("auth-type");
    if (UserRole.SEARCH_ALLOWED == role) {
      try {
        JsonValue body = Json.parse(ctx.body());
        double latitude = body.asObject().get("latitude").asDouble();
        double longitude = body.asObject().get("longitude").asDouble();
        final SearchResult result = searcher.search(latitude, longitude);
        if (result.isEmpty()) {
            final JsonObject errorJson = Json.object().add("error",
                    String.format("Could not find location for lat %s/%s",
                    latitude, longitude));
            ctx.contentType("application/json").result(errorJson.toString());
        } else {
            ctx.contentType("application/json")
              .result("{ \"location\" : \"" + result.city + "\" }");
        }
      } catch (Exception e) {
        final JsonObject errorJson = Json.object().add("error",
                String.format("'latitude' and 'longitude' fields required"));
        ctx.contentType("application/json").result(errorJson.toString());
      }
    } else if (UserRole.SEARCH_REJECTED == role) {
        ctx.status(401).contentType("application/json")
          .result("{ \"error\" : \"request rejected.\" }");
    }
  }
}
Based on the user role the search is either allowed or rejected - imagine an unpaid invoice resulting to now allow new searches to be executed.
Otherwise the JSON extraction is similar to the AWS Lambda earlier, returning a JSON response as well.
Now let’s take a look at authorization.
Authentication & Authorization
One of the core principles of running a serverless function is speed. Due to its statelessness you might lose a lot of speed when trying to create something like a session that contains user data to decide if a user is allowed to execute certain actions. Often other components of the FaaS provider are used to cater for this, like Cognito.
My approach here was to include that data as part of the deployment package, just like the geo data.
The helper class used to store the authentication tokens is called an FST, a finite state transducer, which in turn can be stored as a byte array representation on disk.
In case you are wondering why I chose this route, it’s again all about size & speed. Writing 100k random UUIDs as tokens ends up at 6.5 MB on disk in combination with really fast lookups. When using time based UUIDs (whose ids are more similar among each other) I ended up with a 430kb file.
The first class is a helper class to load and search within an FST without exposing that information to the caller.
public class AuthFST {

    private final FST<BytesRef> fst;

    // visible for testing
    AuthFST(final FST<BytesRef> fst) {
        this.fst = fst;
    }

    public static AuthFST readFrom(final Path path) throws IOException {
        final FST<BytesRef> fst = FST.read(path,
            ByteSequenceOutputs.getSingleton());
        return new AuthFST(fst);
    }

    public String find(final String input) {
        try {
            final BytesRef bytesRef = Util.get(fst, new BytesRef(input));
            if (bytesRef == null) {
                return "unknown";
            } else {
                return bytesRef.utf8ToString();
            }
        } catch (IOException e) {
            Javalin.log.error("Error finding input [{}] in FST", input, e);
            throw new RuntimeException("Error finding input [" +
                input + "]: [" + e.getMessage() + "]");
        }
    }
}
The most important method is the readFrom() method to abstract away the
whole FST part from the caller. Here is a test using the AuthFstWriter
class to create an FST
public class AuthFSTTests {

    @TempDir
    public Path folder;

    private AuthFSTWriter writer = new AuthFSTWriter()
                .allowed("allowed-token")
                .rejected("rejected-token")
                .operations("operations-token");

    @Test
    public void testAuthFST() throws Exception {
        final AuthFST authfst = new AuthFST(writer.createFST());
        assertThat(authfst.find("allowed-token")).isEqualTo("allowed");
        assertThat(authfst.find("rejected-token")).isEqualTo("rejected");
        assertThat(authfst.find("operations-token")).isEqualTo("operations");
        assertThat(authfst.find("unknown-token")).isEqualTo("unknown");
    }

    @Test
    public void testWriteAndReadFromDisk() throws Exception {
        final Path fstFile = folder.resolve("file");
        writer.save(fstFile);

        final AuthFST authFST = AuthFST.readFrom(fstFile);
        assertThat(authFST.find("allowed-token")).isEqualTo("allowed");
    }
}
With the ability to store a file on disk that is used for authorization, the
final step is to integrate this into Javalin by implementing a custom
AccessManager
public class TokenAccessManager implements AccessManager {

    public static final String AUTH_ATTRIBUTE_NAME = "auth-type";

    private final AuthFST auth;

    TokenAccessManager(final AuthFST auth) {
        this.auth = auth;
    }

    @Override
    public void manage(@NotNull final Handler handler,
                       @NotNull final Context ctx,
                       @NotNull final Set<Role> permittedRoles)
            throws Exception {
        final String authorization = ctx.header("Authorization");
        if (authorization == null || authorization.length() == 0) {
            ctx.status(403);
        } else {
            final String operation = auth.find(authorization);
            final Role role = UserRole.fromString(operation);
            ctx.attribute(AUTH_ATTRIBUTE_NAME, role);
            if (permittedRoles.contains(role)) {
                handler.handle(ctx);
            } else {
                ctx.status(403);
            }
        }
    }
}
The manage method extracts the Authorization header value, tries to find
corresponding role for that value in the FST and creates an appropriate role
out of that. Lastly we need a Role implementation, named UserRole
enum UserRole implements Role {
    OPERATIONS, SEARCH_ALLOWED, SEARCH_REJECTED, NONE;

    private static Role fromString(final String input) {
        switch (input) {
            case "operations":
                return OPERATIONS;
            case "allowed":
                return SEARCH_ALLOWED;
            case "rejected":
                return SEARCH_REJECTED;
            default:
                return NONE;
        }
    }
}
And here we go, time to test our Javalin webserver with built-in
authorization. You can run ./gradlew :webserver:assemble :webserver:run and
will have a webserver running at port 7000
[main] INFO org.eclipse.jetty.server.Server - Started @508ms
[main] INFO io.javalin.Javalin - Listening on http://localhost:7000/
[main] INFO io.javalin.Javalin - Javalin started in 160ms \o/
Starting up in less than a second is quite nice for java developers 😀
You can now use curl with Basic auth to request endpoints
$ curl localhost:7000/health --header "Authorization: operations-token"
{ "state" : "OK" }
Using that operations token against the search endpoint will fail however
curl -v -X POST localhost:7000/search --header "Authorization: operations-token"
will show a 403 error.
Sooooo, now we have a running web application including the ability to authorize endpoints for certain users without doing any lookups in any external database.
However we still need to roll this out to Google Cloud Run.
Docker container
First step, dockerizing. Let’s go with graal again
FROM oracle/graalvm-ce:20.3.0-java11 AS builder
RUN gu install native-image
ADD build/libs/webserver-all-0.0.1.jar /webserver.jar
RUN native-image -jar /webserver.jar -da -H:+ReportExceptionStackTraces -H:-UseServiceLoaderFeature --report-unsupported-elements-at-runtime --no-fallback --static --initialize-at-build-time /webserver


FROM busybox
WORKDIR /app
# copy binary
COPY --from=builder /webserver /app/webserver
# FST & lucene directory
ADD build/data /app/data
ADD src/test/resources/auth.fst /app/auth.fst
ENTRYPOINT ["/app/webserver"]
# the PORT env var has been omitted here, set by google cloud run
ENV AUTH_FILE="/app/auth.fst" INDEX_DIRECTORY="/app/data/"
Note: This is not a fully independent build, as we are reusing the locally built jar file. This works on my local installation, but would not work on a CI system probably. If you wanted to properly built it there, you would need to build via gradle in the docker file.
Build the image via:
docker build -t spinscale/gcr-serverless-reverse-geocoder:latest .
You probably need to wait a bit as building a graalvm binary within docker can take some time, but after that you can start up your web application via
docker run --init -p 7000:7000/tcp --env 'PORT=7000' \
    spinscale/gcr-serverless-reverse-geocoder:latest
This should fire up our docker container, run the binary and you should be able to execute a search using the proper credentials. A single search now takes only a little bit more than 1ms for a geo shape, similar to our CLI application.
Also the start up time is fast now
[main] INFO org.eclipse.jetty.server.Server - Started @10ms
[main] INFO io.javalin.Javalin - Listening on http://localhost:7000/
[main] INFO io.javalin.Javalin - Javalin started in 9ms \o/
Another building block solved, time to set up Google Cloud Run infrastructure.
Google Cloud Run deployment
I will spare you setting up a project in the google cloud console and enabling Google Cloud Run for that one, please figure that one out yourself.
You may need to allow the gcloud CLI tool access to gcloud via gcloud auth login and then set the correct project via gcloud config set project lucene-reverse-geocoder. I named my project lucene-reverse-geocoder in
the Google Cloud Console
docker tag spinscale/gcr-serverless-reverse-geocoder \
    gcr.io/lucene-reverse-geocoder/gcr-serverless-reverse-geocoder

docker push gcr.io/lucene-reverse-geocoder/gcr-serverless-reverse-geocoder:latest
gcloud run deploy gcr-serverless-reverse-geocoder --image \
  gcr.io/lucene-reverse-geocoder/gcr-serverless-reverse-geocoder:latest \
  --platform managed --region us-east1
Make sure you allow unauthenticated invocations to that endpoint, as we have the security built into our application. The output should look like this:
Deploying container to Cloud Run service [gcr-serverless-reverse-geocoder] in project [lucene-reverse-geocoder] region [us-east1]
✓ Deploying new service... Done.
  ✓ Creating Revision...
  ✓ Routing traffic...
  ✓ Setting IAM Policy...
Done.
Service [gcr-serverless-reverse-geocoder] revision [gcr-serverless-reverse-geocoder-00001-zis] has been deployed and is serving 100 percent of traffic.
Service URL: https://gcr-serverless-reverse-geocoder-wiqsafgikq-ue.a.run.app
Let’s verify the correct behavior via
curl -X POST -v --header "Authorization: allowed-token" \
    https://gcr-serverless-reverse-geocoder-wiqsafgikq-ue.a.run.app/search \
    -d '{"latitude":48.14, "longitude":11.57}'
Looks good to me! Response times are super slick as well. Let’s do another quick unscientific benchmark using hey:
hey -d '{"latitude":48.14, "longitude":11.57}' -n 400 -c 5 -m POST \
  -H "Authorization: allowed-token" \
  https://gcr-serverless-reverse-geocoder-wiqsafgikq-ue.a.run.app/search
The response looks like this:
Summary:
  Total:	9.9249 secs
  Slowest:	0.2234 secs
  Fastest:	0.1174 secs
  Average:	0.1228 secs
  Requests/sec:	40.3025

  Total data:	10800 bytes
  Size/request:	27 bytes

Response time histogram:
  0.117 [1]	|
  0.128 [392]	|■■■■■■■■■■■■■■■■■■■■■■■■■■■■■■■■■■■■■■■■
  0.139 [1]	|
  0.149 [0]	|
  0.160 [0]	|
  0.170 [0]	|
  0.181 [5]	|■
  0.192 [0]	|
  0.202 [0]	|
  0.213 [0]	|
  0.223 [1]	|


Latency distribution:
  10% in 0.1194 secs
  25% in 0.1204 secs
  50% in 0.1219 secs
  75% in 0.1232 secs
  90% in 0.1244 secs
  95% in 0.1255 secs
  99% in 0.1788 secs

Details (average, fastest, slowest):
  DNS+dialup:	0.0006 secs, 0.1174 secs, 0.2234 secs
  DNS-lookup:	0.0001 secs, 0.0000 secs, 0.0042 secs
  req write:	0.0000 secs, 0.0000 secs, 0.0044 secs
  resp wait:	0.1221 secs, 0.1173 secs, 0.2232 secs
  resp read:	0.0001 secs, 0.0000 secs, 0.0002 secs

Status code distribution:
  [200]	400 responses
As you can see via the distribution, 99th percentile was 0.2 seconds. I think that is good enough for our little non-optimized run here. One run took 400ms - I assume that was some kind of startup mechanism.
There’s two more things to Google Cloud Run that I haven’t mentioned yet, but are interesting and different compared two AWS Lambda
- As already mentioned a started instance can process more than one request in parallel. That makes a even more sense if your service waits a lot on I/O
- Billing takes not the number of requests into account, but how long the container runs - so improving your program efficiency and ending up with faster requests makes quite the difference
Google Cloud Run and its architecture looks slightly better to me than AWS Lambda, on the other hand Lambda seems to innovate a lot faster and keeps adding new features - where as Google Cloud Run seems to be pretty much the same since it started. It’s gonna be interesting to watch this space in the future, but as a gray haired Java developer I will probably not bet all my money on any of those serverless services in the future.
Summary
To me, there are a few important points we need to talk about in the context of all of this serverless hypes.
- Economics
- Developer experience
- Operational experience
Economics
Serverless is sold as being economically much more viable because of not wasting any compute resources (k8s anyone?). The reality is a bit more subtle as you probably need to adapt your code and application to that new generation billing model. Another big factor for me is runtime cost (going down) vs. development cost (probably steep at the beginning due to the learning curve). Keep both in mind before going serverless.
One more thing is to always have a calculation handy to compare the break even vs a non serverless model. At some point billing for each request may become more expensive than having a baseline of instances running that will answer thousands of requests per second and only go with FaaS approaches to deal with load spikes.
Developer experience
The elephant in the room for developer experience is the vendor lock-in. I don’t consider that a bad thing per se, but with a provider offering you an execution environment like AWS Lambda it may be more tight than running your services on a few instances - which probably is also costlier.
While testing around I found the deployment model rather important, as a docker image opened completely different ideas like the one mentioned in the last paragraph of the economics variant above. This is only enabled, because you do not need an S3 bucket or a custom runtime for deployment. Also for testing this is much better. Things will be different, the moment you do not have a stateless service, but use other cloud provider services of course.
Operational experience
This is often overlooked but I think this is still lacking somewhat. All your Observability tools might not work at all in a serverless environment - especially if the container is immediately shut down again after a request has been processed (some serverless technologies do not have this problem anymore). As Observability is big market now, that’s a good trick of the different serverless providers to market their own solution and I suppose that will happen over the next months more aggressively.
Apart from the big cloud providers there are a few smaller ones like IOPipe (bought by New Relic), Thundra, Epsagon. I suppose there will be a certain buy-in happening for more of those.
So, is serverless the future for application development? I don’t think so, neither is k8s. Interestingly enough the serverless and the k8s folks don’t seem to like each other. Serverless platform developers from one cloud provider tell their solution architects not to bother with k8s, which is an interesting stance.
I do think that serverless as well as k8 are imperfect on the deployment side. The benchmark here is Heroku, Qovery, Render and DigitalOcean, who all have understood that the infrastructure should not make application development more complex despite keeping the ability to scale.
Check out the GitHub repository
Just a reminder here at the bottom, that all the code is available in a GitHub repository, so you can try it out yourself, if you want.
What’s next?
I have left out a couple of things that you may want to keep in mind
- Only sent a single query and retrieve point/shape as booth
- Observability for graalvm binaries
- Lucene recently got K-nearest-neighbor vector search, which might be another interesting candidate to create serverless functions
- Better support for Lucene read only indices - maybe have the possibility to put those into the class path, so you don’t need an extra directory for this?
Resources
- Presentation: Running A Serverless Lucene Reverse Geocoder
- Whosonfirst
- Configuring Google Cloud Run with Terraform
- Micronaut, Micronaut AWS integration
- Quarkus, Quarkus Lambda Integration
- Serverless Framework
- GraalVM
- Javalin
- hey
Final remarks
If you made it down here, wooow! Thanks for sticking with me. You can follow or ping me on twitter, GitHub or reach me via Email (just to tell me, you read this whole thing :-).
If there is anything to correct, drop me a note, and I am happy to do so and append to this post!
Same applies for questions. If you have question, go ahead and ask!
If you want me to speak about this, drop me an email!