 Alexander Reelsen
Create a custom Tailwind CSS build with Gradle in your Java project
This post is superseded by Create A Custom Tailwind CSS Build With Gradle In Your Java Project (2023 Edition), as the complex setup in this post is no longer needed.
TLDR; This post will show how to create a custom Tailwind CSS build in a Gradle based Java project. This example uses Javalin, but as the final result will be a CSS file that does not really matter. For the Tailwind build we will be using Snowpack to create the final CSS artifact.
Note: I am a backend developer by trade, so if you find anything horrible wrong in here, feel free to ping me - I am more than happy to correct.
Introduction
Bridging the gap between node driven front-end development and Java driven backend development is surprisingly hard, at least for me. This blog post is merely a reminder to myself how to set something like that up and stay sane while doing so. The ever changing technology landscape in the Javascript world makes it rather hard to keep up at times for folks outside of that ecosystem.
Let’s untangle the technology zoo involved today
- Gradle as our build system
- A super small Javalin Web Server
- The node gradle plugin to bridge the Gradle and npm world
- Snowpack to build the frontend classes
- postcss (called via Snowpack) to find needed CSS classes and post-process those
- Tailwind CSS as our CSS toolkit, which seems to be the preferred way of building halfway-ok looking prototypes even if you don’t have any measurable UI skills like I do
- Last but not least, the Tailwind configuration uses purge css, a tool to remove unneeded CSS
That’s quite the list of things to keep in mind, only to end up with a small CSS file, that is optimized for your use-case.
We will start with nothing, create the Gradle and Java project, and once that is up and running, we will start building out the customized CSS in this blog post.
If you want to skip reading my descriptions and dive into the code, please go ahead and check out the GitHub sample repository I created.
Creating a new Gradle project
gradle init --type basic --dsl groovy \
  --project-name javalin-custom-tailwindcss-example
Let’s create a custom build.gradle file
plugins {
  id 'java'
  id 'application'
}

repositories {
  mavenCentral()
}

group = 'de.spinscale.javalin'
version = '0.1.0-SNAPSHOT'

dependencies {
  compile 'io.javalin:javalin:3.13.0'
  // logging
  compile 'org.slf4j:slf4j-simple:1.8.0-beta4'

  // testing intentionally left blank, not part of this example
}
Next, add new directories
mkdir -p src/main/{java,resources/html}
Adding a Javalin endpoint
Before we can add any HTML, let’s add a server in
src/main/java/Server.java
import io.javalin.Javalin;
import io.javalin.http.staticfiles.Location;

public class Server {

  public static void main(String[] args) {
    Javalin app = Javalin.create(config -> {
      config.addStaticFiles("/",
        "build/resources/main/html", Location.EXTERNAL);
    });
    app.start(7000);
  }
}
Let’s add an src/main/resources/html/index.html that uses the default
Tailwind CSS build distributed via common CDNs. I pretty much used the login
sample
<!doctype html>
<html>
<head>
    <meta charset="UTF-8"/>
    <meta name="viewport" content="width=device-width, initial-scale=1.0"/>
    <link rel="stylesheet" href="https://cdnjs.cloudflare.com/ajax/libs/tailwindcss/2.0.3/tailwind.min.css" integrity="sha512-wl80ucxCRpLkfaCnbM88y4AxnutbGk327762eM9E/rRTvY/ZGAHWMZrYUq66VQBYMIYDFpDdJAOGSLyIPHZ2IQ==" crossorigin="anonymous" />
</head>
<body>

<div class="min-h-screen flex items-center justify-center bg-gray-50 py-12 px-4 sm:px-6 lg:px-8">
    <div class="max-w-md w-full space-y-8">
        <div>
            <h2 class="mt-6 text-center text-3xl font-extrabold text-gray-900">
                Sign in
            </h2>
        </div>
        <form class="mt-8 space-y-6" action="#" method="POST">
            <input type="hidden" name="remember" value="true">
            <div class="rounded-md shadow-sm -space-y-px">
                <div>
                    <label for="email-address" class="sr-only">Email address</label>
                    <input id="email-address" name="email" type="email" autocomplete="email" required class="appearance-none rounded-none relative block w-full px-3 py-2 border border-gray-300 placeholder-gray-500 text-gray-900 rounded-t-md focus:outline-none focus:ring-indigo-500 focus:border-indigo-500 focus:z-10 sm:text-sm" placeholder="Email address">
                </div>
                <div>
                    <label for="password" class="sr-only">Password</label>
                    <input id="password" name="password" type="password" autocomplete="current-password" required class="appearance-none rounded-none relative block w-full px-3 py-2 border border-gray-300 placeholder-gray-500 text-gray-900 rounded-b-md focus:outline-none focus:ring-indigo-500 focus:border-indigo-500 focus:z-10 sm:text-sm" placeholder="Password">
                </div>
            </div>

            <div>
                <button type="submit" class="group relative w-full flex justify-center py-2 px-4 border border-transparent text-sm font-medium rounded-md text-white bg-indigo-600 hover:bg-indigo-700 focus:outline-none focus:ring-2 focus:ring-offset-2 focus:ring-indigo-500">
          <span class="absolute left-0 inset-y-0 flex items-center pl-3">
            <!-- Heroicon name: solid/lock-closed -->
            <svg class="h-5 w-5 text-indigo-500 group-hover:text-indigo-400" xmlns="http://www.w3.org/2000/svg" viewBox="0 0 20 20" fill="currentColor" aria-hidden="true">
              <path fill-rule="evenodd" d="M5 9V7a5 5 0 0110 0v2a2 2 0 012 2v5a2 2 0 01-2 2H5a2 2 0 01-2-2v-5a2 2 0 012-2zm8-2v2H7V7a3 3 0 016 0z" clip-rule="evenodd" />
            </svg>
          </span>
                    Sign in
                </button>
            </div>
        </form>
    </div>
</div>
</body>
</html>
Let’s test this by running ./gradlew run - which requires one last bit of
configuration in the build.gradle file, by appending
application {
  mainClassName = 'Server'
}
When you open http://localhost:7000 you will see
that the tailwind.min.css file is a whopping 2.7 megabytes in size, despite us
using only a small part of this.
Let’s create a custom build!
Adding the css sub project
First, let’s add a sub project, that is doing all this fancy CSS creation to
keep the main Java project clean. Change the settings.gradle file to the
following to refer to a sub project
rootProject.name = 'javalin-custom-tailwindcss-example'

include 'css'
Now run mkdir css and create a css/build.gradle file
plugins {
  id "com.github.node-gradle.node" version "3.0.1"
}

node {
  // current LTS release
  version = "14.15.5"
  download = true
}

// build css and put it into resources directory
task build(type: NpxTask) {
  dependsOn npmInstall
  command = './node_modules/.bin/snowpack'
  args = ['build']
  onlyIf {
    File destFile   = file("$projectDir/build/src/project.css")
    File sourceFile = file("$projectDir/src/project.css")

    if (!destFile.exists()) {
      return true
    }

    return sourceFile.lastModified() > destFile.lastModified()
  }
}
The build task tries to be a little bit smart and only builds the CSS file,
if there have been changes. This does not work for all cases, but was
usually good enough for me. It might make sense to have buildForce task,
that does not contain the onlyIf part so you can always build your CSS
file.
Now comes the fun part - wiring all the Javascript magic together (magic for me, not for any average web developer, who knows what happens there).
Setting up the Tailwind build using Snowpack
The Gradle sub project configures the Gradle node plugin, which will take
care of downloading nodejs, and adds a npx task running Snowpack to build
our CSS file. Before being able to run this, we need to configure a couple
of more files for nodejs. First and foremost, the css/package.json file
defining dependencies.
{
  "name": "css",
  "description": "tooling to create a custom Tailwind build",
  "scripts": {
    "build": "./node_modules/.bin/snowpack build"
  },
  "devDependencies": {
    "@snowpack/plugin-postcss": "1.1.0",
    "@tailwindcss/typography": "0.4.0",
    "autoprefixer": "10.2.4",
    "cssnano": "4.1.10",
    "postcss": "8.2.6",
    "postcss-cli": "8.3.1",
    "postcss-fail-on-warn": "0.1.0",
    "postcss-import": "14.0.0",
    "snowpack": "3.0.11",
    "tailwindcss": "2.0.3"
  }
}
If you look in the css/build.gradle file, the build depends on the
npmInstall task, so we are safe, that those dependencies will be
installed. The next step is the configuration of Snowpack. In case you
never heard of it like me, it’s tagline is Snowpack is a modern,
lightweight tool chain for web application development. - and seems to be
faster than other tools. It also allows for dev environments with auto
reload in the browser, however I did not choose that option, but just wanted
my CSS file to be created. Let’s create a css/snowpack.config.js file
module.exports = {
  plugins: [
    "@snowpack/plugin-postcss"
  ],
  mount: {
    "src": "/src"
  }
}
Snowpack uses the postcss plugin, which is doing all the hard CSS work and
will use the src directory as its input.
What is postcss you may ask. What an excellent question!
postcss is a tool for transforming CSS with
JavaScript. Let’s add a css/postcss.config.js file
module.exports = {
  plugins: [
    require('tailwindcss'),
    require('postcss-fail-on-warn'),
    require('postcss-import'),
    require('autoprefixer'),
    require('cssnano'),
  ]
}
So, let’s take a closer look at this configuration and what this does.
First, the tailwindcss plugin is the part that will create the custom
build. The postcss-fail-on-warn plugin will do what its name says to
prevent leniency. In order to support @import rules in CSS file, we need
to use the postcss-import plugin. We will use this feature in the main CSS
file later. The autoprefixer plugin creates vendor specific CSS prefixes
as far as I have understood - something I never care for when just writing
prototypes, but is handy when going to production. Finally
cssnano minifies your CSS. You might
want to remove that one for testing.
We are not done yet however! The final configuration file that needs to be
created is for the custom Tailwind built. It’s aptly named
css/tailwind.config.js
module.exports = {
  purge: [
    '../src/main/resources/html/**/*html',
    './src/**/*.html',
  ],
  darkMode: false, // or 'media' or 'class'
  theme: {
    extend: {},
  },
  variants: {
    extend: {},
  },
  plugins: [
    require('@tailwindcss/typography'),
  ],
}
Now this configuration is important, as this contains one of the few
custom configurations. You can see the purge parameter list in the
configuration file, that refers to the HTML directory of the root
project from Javalin and would need to be changed if you switch to a
different templating engine or path. This array resembles the list of
directories and files to process and search for CSS classes being used, that
are collected to create the minimal possible CSS build.
Also, if you are creating classes somehow programmatically, so that
information cannot be extracted from the templates, you can specify those in
a file in the css/src/ directory and thus end up with those classes as
well.
On top of that, Tailwind has a modular system as well. In the above example I am using the tailwind typography plugin. If you ever want to render markdown, you can use prose classes from that typography plugin to get sane default markdown styles.
The moment you use Tailwind plugins and you stick to the default built, you would need to add more external style sheets to your project. Another advantage of this building approach.
Don’t fret, we’re almost there now!
The last step is to write a custom CSS file with your own custom classes in
as css/src/project.css - don’t forget to run mkdir css/src first.
@tailwind base;
@tailwind components;
@tailwind utilities;

.my-title {
  @apply mt-6 text-center text-3xl font-extrabold text-gray-900
}
This way you can now use my-title as a class for the <h2> being used in
our HTML, making your own HTML much more readable.
OK, let’s give this a spin now and see if we get a fancy CSS file as a result!
Run this in the main directory of your application
./gradlew :css:build
Running this should show output similar to this
> Task :css:npmInstall

> esbuild@0.8.46 postinstall /private/tmp/x/css/node_modules/esbuild
> node install.js

npm notice created a lockfile as package-lock.json. You should commit this file.
npm WARN css@ No repository field.
npm WARN css@ No license field.

added 365 packages from 199 contributors and audited 365 packages in 7.13s

49 packages are looking for funding
  run `npm fund` for details

found 0 vulnerabilities


> Task :css:build
[snowpack] ! building source files...
[snowpack] ✔ build complete [4.99s]
[snowpack] ! verifying build...
[snowpack] ✔ verification complete [0.00s]
[snowpack] ! writing build to disk...
[snowpack] watching for changes...

BUILD SUCCESSFUL in 19s
3 actionable tasks: 3 executed
You should end up with a file in css/build/src/project.css - and that
should be rather small, in my case it was 7.6kb (uncompressed). Which is a
nice reduction from 2.7 megabytes.
Allow Javalin app to use the CSS file
Finally, let’s do two changes to our src/main/resources/html/index.html
file. First, let’s use the my-title class.
<h2 class="my-title">
    Sign in
</h2>
Second, we still need to put the CSS class into a proper directory, so it gets loaded by Javalin. Running
find . -name "project.css"
You will see, that the CSS file is only in the css/ sub directory, but not
in the resources directory of the root project. There are several (probably
cleaner) ways to fix this, I went with the following in the build.gradle
file
task copyCssFile(type: Copy) {
  dependsOn ':css:build'
  from 'css/build/src/project.css'
  into 'build/resources/css'
}
compileJava.dependsOn 'copyCssFile'
I know that compileJava is not the best dependency stage here, one could
also put this into the assemble part, but this ensures everything is there
when ./gradlew run is called.
After running ./gradlew copyCssFile you should end up with the file in
build/resources/css/project.css. Again, let’s go simple here for the sake
of example, usually you would make this more configurable. Now
src/main/java/Server.java looks like this
import io.javalin.Javalin;
import io.javalin.http.staticfiles.Location;

public class Server {

  public static void main(String[] args) {
    Javalin app = Javalin.create(config -> {
      config.addStaticFiles("/", "build/resources/main/html",
        Location.EXTERNAL);

      config.addStaticFiles("/css", "build/resources/css",
        Location.EXTERNAL);
    });
    app.start(7000);
  }
}
The final bit would be to replace the style sheet link in src/main/resources/html/index.html:
<link rel="stylesheet" href="/css/project.css" />
Rerunning ./gradlew run will now deliver a nice and tiny customized build
of Tailwind CSS to your customers!
Summary
Let’s follow the call stack of ./gradlew :css:build one more time
- Gradle starts
- Gradle node plugin checks if node is installed
- Gradle node plugin runs
npm install - Gradle node plugin runs Snowpack, if the CSS file in the CSS directory is newer than the CSS file in the build directory. Note that this may not catch changes in the templates
- Snowpack runs postcss
- postcss creates custom Tailwind build, that only includes those CSS classes that are found in the files configured
- postcss minifies CSS, autoprefixes CSS (for different browsers), postcss also exits early on errors instead of you wondering why the color you configured is not valid.
So this is the graph I came up with to visualize this to myself
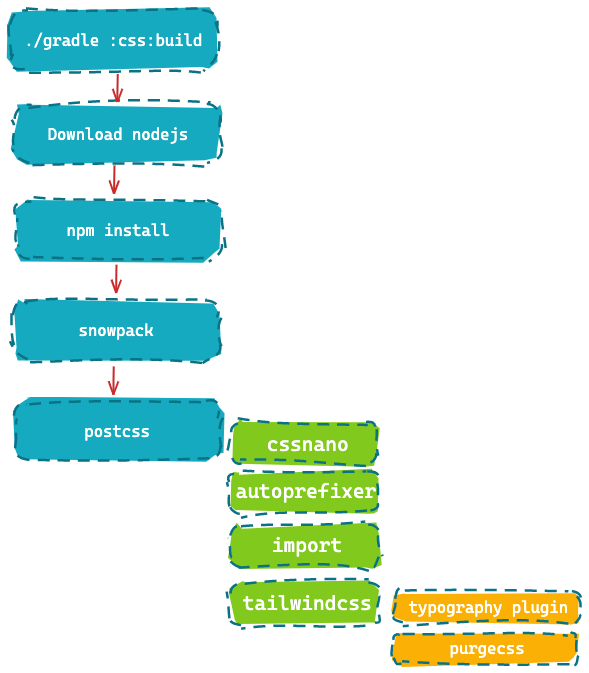
As you can see, there is a lot of passing down responsibilities until we hit the final step to strip all unneeded CSS classes.
One more thing: I have done Snowpack very wrong in this example. Snowpack is a much more powerful solution than just a caller to postcss. It’s a really fast JS bundler, that can be combined with livereload to instantly update when you change your source files. If you ever write single page applications, taking a look at Snowpack might be well spent time. That said, in this example it is unfortunately only a CSS creation tool.
Also, Snowpack has proxying options via its routing functionality. Unfortunately I was not able to get this up and running with my java application, so that I took the less developer friendly route of static CSS generation. If you want to dig deeper into this, I am happy to retrieve a PR for the GitHub repository.
Do I like all of this? Hell no, it feels overly complex to me! Do I see any other option? Not really… so for now, this post reminds me of the different steps to jump through, to have a custom built.
As I have not found a ton of resources for creating your custom CSS builds within a Java project I keep myself asking if I am doing something terribly wrong, or if everyone is doing things differently and thus does not want to talk about it. If you know more, I am more than happy to be enlightened about what is the best approach to solve this issue.
This post is superseded by Create A Custom Tailwind CSS Build With Gradle In Your Java Project (2023 Edition), as the complex setup in this post is no longer needed.
Resources
Final remarks
If you made it down here, wooow! Thanks for sticking with me. You can follow or ping me on twitter, GitHub or reach me via Email (just to tell me, you read this whole thing :-).
If there is anything to correct, drop me a note, and I am happy to do so and append to this post!
Same applies for questions. If you have question, go ahead and ask!
If you want me to speak about this, drop me an email!