 Alexander Reelsen
Understanding the Elasticsearch Percolate Query
TLDR; This blog post dives into the percolate query of Elasticsearch. This mechanism allows you to classify or tag documents based on registered queries. What sounds weird at first is a powerful mechanism which we will dive into throughout this post.
Why do I need percolation?
This is the hardest part about the percolate feature. Because it flips the relationship between document and query around, it’s hard to understand this when reading it for the first time or get it explained. Let’s try with some use-cases
- You are running a a news website and want to deliver ads with every article that you are rendering. It probably makes sense that an article about cars delivers ads that have something to do with mobility. If an article is about health, maybe show some healthy food or sports clothes.
- You are running an online marketplace for used cars. Users are typing in their criteria for a car, but are not happy with the shown cars. You are allowing them to register an alert to sent out a notification once a proper car matching their requirements is added to your list of cars.
- You are running a shop. The user clicks on a product that is out of stock. You want to make sure that the user is notified once that product is back in stock.
The concept is similar for many other use cases: dating platforms, job platforms - whenever a notification mechanism is required once a new document has been added to your data that matches the requirements of a user.
The basic idea here is, that you are storing a query with parameters like
brand:bmw AND model:330e AND price < 35000 AND region:Munichproduct_id:XYZ AND stock:>1
and whenever a document matches one of those queries, you would like to notify the user who stored that query.
That is basically what percolation is. So instead of storing documents and running queries against it, percolation requires to store queries and run documents against it. This is the reason why it is often referred as flipping around query and documents.
Back in the days[tm] there used to exist a dedicated percolate API, where as nowadays the percolator is implemented as a custom query. This makes it some times even more complex to understand the basic concept because it is looking like all the other queries.
Understanding the concept
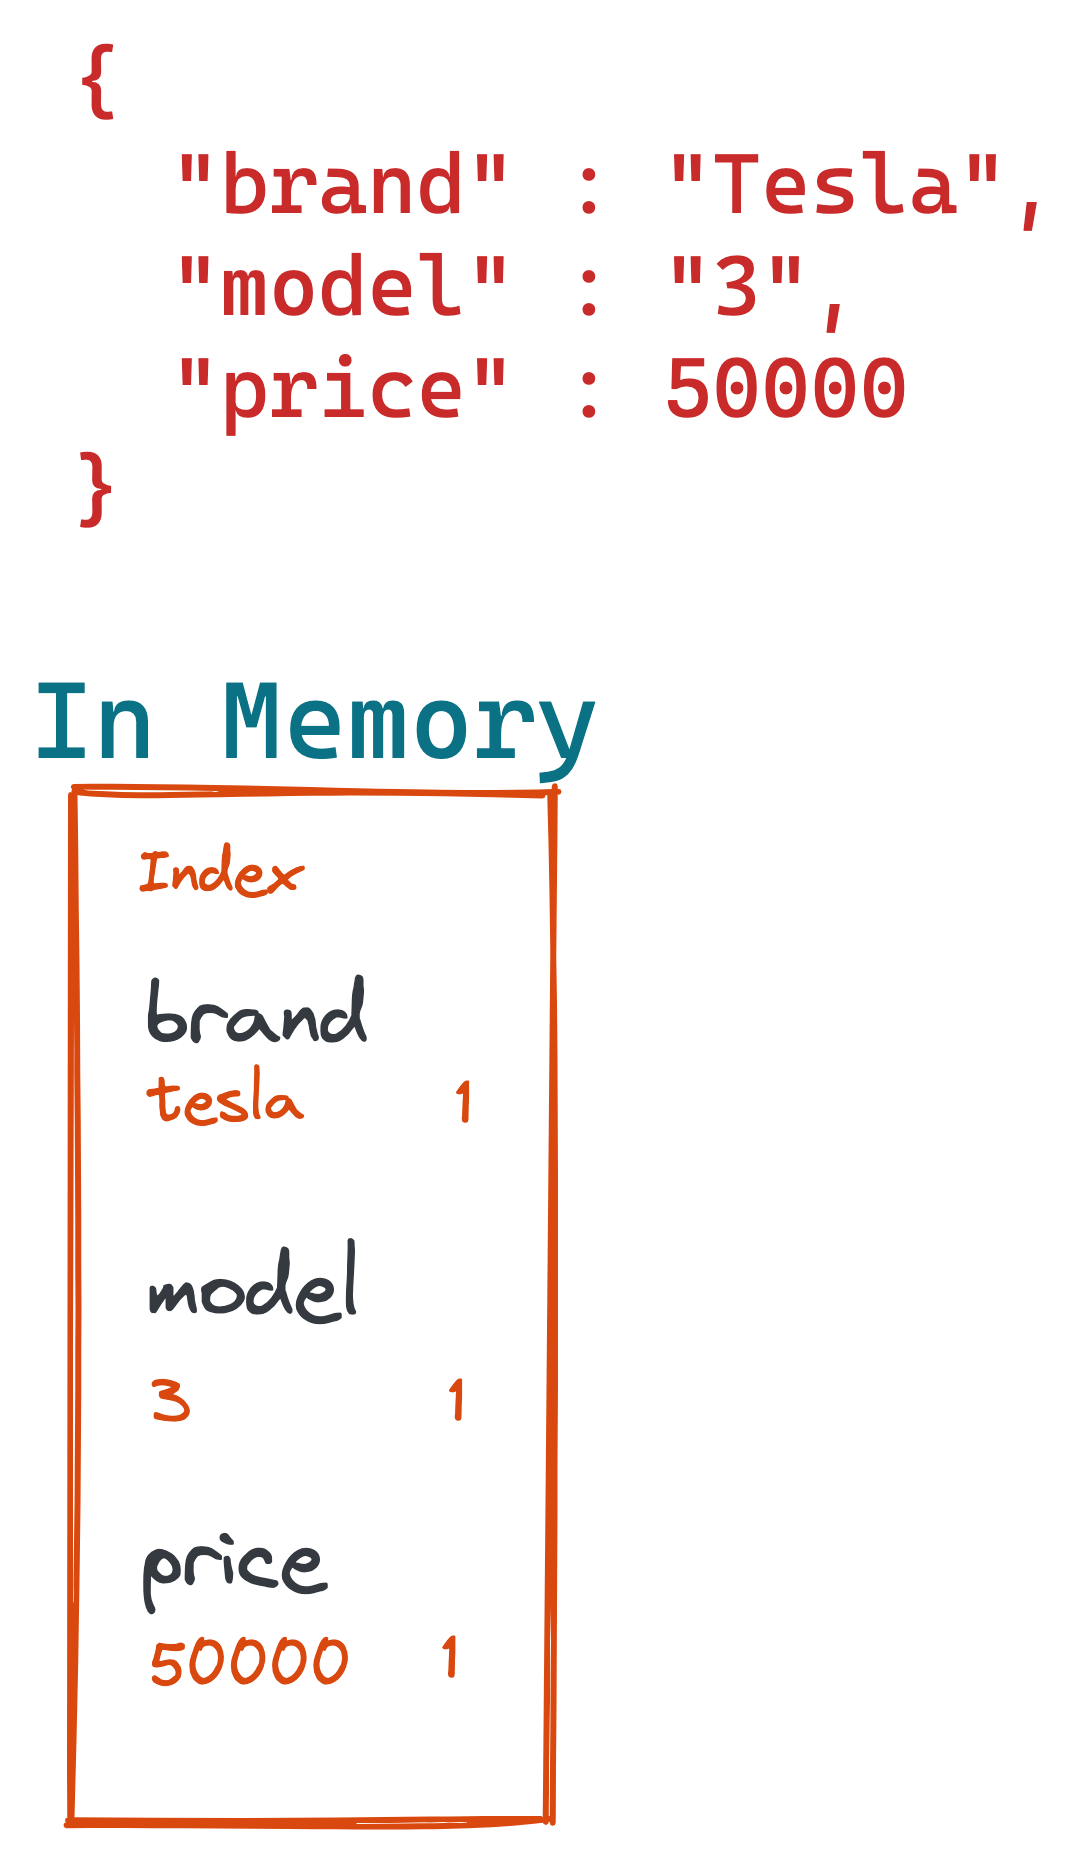
So, let’s take a look what happens at percolation. For this example we will take the car ads use-case. A user has saved a query to search for a certain car criteria. At some point a new Tesla Model 3 comes in, which JSON representation looks like this
{
  "brand": "Tesla",
  "model" : "3",
  "price": 60000
}
Let’s ignore that this is an incomplete document missing many fields like the region (probably the most common filter) and all of its features.
The representation in the inverted index, together with other cars would probably look like this:
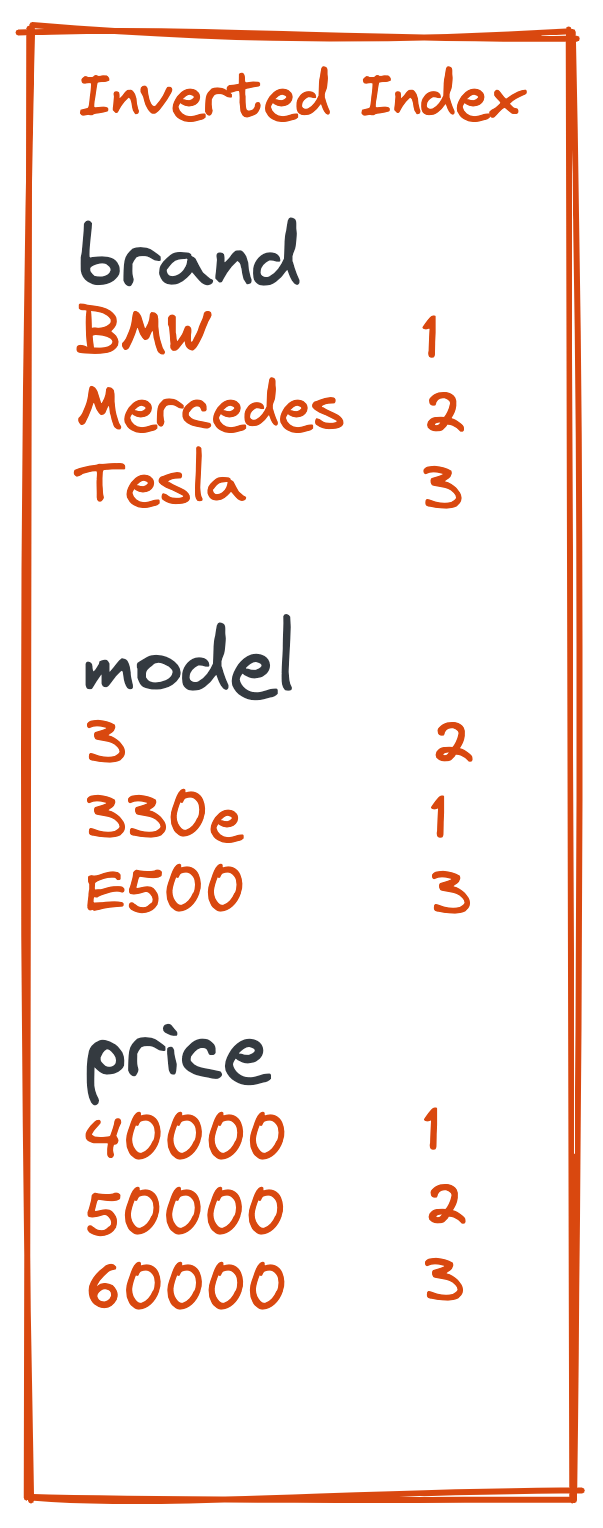
The above inverted index contains three cars and three fields. A search might look like this
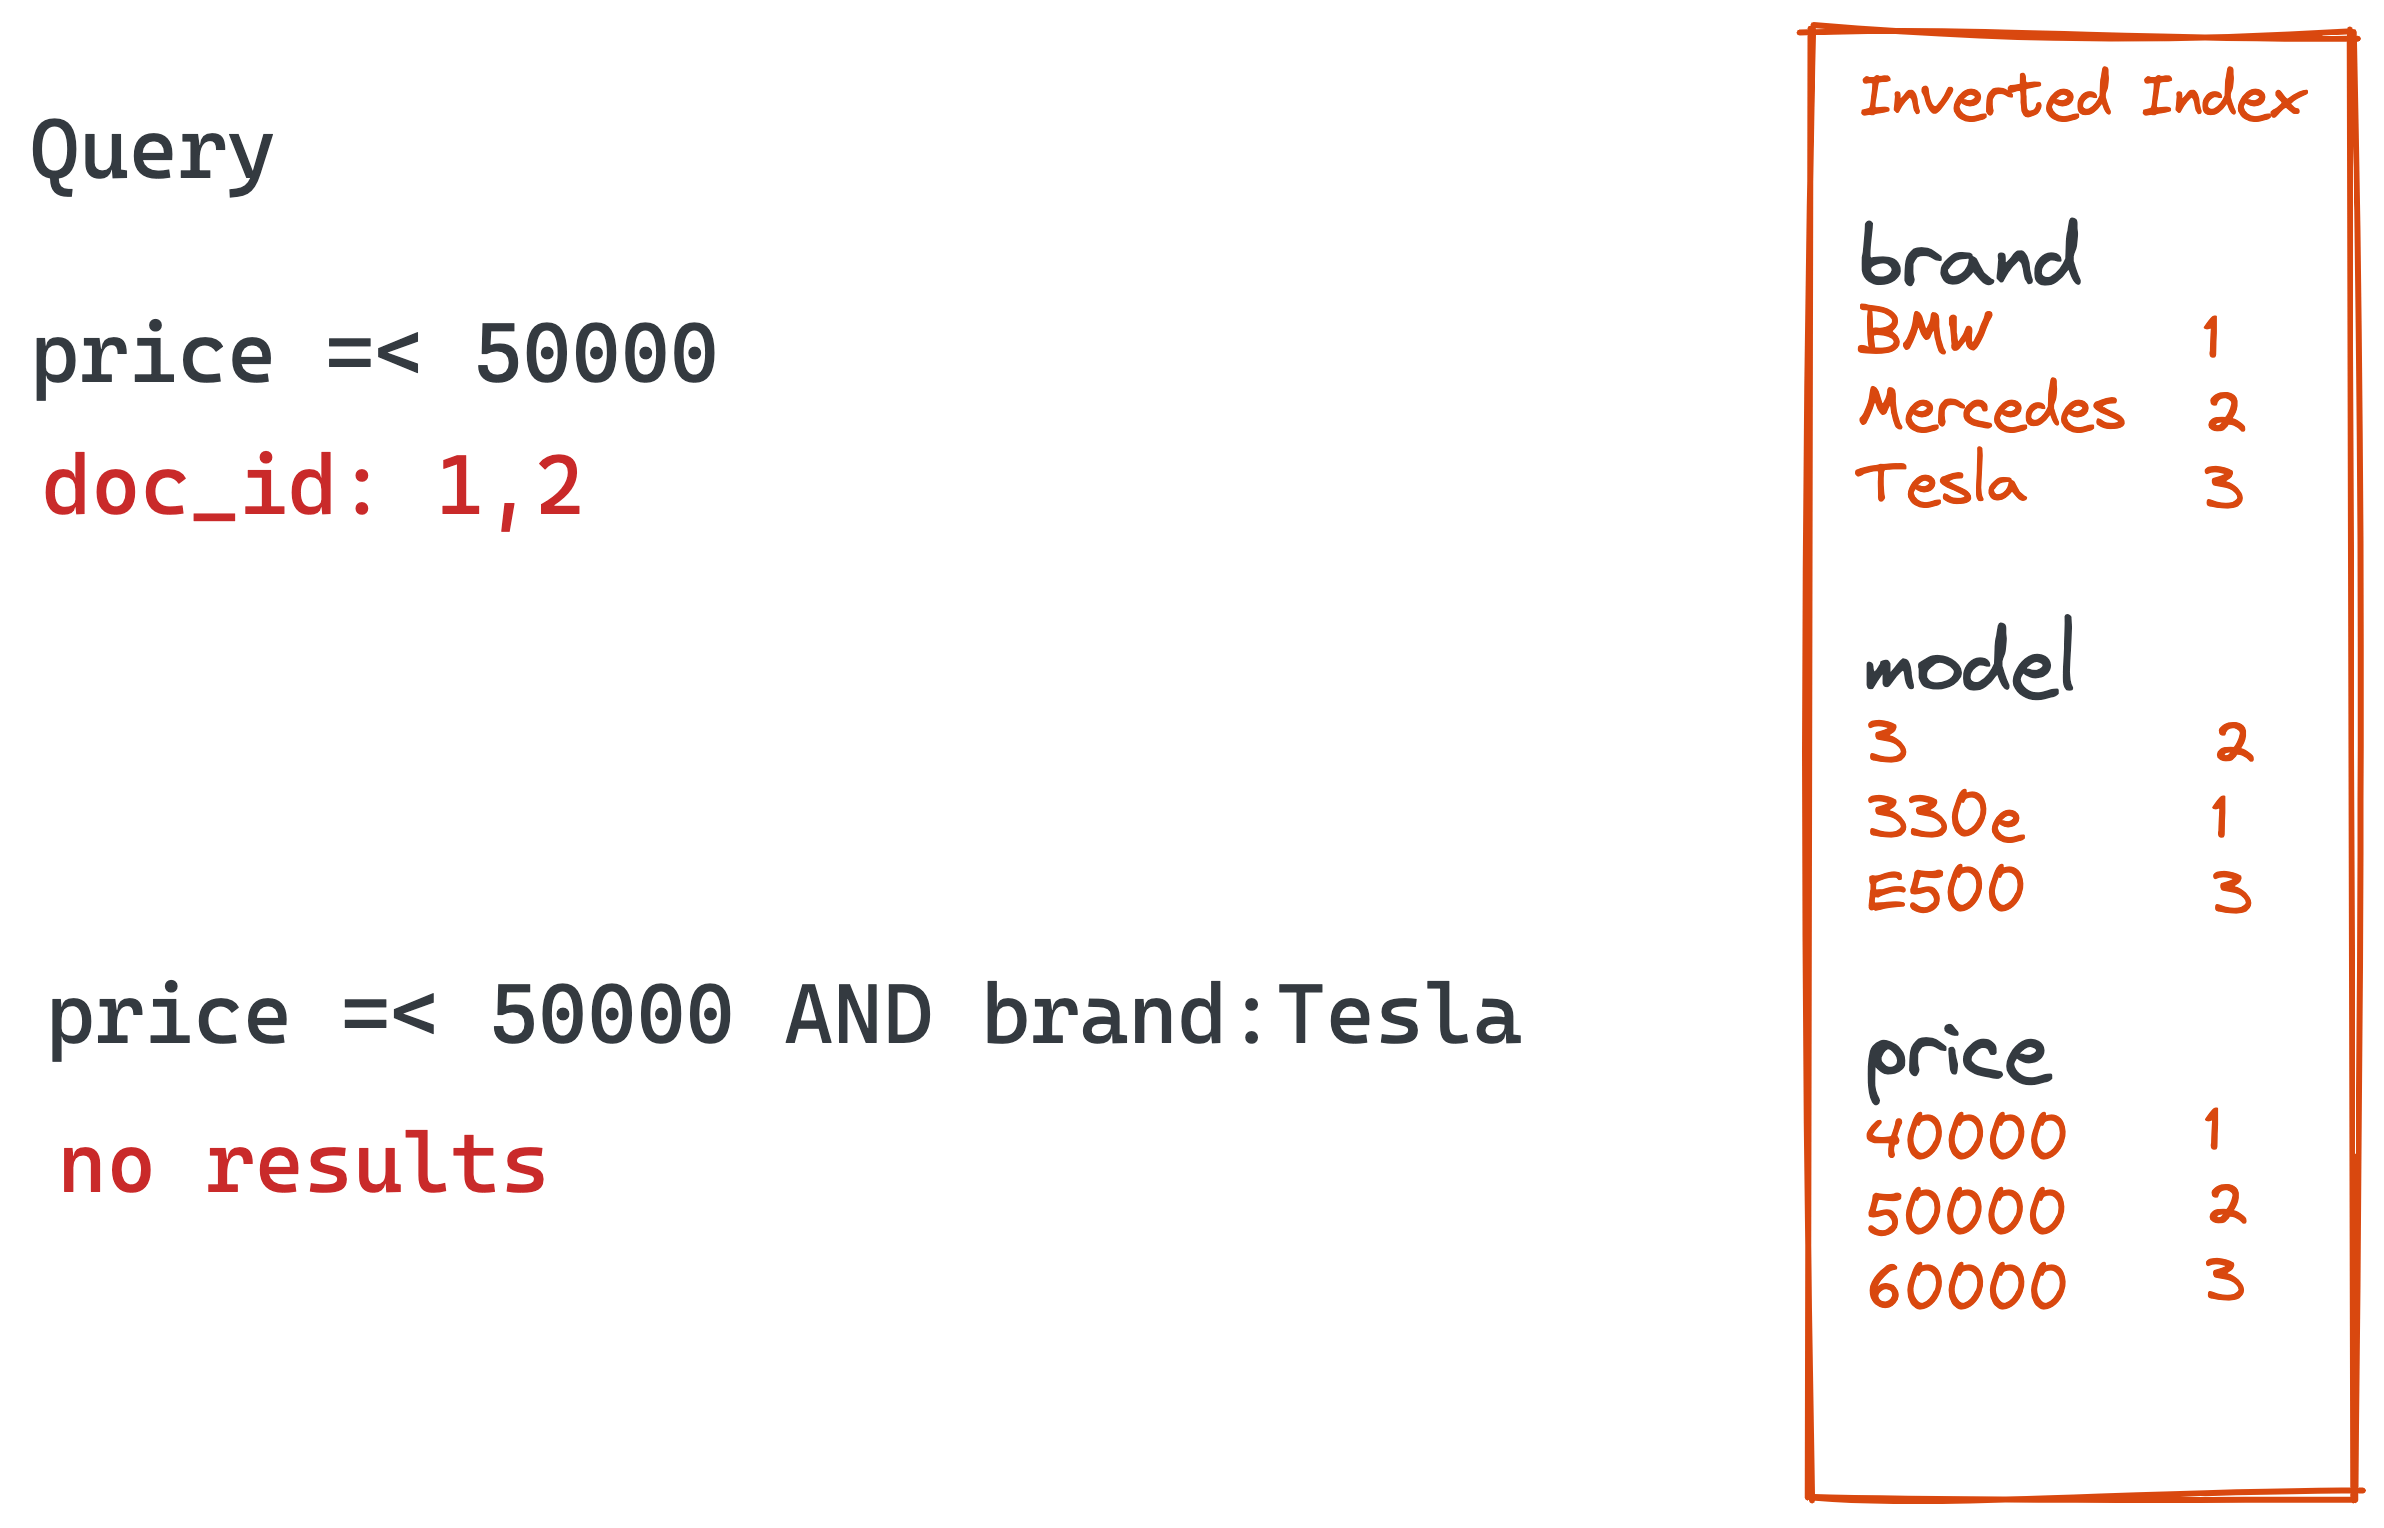
Turns out, there are no cheap Teslas. Imagine we would like to be notified, when there is a Tesla for less or equal than 50k.
The user can store a query that matches the condition for a Tesla Model 3 for less than 50000. The percolation begins when a document gets run against the stored queries.
By using that new Tesla Model 3 document, the percolate query creates an in-memory index out of that. This in-memory index will only exist for the duration of the percolation query.
If as a next step the percolation query now retrieves the stored searches like searching for a Tesla for less than 50k.
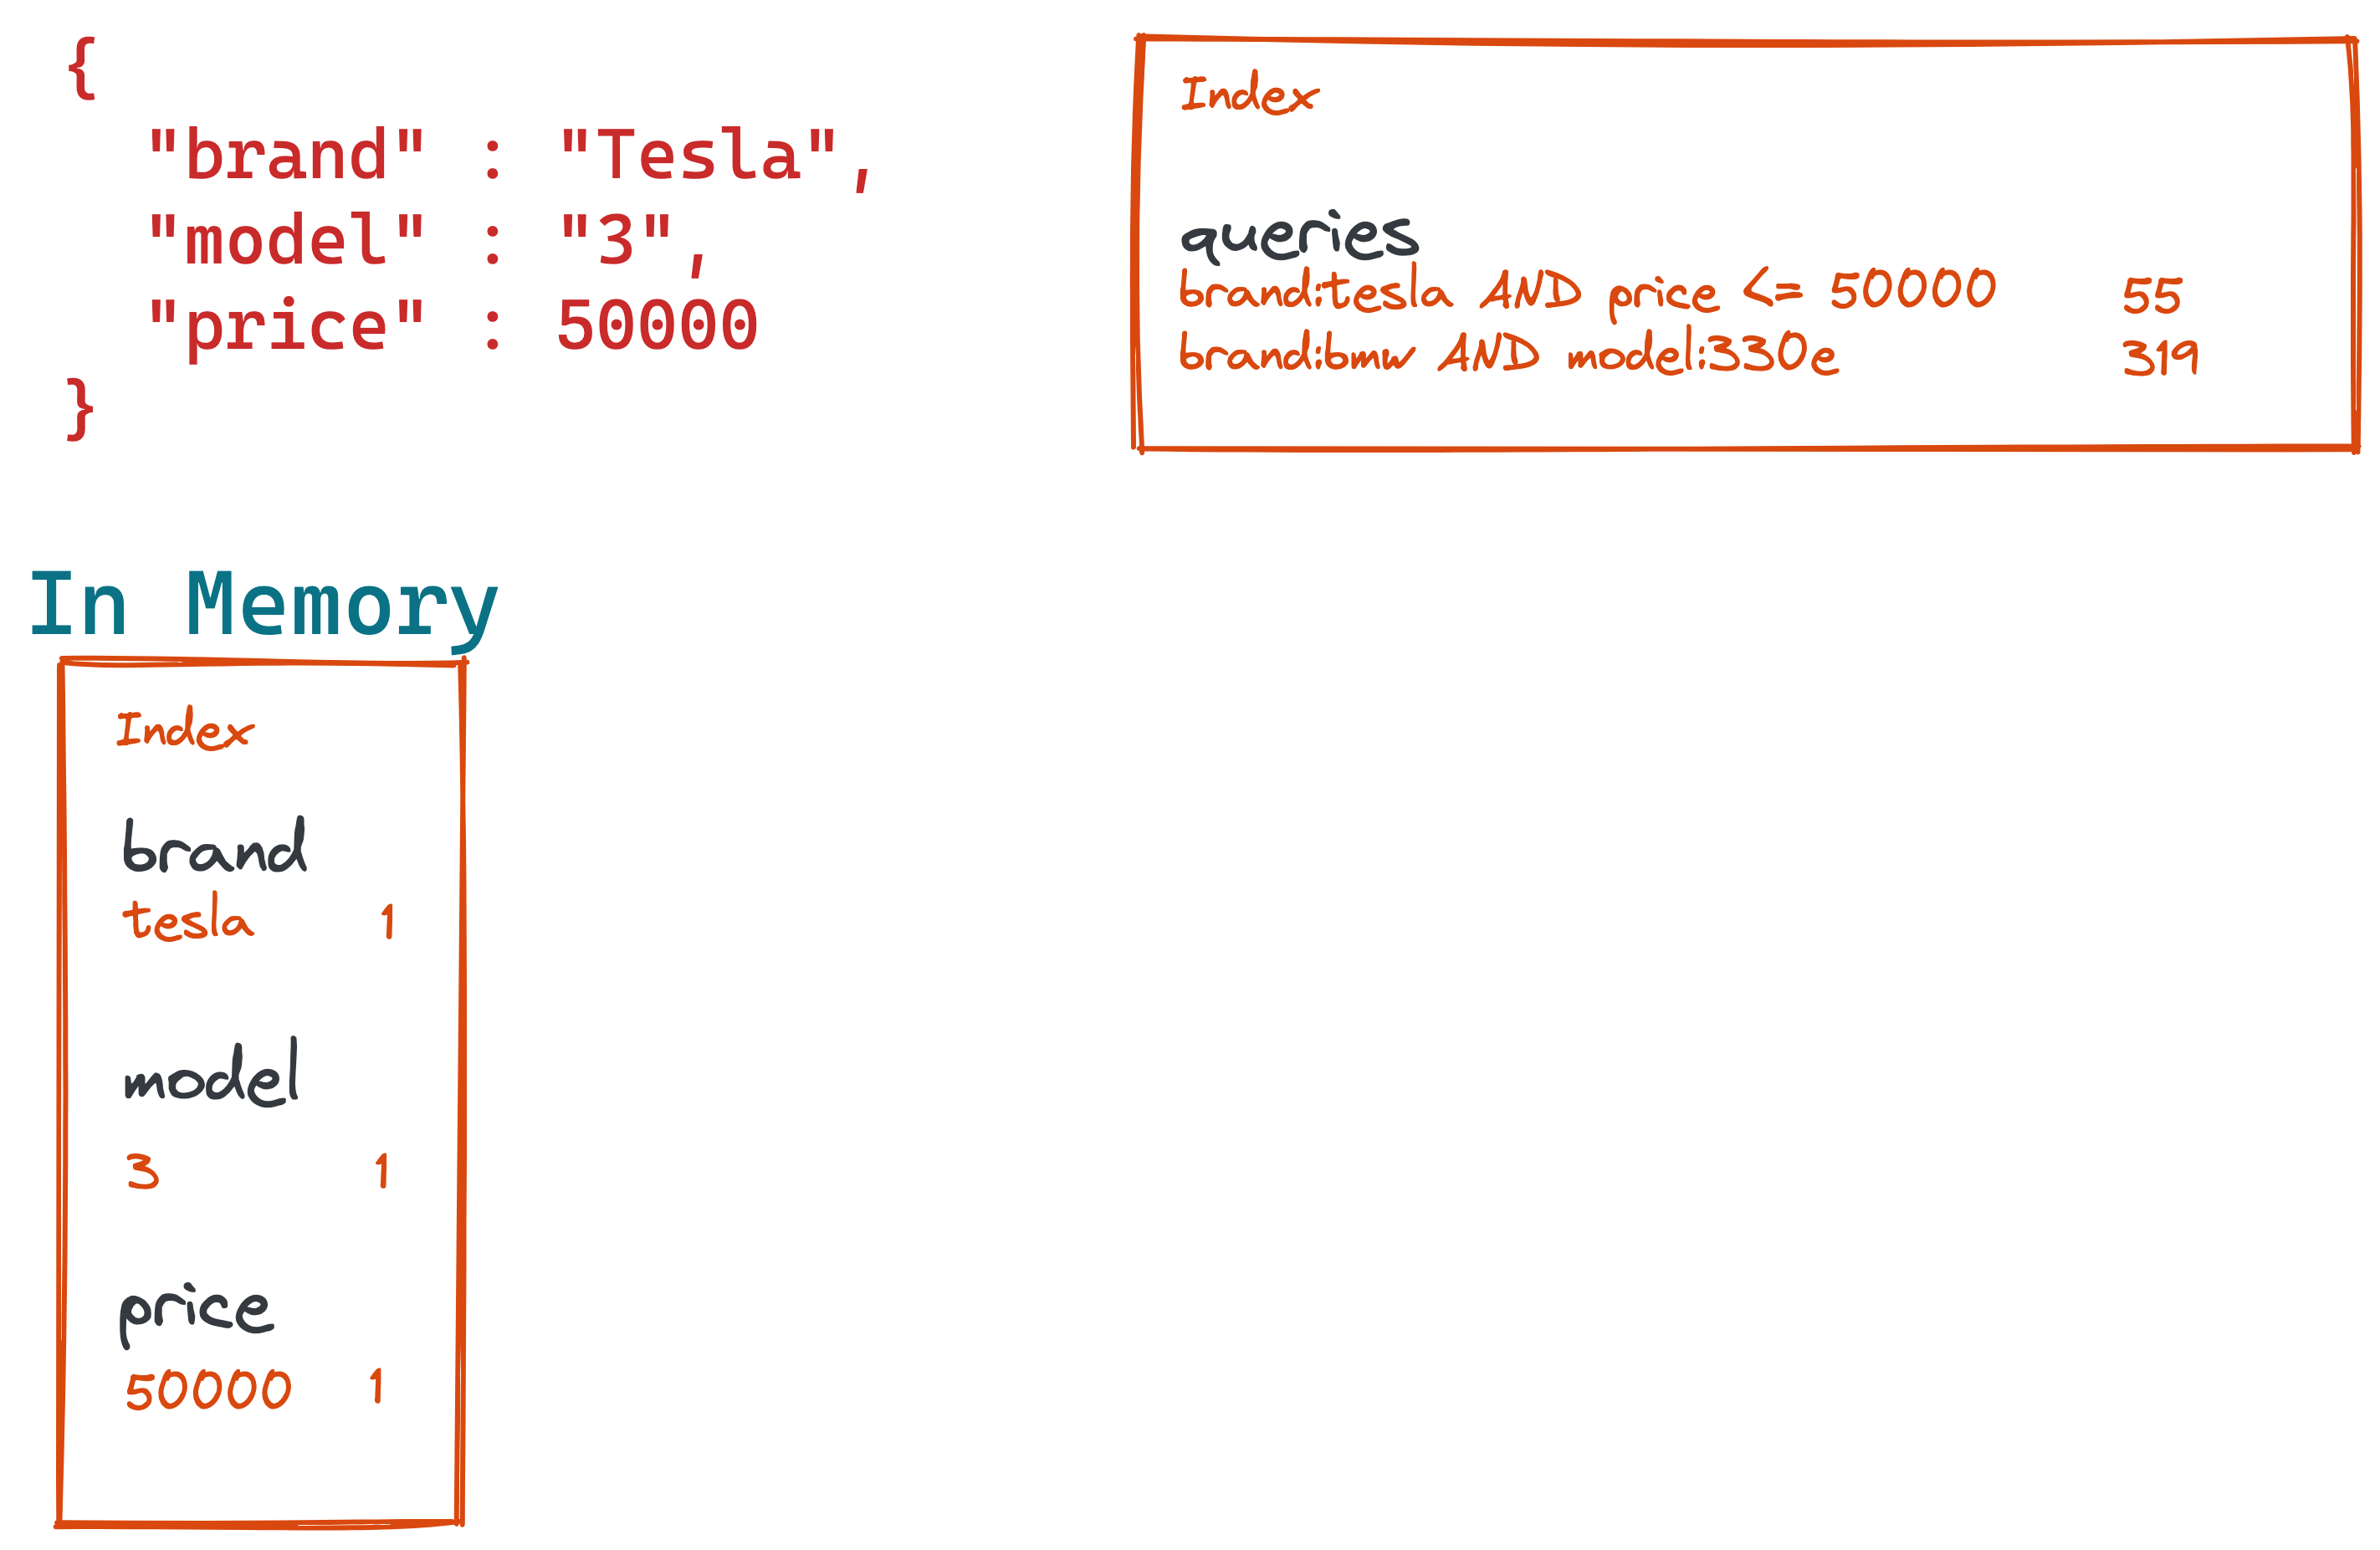
Now the final step is to run each of those stored queries against the in-memory index and simply return which of those queries matched.
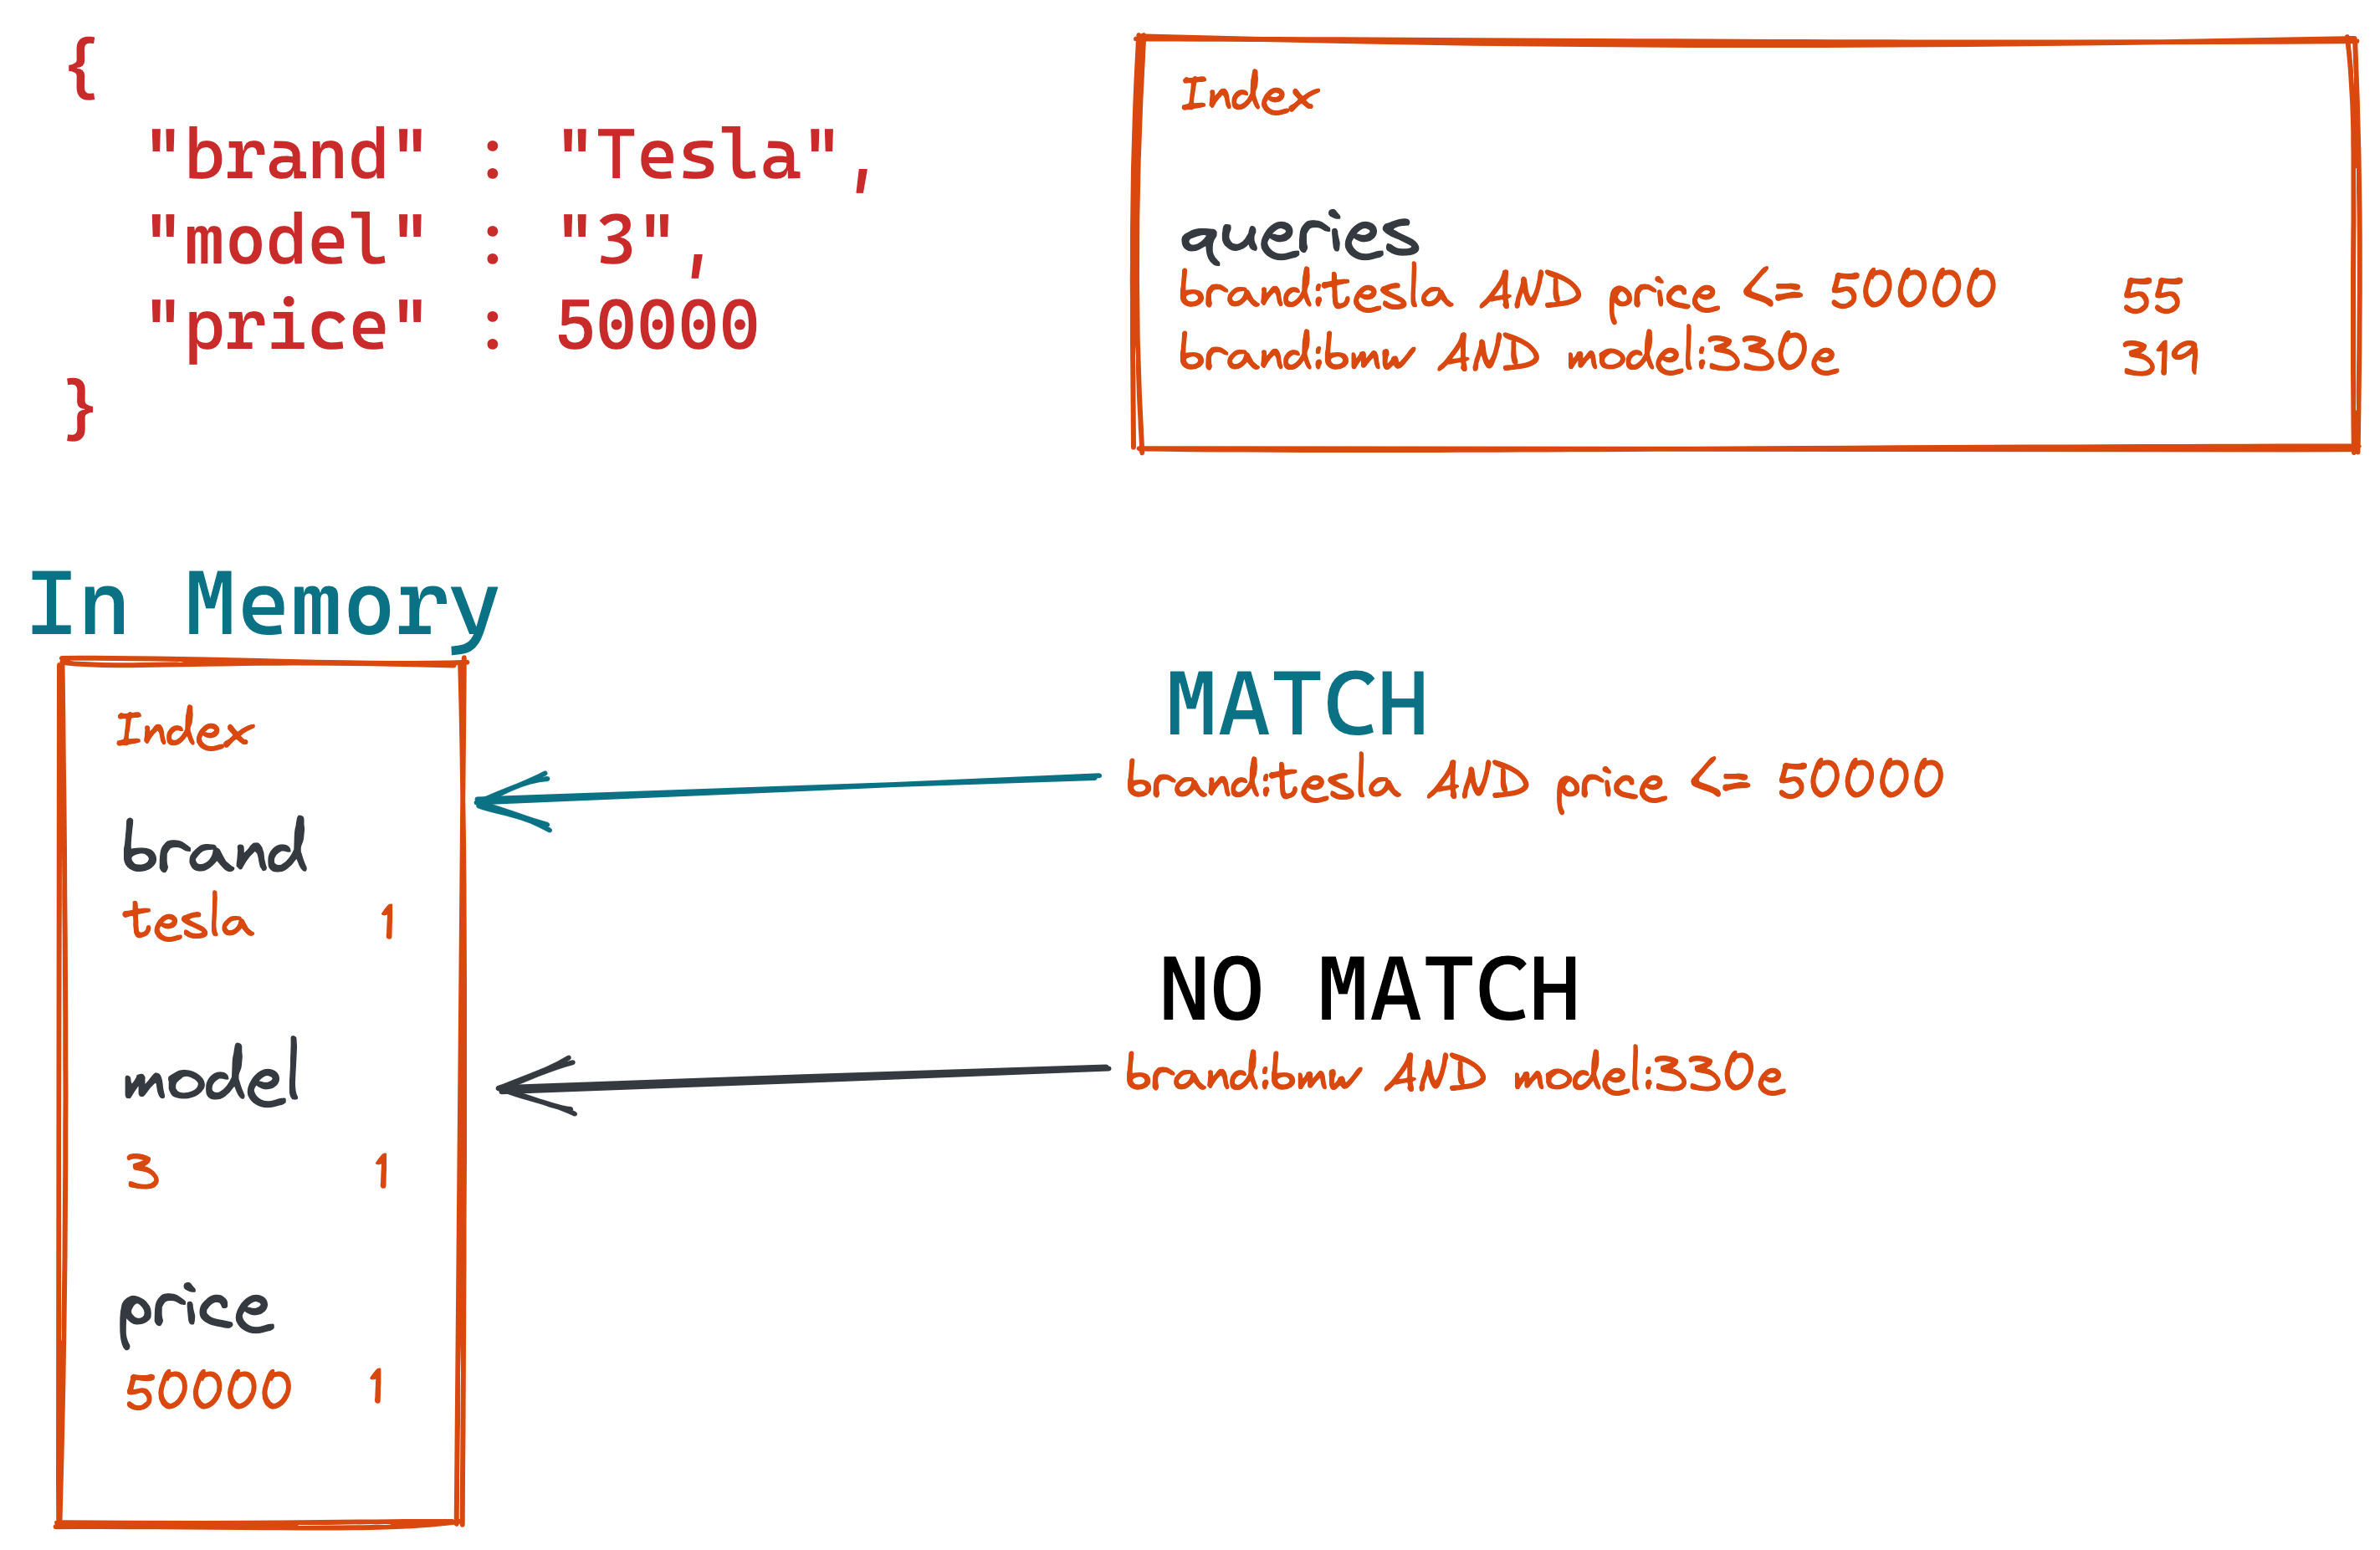
With the information of which query matched as part of the query response, you can now trigger any mechanism like sending an email or trigger an in-app notification to ping your user about a new and cheap Tesla being available.
This is the core concept. There are more features to it, but this is what happens for every percolation.
Let’s go away from the concepts and dive into the concrete Elasticsearch implementation.
Document index
Let’s stick with the car ads example and create a cars index with three
cars.
PUT cars
{
  "mappings": {
    "properties": {
      "brand" : { "type" : "keyword" },
      "model" : { "type" : "keyword" },
      "price" : { "type" : "long" }
    }
  }
}

PUT cars/_bulk?refresh
{ "index" : { "_id": "1" } }
{ "brand" : "Tesla", "model" : "3", "price": 60000 }
{ "index" : { "_id": "2" } }
{ "brand" : "BMW", "model" : "330e", "price": 40000 }
{ "index" : { "_id": "3"} }
{ "brand" : "Mercedes", "model" : "E500", "price": 50000 }
The following query does not yield a result, as there is currently no cheap Tesla indexed:
GET cars/_search
{
  "query" : {
    "query_string" : {
      "query" : "brand:Tesla AND model:3 AND price:<=50000"
    }
  }
}
However we would like to get notified and take that exact query and store it in our percolation index. Let’s create that one now:
Percolation Index
When you create the percolation index, you need to copy the mapping of the
fields from the cars index that you want to query on:
PUT percolator-queries
{
  "mappings": {
    "properties": {
      "query" : {
        "type" : "percolator"
      },
      "brand" : { "type" : "keyword" },
      "model" : { "type" : "keyword" },
      "price" : { "type" : "long" }
    }
  }
}
Time for storing our alert:
PUT percolator-queries/_doc/tesla_model_3_alert
{
  "query" : {
    "query_string" : {
      "query" : "brand:Tesla AND model:3 AND price:<=50000"
    }
  }
}
Now, after a while a car dealer wants to sell a Tesla for 50k:
PUT cars/_bulk?refresh
{ "index" : { "_id": "4" } }
{ "brand" : "Tesla", "model" : "3", "price": 50000 }
Nothing has happened, because when indexing a document, no percolate query is run. We need to do that manually.
Using the percolate API
Either you take the above JSON and use the percolate query with that, or you
specify the document index and id as part of the percolate query
GET percolator-queries/_search
{
  "query": {
    "percolate": {
      "field": "query",
      "document": {
        "brand": "Tesla",
        "model": "3",
        "price": 50000
      }
    }
  }
}

GET percolator-queries/_search
{
  "query": {
    "percolate": {
      "field": "query",
      "index" : "cars",
      "id" : "4"
    }
  }
}
Both of those queries return the exact same response
{
  "took" : 1,
  "timed_out" : false,
  "_shards" : {
    "total" : 1,
    "successful" : 1,
    "skipped" : 0,
    "failed" : 0
  },
  "hits" : {
    "total" : {
      "value" : 1,
      "relation" : "eq"
    },
    "max_score" : 1.2615292,
    "hits" : [
      {
        "_index" : "percolator-queries",
        "_type" : "_doc",
        "_id" : "tesla_model_3_alert",
        "_score" : 1.2615292,
        "_source" : {
          "query" : {
            "query_string" : {
              "query" : "brand:Tesla AND model:3 AND price:<=50000"
            }
          }
        },
        "fields" : {
          "_percolator_document_slot" : [
            0
          ]
        }
      }
    ]
  }
}
The response contains the hit of the percolator-queries index whose query
matched the supplied document. Equipped with that knowledge, we could now go
ahead and send an email to the user who added the alert. That email or user
ID could have been stored in the above document as well as an additional
field.
The only addition to regular query response is the
_percolator_document_slot. This is used to identify which document
matched, if you are supplying more than one document like this:
GET percolator-queries/_search
{
  "query": {
    "percolate": {
      "field": "query",
      "documents": [
        {
          "brand": "Tesla", "model": "3", "price": 60000
        },
        {
          "brand": "Tesla", "model": "3", "price": 40000
        }
      ]
    }
  }
}
The response now contains 1 in the _percolator_document_slot, indicating
that the document one (starting at zero) from the supplied array matched.
Now we know the basics of percolation. Let’s think about advanced features and proper integration:
Percolation within your document pipeline
Event subscription
As already mentioned, indexing of documents and running the percolation are distinct operations. That means your pipeline needs to be aware of this and run additional queries in order to trigger such an alert.
If you have another primary data store, you will already have a mechanism to add data to your search index - that might be event based (think Kafka/Pulsar), than you could add another component that consumes the same stream and runs percolate queries against Elasticsearch.
Logstash
Logstash features an Elasticsearch filter plugin, that supports the full query DSL, when you specify a template file. This way you could run the percolate query before indexing a document and then use a different output in case of a match in order to trigger the product alert.
Using cron jobs
If your document features a last_updated field, when it had been
indexed/updated the last time, you could use this to run a PIT search,
iterate through all documents and then percolate and specify several
documents per request to increase efficiency.
The cronjob approach offers another neat functionality. You could run those alerts based on criteria stored with the percolation query in order to prioritize those alerts of paying users instead of your free tier. Who wouldn’t like to get an good offer earlier?
Let’s take a look what else percolation has to offer!
Advanced percolation features
If you are not interested in the score, you could wrap the percolation in a
constant_score query to get a little speed bump.
GET percolator-queries/_search
{
  "query": {
    "constant_score": {
      "filter": {
        "percolate": {
          "field": "query",
          "documents": [
            {
              "brand": "Tesla",
              "model": "3",
              "price": 40000
            }
          ]
        }
      }
    }
  }
}
Filtering for more speed
Another speed bump is by not running all percolations against your in-memory index. You can use filters to achieve this. Imagine you have several commercial tiers and only a certain group should be included
PUT percolator-queries/_doc/tesla_model_3_alert
{
  "query" : {
    "query_string" : {
      "query" : "brand:Tesla AND model:3 AND price:<=50000"
    }
  },
  "type" : "platinum"
}
This adds another field named type to the percolator document, that we can
immediately reuse in the query:
GET percolator-queries/_search
{
  "query": {
    "constant_score": {
      "filter": {
        "bool": {
          "filter": [
            { "term" : { "type" : "platinum" } },
            {
              "percolate": {
                "field": "query",
                "documents": [
                  { "brand": "Tesla", "model": "3", "price": 40000 }
                ]
              }
            }
          ]
        }
      }
    }
  }
}
This way only queries of the type platinum will be considered to be run
against the in-memory index.
What data is actually stored?
If you are curious what data is actually stored, run this query:
GET percolator-queries/_search
{
  "fields": [
    "query.*"
  ]
}
which will return the fields parameter as part of each hit:
{
...
  "fields" : {
    "query.extracted_terms" : [
      "{query_string={query=brand:Tesla AND model:3 AND price:<=50000}}"
    ],
    "query.query_builder_field" : [
      {
        "query_string" : {
          "query" : "brand:Tesla AND model:3 AND price:<=50000"
        }
      }
    ],
    "query.extraction_result" : [
      "{query_string={query=brand:Tesla AND model:3 AND price:<=50000}}"
    ]
  }
...
}
So, those are the sub fields stored by the percolate field mapper.
Highlighting
The last feature to take a look at is highlighting. This does not make too much sense in our ads example, as there are no real full-text queries in the percolator query. How about a service, that notifies the user of new news articles coming in? Let’s model this:
PUT articles-percolator
{
  "mappings": {
    "properties": {
      "query" : {
        "type" : "percolator"
      },
      "title" : { "type" : "text" },
      "content" : { "type" : "text" }
    }
  }
}

PUT articles-percolator/_doc/1
{
  "query": {
    "multi_match": {
      "query": "percolate",
      "fields": ["title", "content"]
    }
  }
}
Now use the percolate query for two documents
GET articles-percolator/_search
{
  "query": {
    "percolate": {
      "field": "query",
      "documents": [
        {
          "title": "The Power of the Percolate Query",
          "content": "This will be an introduction into percolation..."
        },
        {
          "title": "Advanced Elasticsearch queries",
          "content": "In todays lecture we will take a look at queries, that are less known but can influence your search in various interesting ways, i.e. the ids query or the percolate query."
        }
      ]
    }
  },
  "highlight": {
    "fields": {
      "title": {},
      "content": {}
    }
  }
}
This returns the following, as both documents match the percolation:
{
  "took" : 9,
  "timed_out" : false,
  "_shards" : { "total" : 1, "successful" : 1, "skipped" : 0, "failed" : 0 },
  "hits" : {
    "total" : { "value" : 1, "relation" : "eq" },
    "max_score" : 0.2772589,
    "hits" : [
      {
        "_index" : "articles-percolator",
        "_type" : "_doc",
        "_id" : "1",
        "_score" : 0.2772589,
        "_source" : {
          "query" : {
            "multi_match" : { "query" : "percolate", "fields" : [ "title", "content" ] }
          }
        },
        "fields" : { "_percolator_document_slot" : [ 0, 1 ] },
        "highlight" : {
          "0_title" : [
            "The Power of the <em>Percolate</em> Query"
          ],
          "1_content" : [
            "are less known but can influence your search in various interesting ways, i.e. the ids query or the <em>percolate</em>"
          ]
        }
      }
    ]
  }
}
The interesting parts here are the 0_title and 1_content fields in the
highlight response field. From the field names in the response you can
infer which document from the supplied documents matched, as well as the
field within the document.
You could now use those snippets within an email to give your users context what part if the document actually did match.
Adding enrichment percolation result to the documents before indexing
One more use-case might be the ability to enrich a document based on the response of a percolation. This might be a good idea for the tagging use-case I mentioned at the beginning. Let’s create some basic tagging example to make sure everyone has the same understanding:
PUT documents-percolator
{
  "mappings": {
    "properties": {
      "query" : {
        "type" : "percolator"
      },
      "title" : { "type" : "text" },
      "content" : { "type" : "text" }
    }
  }
}

PUT documents-percolator/_doc/1
{
  "query": {
    "query_string" : {
      "query" : "title:\"us open\" title:wimbledon title:\"french open\" title:\"australian open\""
    }
  },
  "tags" : [ "sports", "sports-tennis" ]
}

PUT documents-percolator/_doc/2
{
  "query": {
    "query_string" : {
      "query" : "title:djokovic"
    }
  },
  "tags" : [ "sports", "sports-niqlo" ]
}
The two percolation queries also contain a tags field. Now, we could
collect information for running ads based on the tags field like this:
GET documents-percolator/_search
{
  "size": 0,
  "query": {
    "percolate": {
      "field": "query",
      "documents": [
        {
          "title": "US Open: Novak Djokovic wins against Alexander Zverev",
          "content": "A dominant win against the german"
        }
      ]
    }
  },
  "aggs": {
    "tags": {
      "terms": {
        "field": "tags.keyword",
        "size": 10
      }
    }
  }
}
which returns the following aggregations (concrete documents are not shown
due to size: 0:
"aggregations" : {
  "tags" : {
    "doc_count_error_upper_bound" : 0,
    "sum_other_doc_count" : 0,
    "buckets" : [
      {
        "key" : "sports",
        "doc_count" : 2
      },
      {
        "key" : "sports-tennis",
        "doc_count" : 1
      },
      {
        "key" : "sports-uniqlo",
        "doc_count" : 1
      }
    ]
  }
}
We could now add this to the tags field of our document and index like
this:
PUT documents/_doc/1
{
  "title": "US Open: Novak Djokovic wins against Alexander Zverev",
  "content": "A dominant win against the german",
  "tags" : ["sports", "sports-tennis", "sports-uniqlo" ]
}
Based on this, you can now easily find the ads supposed to be delivered with this article. If you have the ads stored in Elasticsearch as well, think about using the terms lookup query.
Note, that this still requires a setup of your ingestion pipeline to add this additional step, there is no way to do this inside of Elasticsearch.
What about the enrich processor?
While reading the last sentence, you may have thought that the enrich processor would probably be a good way of enriching information before a document is stored. In general this is true, however this is one important limitation: The current scope of that processor is pretty much exact key lookups and not utilizing queries - even though there will be support for ranges in 7.16.
I am not sure if a percolate processor would make sense in order to execute a percolate query as part of the ingest pipeline, as it would be very custom, what part of the response you would be adding to the existing document.
Summary
The percolator has been around since version 0.15 - I kid you not, check the original blog post from 2011. However the implementation back then was vastly different, i.e. you could run percolation and index operation in one go, but the whole architecture was not scalable and got a major overhaul before the release of Elasticsearch 1.0 in 2013 (see this slideshare presentation). With these changes in place one could scale percolator queries across several nodes and shards and if have dedicated percolation nodes by using shard allocation filtering.
Also the percolator used to be a special and dedicated index and not a specialized query. In 2016 there was another round of improvements reducing the number of queries that needed to be fired against the in-memory index by indexing all query terms when the percolator query is stored.
That said, the idea and concept of the percolator has been around for a decade now, with various refinements and improvements on the way until today. If you check on the recent PRs, you will see that the percolator has become a stable feature with only a few PRs. The same applies for issues.
Also there is a different Lucene implementation following the same idea of turning the relationship of document and query upside down, that was previously called Luwak and has been merged into Lucene as the monitor sub project. Unfortuantely documentation on that one is rather sparse. In general, the memory requirements for the monitor project are a bit higher as all queries are stored in memory, but this also means percolator has a slightly higher latency.
If you do have new ideas or features for the percolator, I am all ears and curious!
One general rule of percolation for me is, that this is never a feature you get started with. At some point, when you know more about the data and the use-case it’s very possible you will find a use-case for this, but without knowing the inside out’s of your data and how you users are querying that data and in what parts they are interested this is really hard. So, start your search use-case and then think about potential percolate usages over time.
Happy Percolating!
Resources
- Elasticsearch Documentation: Percolate Query
- Understanding the Elasticsearch Percolator
- Link to percolator module in the source
- The percolate field mapper highlighting the code used to store the percolated query on indexing
Final remarks
If you made it down here, wooow! Thanks for sticking with me. You can follow or ping me on twitter, GitHub or reach me via Email (just to tell me, you read this whole thing :-).
If there is anything to correct, drop me a note, and I am happy to do so and append to this post!
Same applies for questions. If you have question, go ahead and ask!
If you want me to speak about this, drop me an email!