 Alexander Reelsen
Programming an Elgato Streamdeck with Java - Part 1
TLDR; This is a multi part series of using your Elgato Streamdeck with Java. This is the first part, which deals with the initial USB communication.
I’ve owned an Elgato Stream Deck+ for quite some time, but never really used it. At some point I tried to create a node.js + typescript project to programmatically control it, because there are some nice libraries available. There were some issues and I quickly got frustrated for an evening project so I turned to my favorite programming language to solve this: Java.
As the Stream Deck is an USB device, it is basically a configurable keyboard. You need to read from it whenever an input is received and write to it, if you want to send images for the buttons or the LCD display to it.
Let’s quick take a look what controls the Stream Deck Plus has.
- Eight buttons, each of which is also a display
- Four knobs, that can be turned left, right and pressed. These are named encoders
- One wide LCD display, that can recognize short and long presses as well as dragging your finger on it (i.e. using it as a slider).
So, for my use-case I need to be able to identify presses of buttons and encoders, turning left/right of encoders, putting images on the buttons. The LCD was not of big interest.
As I wanted to increase productivity, I wanted to be easily manage settings needed for online meetings without clicking or typing. The following things I wanted to control:
- DND mode in osx: On/off, see the status
- Elgato Key light management: On, off, use a knob to regular brightness. See status.
- Controlling my blinds, so I can open/close/set them to a percentage without walking to the switch in my office or using my phone app. See status (I mean I could just trying to watch out the window).
So, this is the goal. The first thing however is to read from USB. This is what this part will be about.
Finding the USB device
I have to admit, I had never done this, so I had no idea what would be the right way to do it. Actually I only cared for the way that works, not the best way. After googling a little I found hid4java, a JNA wrapper for libusb/hidapi, that works on osx, windows and Linux.
All right, added as a dependency, and time to test.
public class DumpUsbDevices {

    public static final int VENDOR_ID = 4057;
    public static final int PRODUCT_ID = 132;

    public static void main(String[] args) {
        HidServices hidServices = HidManager.getHidServices();
        hidServices.start();

        System.out.println(String.format("Found %d devices",
                hidServices.getAttachedHidDevices().size()));

        Optional<HidDevice> device = hidServices.getAttachedHidDevices().stream()
                .filter(d -> d.getVendorId() == VENDOR_ID)
                .filter(d -> d.getProductId() == PRODUCT_ID)
                .findAny();
        device.ifPresent(hidDevice ->
            System.out.println("Found " + hidDevice.getProduct())
        );

        hidServices.stop();
    }
}
This will print the total number of USB devices and if a streamdeck is found.
This worked on first try for me on osx, once I upgraded the hid4java
library to the latest release, so you should do the same, if you decide to
play around with this.
OK, finding it is not too impressive. We want to be able to read data from
the Streamdeck. Checking the available methods for HidDevice shows a
pretty straightforward API:
read()methods, that allow a certain number of bytes to read and wait only until a timeout hits- A
write(byte[] message, int packetLength, byte reportId)to write data
This is all we need.
Reading data
This the main routine we need to do to react on actions on the Stream Deck.
if (device.isPresent()) {
    HidDevice hidDevice = device.get();
    hidDevice.open();
    byte[] data = new byte[20];
    hidDevice.read(data); // this is blocking
    System.out.println("Retrieved data");
    hidDevice.close();
}
Because hidDevice.read() is blocking, this code blocks, until you took any
action on the Streamdeck. Once I hit a button, I get notified and the device
gets closed. We could read the data array now, but if you are interested
what is being read, you can also enable logging of all data being sent by
setting
HidApi.logTraffic = true;
When doing this and hitting the first button the following is being logged:
Found 15 devices
< [14]: 01 00 08 00 01 00 00 00 00 00 00 00 00 00 00 00 00 00 00 00
Retrieved data
So, we retrieved our first in our small java application. Nice! This is logged when I hit the top right button (fourth one):
< [14]: 01 00 08 00 00 00 00 01 00 00 00 00 00 00 00 00 00 00 00 00
When comparing the two outputs, the position of the 1 byte has changed
from position 5 to position 8 (just where the buttons are!), where as the
first bytes remained constant.
The first four bytes actually identify the action, like a pressed button in this example. With the right timing you can also catch when two buttons are pressed at the same time like this
< [14]: 01 00 08 00 00 00 01 01 00 00 00 00 00 00 00 00 00 00 00 00
Putting the above code in a while loop is needed to not stop the program after the first input:
while (true) {
    byte[] data = new byte[20];
    hidDevice.read(data);
}
Let’s press one of the buttons again:
< [14]: 01 03 05 00 00 01 00 00 00 00 00 00 00 00 00 00 00 00 00 00
< [14]: 01 03 05 00 00 00 00 00 00 00 00 00 00 00 00 00 00 00 00 00
Turns out there are actually two events - one for pressing and one for releasing again. So we could go fancy and implement independent events for that.
Let’s press one of the knobs aka encoders and check the output:
< [14]: 01 03 05 00 00 01 00 00 00 00 00 00 00 00 00 00 00 00 00 00
< [14]: 01 03 05 00 00 00 00 00 00 00 00 00 00 00 00 00 00 00 00 00
Same here, pressed & released event. But the first four bytes are different now, marking an encoder action.
Let’s turn the knob/encoder to the right:
< [14]: 01 03 05 00 01 01 00 00 00 00 00 00 00 00 00 00 00 00 00 00
And to the left
< [14]: 01 03 05 00 01 ff 00 00 00 00 00 00 00 00 00 00 00 00 00 00
When also turning all the other knobs a pattern emerges. The position of the
knob is encoded in the response as well as a number how much the knob is
turned, try turning it fast and you see different bytes encoded. So
apparently the knob is sending an info like I was turned left by 5.
So, let’s write some code to act on a button press
byte[] data = new byte[20];
hidDevice.read(data); // this is blocking
if (data[0] == 1 && data[1] == 0 && data[2] == 8 && data[3] == 0) {
    System.out.println("some button pressed");
}
OK, let’s go crazy and figure out, which button was pressed:
if (data[0] == 1 && data[1] == 0 && data[2] == 8 && data[3] == 0) {
    for (int i = 0; i < 8; i++) {
        if (data[4 + i] == 1) {
             System.out.println("Button " + i + " was pressed");
        }
    }
}
With this piece of code we print even if two buttons are pressed (we are also printing an additional message if one of them is released but the other is still pressed).
For my use-case I ignored the case of two buttons pressed at once and buttons being released to keep it simple. I am just interested if one button is pressed at a time.
You can see with the above snippet, that you have all the basics available to implement an event based system, where you emit an event whenever you interact with Stream Deck. In the next posts we take of this properly, as we also need to make sure, we do not run long running operations like a HTTP request in the same thread to not block the thread reading from the Stream Deck.
Writing images
After figuring out the basics of reading, let’s figure out how to write. The most common reason for writing is to set an image for one of the buttons or the LCD.
This is where things get tricky and thankfully the internet has you covered. First I had to learn that different Stream Decks have different ways of sending images and also different Stream Decks support different image formats. Apparently my Stream Deck only supports JPEG files, but not PNG or SVG like others.
Before we do that, let’s take a shortcut and set the color of a button. It turns out there is a simple way to do this:
byte pos = 0;
byte red = (byte) 136;
byte green = (byte) 00;
byte blue = (byte) 255;
byte[] buffer = new byte[] { 0x06, pos, red, green, blue };
hidDevice.sendFeatureReport(buffer, (byte) 0x03);
By sending a so called feature report, which is basically an easy way for USB devices to exchange data. The above one sets the color of the first button to purple.
If you think I figured this out by testing, you are wrong. I just took a look at other open source implementations in different languages, particularly python and node libraries were helpful.
Having colors is nice, but is rarely explanatory for me as a user of my
Streamdeck. We need to supply images, which is a bit more code. Images must
be JPEG and 120x120 pixels. Once that is given, there is a dedicated method
that loads images with several write() calls in case the image is too big
as the maximum data to sent at once is 1024 bytes. Each packet looks like
this:
| Byte Position | Description |
|---|---|
| 0,1 | Static value to indicate image sent: 0x2, 0x7 |
| 2 | Position of the button (0-8) for this packet |
| 3 | Is this the last packet? 0 more packets are following, 1 otherwise |
| 4,5 | Size of this packet, 1026 at max |
| 6,7 | The incremental part of this binary data (0 till number of total number of packets) |
| 8-1023 | data of the actual image |
Time to codify this into a method:
public static void setButtonIcon(HidDevice hidDevice, int index, byte[] input) {
    int maxPacketSize = 1023;
    int header = 7;
    int maxPayloadSize = maxPacketSize - header;

    int remainingBytes = input.length;
    for (int part = 0; remainingBytes > 0 ; part++) {
        byte[] packet = new byte[maxPacketSize];
        int length = Math.min(remainingBytes, maxPayloadSize);
        boolean isLast = remainingBytes <= maxPayloadSize;

        packet[0] = 0x07;
        packet[1] = (byte) index;
        packet[2] = isLast ? (byte) 1 : 0;
        packet[3] = (byte) (length+1);
        packet[4] = (byte) (length+1 >> 8);
        packet[5] = (byte) (part);
        packet[6] = (byte) (part >> 8);

        System.arraycopy(input, part * maxPayloadSize, packet, header, length);
        // first part of the header is sent here as third argument
        // yes that was confusing for me as well
        hidDevice.write(packet, packet.length, (byte) 0x02, true);
        remainingBytes -= maxPayloadSize;
    }
}
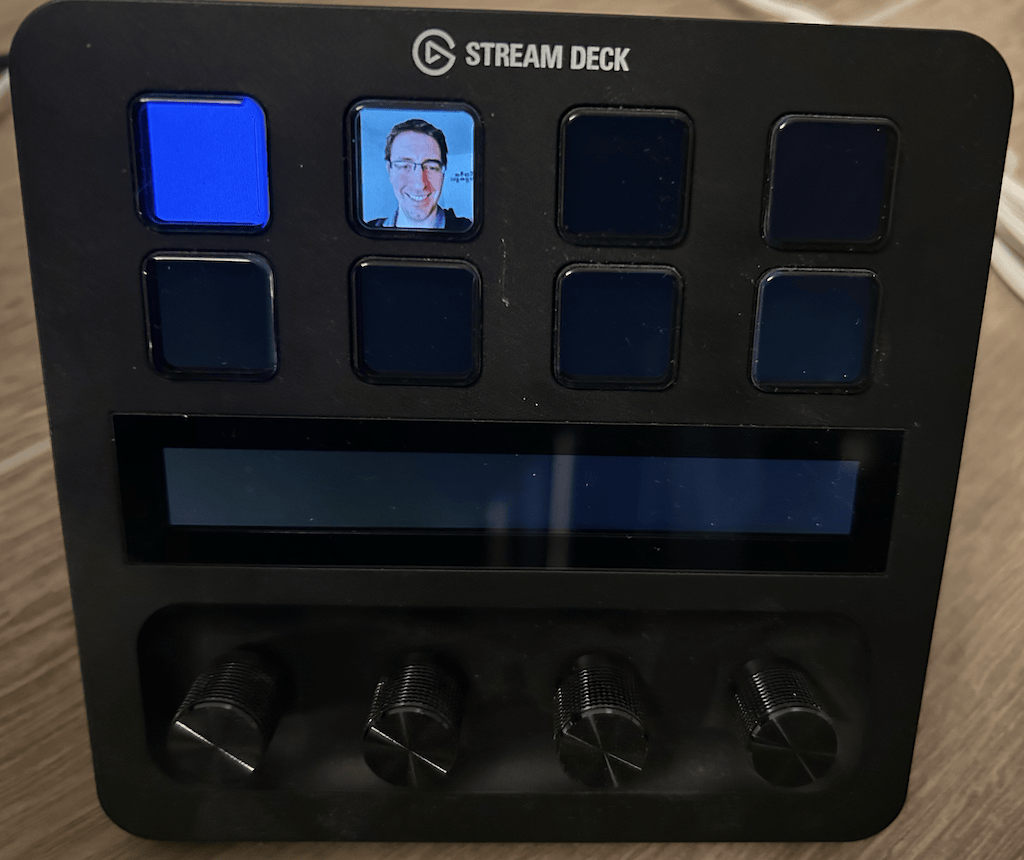
Let’s call this with a nice image:
try (InputStream is = DumpUsbDevices.class.getResourceAsStream("/icons/alex.jpg")) {
    byte[] result = is.readAllBytes();
    setButtonIcon(hidDevice, 1, result);
}
The image above is 7207 bytes, resulting in 8 packets being sent, which
again is easy to follow with logging enabled.
Now we end up with an image of myself on the Streamdeck - who wouldn’t want that?!
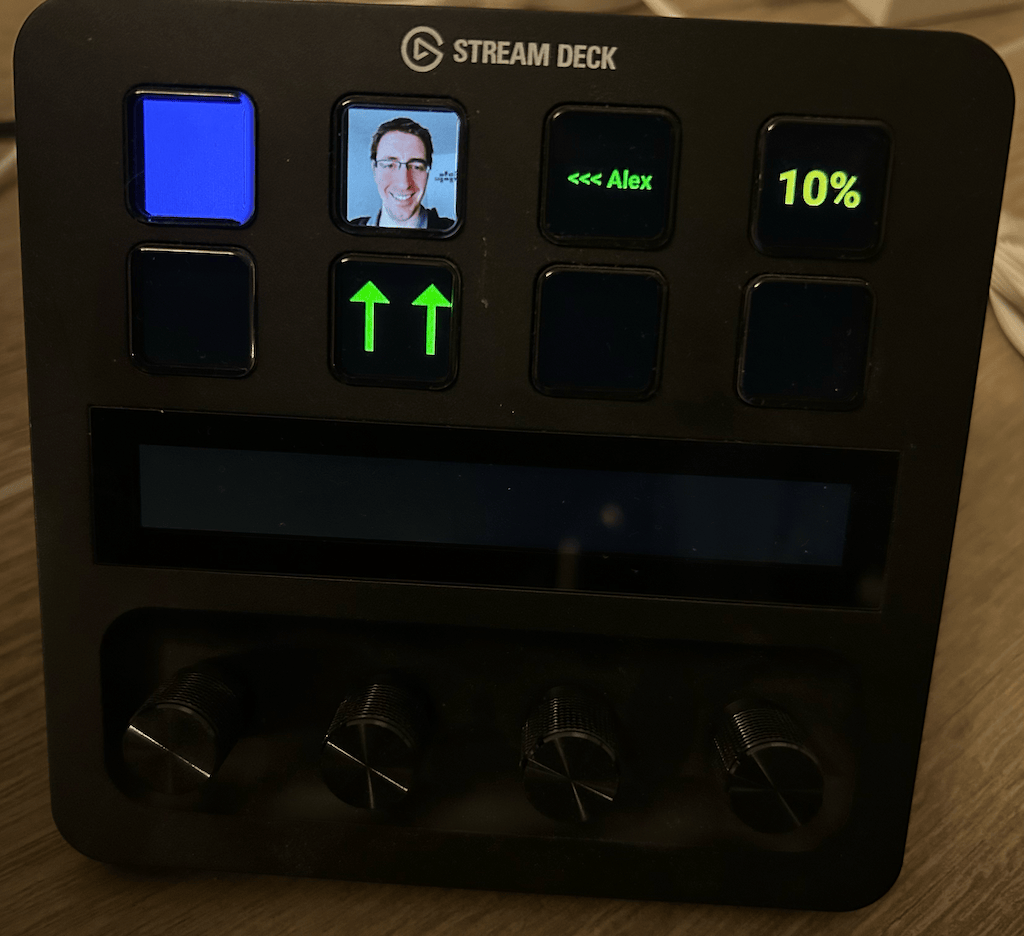
OK, one last thing: How about we are able to write text into a button, i.e. a percentage, that changes when a knob/encoder is turned? Something like
setButtonText(int index, String text, String fontName, int size, Color color);
called like
setButtonText(index, "10%", "Roboto", 48, Color.YELLOW),
Turns out, that all of this is built into Java thanks to java.awt we can
create images on the fly, that even scale properly to fit into the 120x120
image resolution.
public static byte[] createButtonText(String text, String fontName,
                                      int size, Color color) throws IOException {
    BufferedImage image = new BufferedImage(
            120, 120, BufferedImage.TYPE_INT_RGB);

    Graphics2D g = image.createGraphics();
    Font font = new Font(fontName, Font.BOLD, size);

    FontMetrics metrics = g.getFontMetrics(font);

    GlyphVector vector = font.createGlyphVector(metrics.getFontRenderContext(), text);
    Shape outline = vector.getOutline(0, 0);
    double expectedWidth = outline.getBounds().getWidth();
    double expectedHeight = outline.getBounds().getHeight();
    boolean textFits = image.getWidth() >= expectedWidth && image.getHeight() >= expectedHeight;

    if (!textFits) {
        double widthBasedFontSize = (font.getSize2D()*image.getWidth())/expectedWidth;
        double heightBasedFontSize = (font.getSize2D()*image.getHeight())/expectedHeight;
        double newFontSize = Math.min(widthBasedFontSize, heightBasedFontSize);
        font = font.deriveFont(font.getStyle(), (float)newFontSize);
    }

    int positionX = (image.getWidth() - metrics.stringWidth(text)) / 2;
    int positionY = (image.getHeight() - metrics.getHeight()) / 2 + metrics.getAscent();

    AttributedString attributedText = new AttributedString(text);
    attributedText.addAttribute(TextAttribute.FONT, font);
    attributedText.addAttribute(TextAttribute.FOREGROUND, color);
    g.drawString(attributedText.getIterator(), positionX, positionY);

    ByteArrayOutputStream bos = new ByteArrayOutputStream();
    ImageIO.write(image, "jpeg", bos);
    return bos.toByteArray();
}
Now we can easily create button texts ad hoc and programmatically
byte[] text = createButtonText("10%", "Roboto", 48, Color.YELLOW);
setButtonIcon(hidDevice, 3, text);

byte[] alex1 = createButtonText("<<< Alex", "Roboto", 24, Color.GREEN);
setButtonIcon(hidDevice, 2, alex1);

byte[] alex2 = createButtonText("↑↑", "Roboto", 96, Color.GREEN);
setButtonIcon(hidDevice, 5, alex2);
And this is what we get:
This concludes the first part of this series, as we now have all the basics to interact with my Streamdeck via Java.
Next up
So, this post introduced how to read and write from an USB device, that accidentally happens to be a Streamdeck. In the next series of this post (coming in without a concrete timeline, I only blog, when I have free time) we will dive into creating a stateful application out of a completely stateless ability to read from an USB device. Why stateful? Well you want to have your own custom screens, the ability to go back and forth between those screens or remember if your blinds are up or down. Also we finally want to be able to actually do some magic, when a button is clicked, so we need to act on such events.
So expect at least two more parts to this.
Resources
- hid4java
- lsusb
- python-elgato-streamdeck
- node-elgato-stream-deck: interesting implementation as you can control your Streamdeck from within the browser via webHID.
Final remarks
If you made it down here, wooow! Thanks for sticking with me. You can follow or contact me on Bluesky, Mastodon, GitHub, LinkedIn or reach me via Email (just to tell me, you read this whole thing :-).
If there is anything to correct, drop me a note, and I am happy to fix and append a note to this post!
Same applies for questions. If you have question, go ahead and ask!
If you want me to speak about this, drop me an email!